ION USB turntable iTTUSB Скачать руководство пользователя страница 19

19 


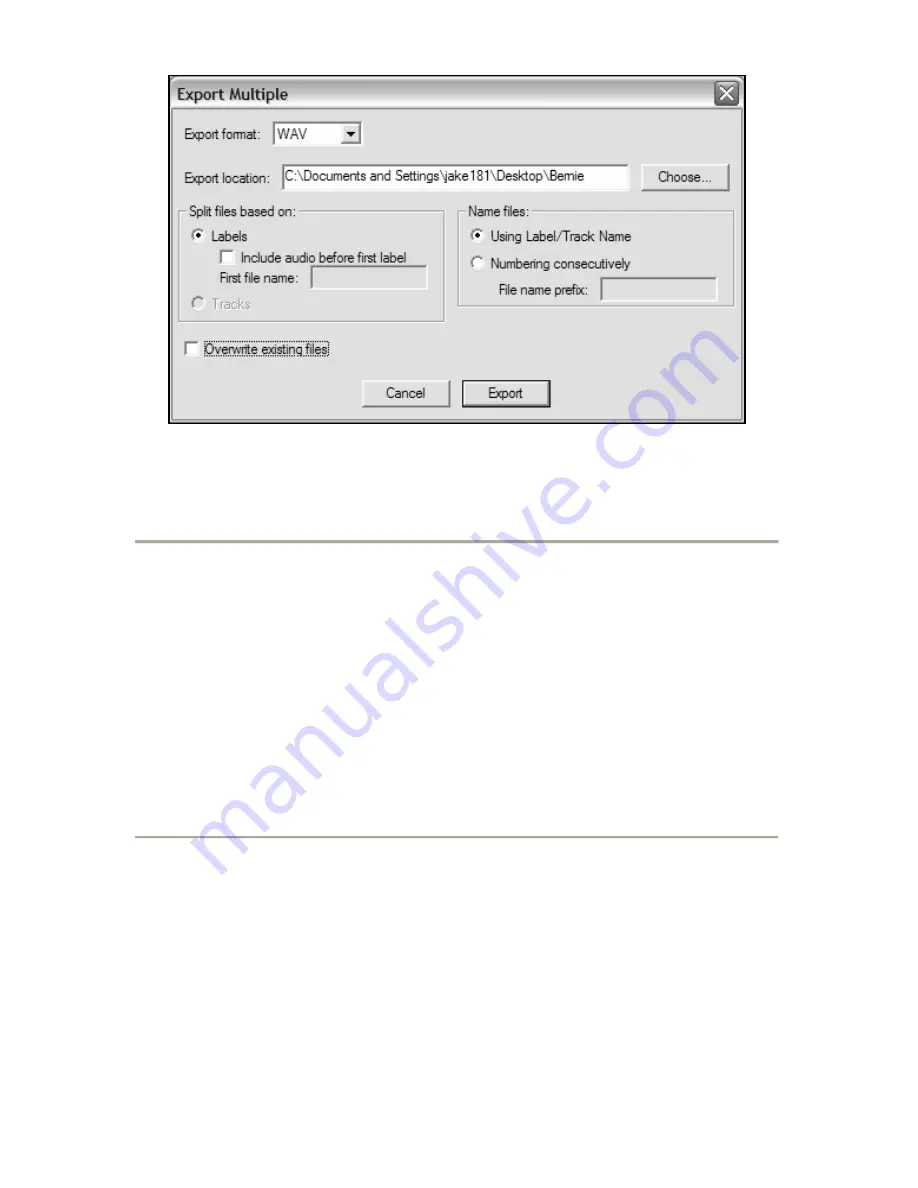
Figure 16: Export Options Menu 


Listening and Exporting to WAV/MP3 


To listen to your digitized audio, you will need a third party application 

that can play WAV files.  There are a variety of applications built into 

many operating systems as well as free downloads on the internet.  You 

can also use any standard audio CD burning software to burn your WAV 
files to an audio CD. 


There are many free software applications that can play, burn, as well as 
convert WAV files to MP3.  Once a file is in MP3 format it can be placed 

on any MP3 compatible mobile digital device. 


Recording 78RPM Records 


If you want to record a 78 RPM album, you can record it at 33.3 or 45 

RPM and convert it to 78 RPM in the Audacity software! After you have 

recorded the album, open the "Edit" menu then click "Select" then click 

"All".  Next, open the "Effect" menu and choose "Change Speed".  Then 
select the speed that you recorded at (33 or 45), as well as the speed 

you would like it to be (78).  Then press "OK".

Содержание USB turntable iTTUSB

Страница 1: ...th the iTTUSB 4 Audacity Configuration on PC 6 Configuring Audacity for Mac OS 10 4 and above 8 Recording into the Computer 10 Adjusting Your Audio Level Optional 11 Cleaning Your Audio Optional 12 Hi...

Страница 2: ...e General Public License GPL More information as well as open source code can be found on the CD included or on the web at http audacity sourceforge net Audacity works on both Windows 98 and greater a...

Страница 3: ...d connect the USB port on the iTTUSB to the USB port of your computer 2 Turn your computer on and allow it to boot fully if it is not on already 3 Turn on the power switch to your turntable 4 Your com...

Страница 4: ...to work with the iTTUSB 1 With no programs or windows open click on START Settings Control Panel 2 In the Control Panel double click on Sounds and Audio Devices 3 Ensure your computer s soundcard is s...

Страница 5: ...puter s soundcard is listed as the default Sound Playback Device and USB Audio Codec is listed as your default Sound Recording Device 6 If active press the Apply button and then press OK If the Apply...

Страница 6: ...6 Audacity Configuration on PC 1 Go to START All Programs Audacity to launch Audacity 2 Select the Edit menu and then Preferences Figure 1 Select Preferences...

Страница 7: ...g system 99 of the time it will contain USB in the Name Figure 2 Select USB Audio Device from Preferences If you would like to record in stereo click on the pull down tab next to Channels and select 2...

Страница 8: ...time Audacity v 1 2 4 is opened this reset will occur To work around this problem wait until Audacity opens and performs the erroneous format reset outlined above then you simply have to select the de...

Страница 9: ...your settings match then you are ready to begin recording The basic rule is after Audacity is open use the AUDIO MIDI SETUP utility to manually select format settings that match the format settings i...

Страница 10: ...ding You will hear the audio coming from the output of your computers soundcard No Audio go back to the preference menu Figure 2 and make sure you have Software Playthrough selected and the speaker vo...

Страница 11: ...section as well as on the web See Figure 5 b Normalize should be used to have the correct volume on the recording See Figure 6 Please note It is a good idea to place the needle on the record while it...

Страница 12: ...8 3 Click Get Noise Profile The Noise Removal window will now close automatically 4 Select the entire track of audio you wish to remove noise from If you wish to clean up the entire recording use Sel...

Страница 13: ...13 Figure 7 Selecting Noise in Track Figure 8 Noise Removal Window...

Страница 14: ...ile before you can remove the noise from a track If you select actual audio for the noise profile the computer may remove all of your audio See Step 1 Once the Noise Profile is set it will save the pr...

Страница 15: ...cord 4 hours of music in under 3 hours Instructions 1 Record your 33 1 3 RPM vinyl at 45RPM by pressing the 45RPM button on the top panel 2 You will hear the audio recording at an unusual pitch due to...

Страница 16: ...by the gaps as shown with 1 2 3 below Figure 11 The next steps show how to label these tracks and export them to WAV CD quality format Figure 11 Identifying Separate Audio Tracks 3 Press the Skip to...

Страница 17: ...r the track Use the space bar to easily start and stop playback Note the label is placed at the START of the track For example in Figure 14 TRACK 1 is labeled at the beginning of audio recording Track...

Страница 18: ...e files 2 Select the File menu and then select Export Multiple as shown in Figure 15 3 The Export Multiple window will come up see Figure 16 a Select WAV as the export format and choose the Export loc...

Страница 19: ...are many free software applications that can play burn as well as convert WAV files to MP3 Once a file is in MP3 format it can be placed on any MP3 compatible mobile digital device Recording 78RPM Rec...

Страница 20: ...ecording device o If you can not hear the music but you do see the music on the screen open your preferences Figure 2 and make sure that your Playback Device is set to your internal computer soundcard...

Страница 21: ...sing the line input on the device to prevent feedback o Make sure that your RCA plugs are plugged into a source or not touching bare metal If you are experiencing noise through the USB you may have in...

Отзывы: