background image


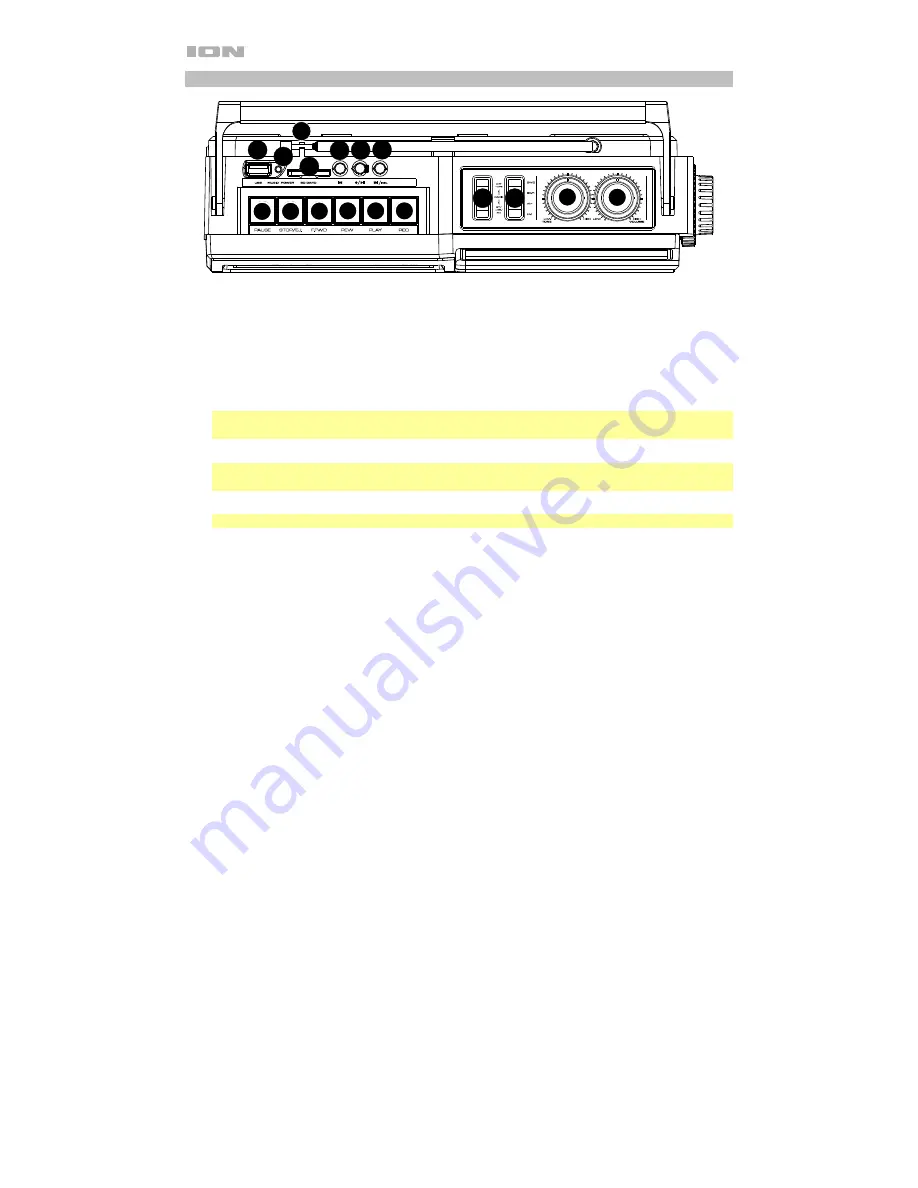
Top Panel 


1.


Antenna: 

Adjust the antenna to get the best radio station reception.  


2.


Volume: 

Adjust this to control the overall playback volume. 


3.


Tone: 

Turn this knob to left of the center position to increase the bass frequencies. Turn this 

knob to right of the center position to increase the high frequencies.


4.


Pause: 

In Tape mode, press this button to pause the tape playback.


5.


Stop/Eject:

 In Tape mode, press this button to stop or eject a tape. 


6.


Fast Forward: 

In Tape mode, press this button to fast forward the tape.


Note: 

The cassette mechanism will not auto-stop when fast forwarding. Press the 

Stop

 button 

after fast forwarding is completed.  

7.


Rewind:

 In Tape mode, press this button to rewind the tape.   


Note: 

The cassette mechanism will not auto-stop when rewinding. Press the 

Stop

 button after 

rewinding is completed.  

8.


Play: 

In Tape mode, press this button to play the tape.


Note: 

There will be a delay in playback for a few seconds after the 

Play

 button is pressed.   

9.


Record: 

In Tape mode,


press the 

Record

 button to record to a tape.   


10.


Mode: 

Adjust this switch to change the mode from Tape, Radio, and BT (Bluetooth)/USB/SD. 


11.


Band: 

Adjust this switch to select AM, FM, SW1, or SW2.   


12.


USB Port: 

Connect your USB flash drive here to play music or record the audio from a tape, 

radio, or the internal microphone.


13.


SD Card Slot: 

Insert your SD card here to play music or record audio from a tape, radio, or the 

internal microphone.


14.


LED: 

The LED will illuminate solid blue when an SD card or USB flash drive is connected. The 

LED will flash blue when USB media is playing. The LED will be lit solid blue during Bluetooth 
playback.


15.


Previous Track: 

Press this button to go to the previous track. 


16.


Record/Play/Pause: 

Press this button to play/pause a USB or  SD  card  track.  Press  and  hold 

this button to record the radio, tape, or internal mic source to a USB flash drive or SD card.


17.


Next Track/Delete Track: 

Press this button to go to the next track. Press and hold the 

Next 

Track

 button to delete the current USB or SD track. 


1

2

3

4

5

6

7

8

9

12

13

14

15 16 17

11

10

Содержание Retro Rocker

Страница 1: ...Quickstart Guide English 2 10 Guía de inicio rápido Español 11 19 Guide d utilisation rapide Français 20 29 Appendix English 30 ...

Страница 2: ... more convenient Box Contents Retro Rocker Power Cable Quickstart Guide Safety Warranty Manual Support For the latest information about this product documentation technical specifications system requirements compatibility information etc and product registration visit ionaudio com For additional product support visit ionaudio com support Setup Items not listed under Introduction Box Contents are s...

Страница 3: ...adphones are connected to the Headphone Output the internal speakers will be muted 4 Radio Channel Display View the selected radio station here 5 Tuning Dial Adjust this dial to tune in to a radio station Side Panel 1 Headphone Output Connect your headphones to this 1 8 3 5 mm output When using headphones the internal speakers will be muted Note When headphones are connected to the Headphone Outpu...

Страница 4: ...econds after the Play button is pressed 9 Record In Tape mode press the Record button to record to a tape 10 Mode Adjust this switch to change the mode from Tape Radio and BT Bluetooth USB SD 11 Band Adjust this switch to select AM FM SW1 or SW2 12 USB Port Connect your USB flash drive here to play music or record the audio from a tape radio or the internal microphone 13 SD Card Slot Insert your S...

Страница 5: ...strip opening Recording from the Radio to Tape 1 Press Stop Eject to open the cassette holder 2 Insert a blank tape and close the cassette holder 3 Set the Function switch to Radio 4 Set the Band switch to desired frequency band AM FM SW1 or SW2 5 Adjust the Tune dial to select a radio station 6 Extend and adjust the antenna for best reception 7 Press the Record button to start recording 8 To stop...

Страница 6: ...nit may not record properly if both a USB and an SD card is plugged in at the same time 2 Set the Function switch to Radio 3 Set the Band switch to desired frequency band AM FM SW1 or SW2 4 Adjust the Tune dial to select a radio station 5 Extend and adjust the antenna for best reception 6 To start recording press and hold the Record Play Pause button 7 To stop recording press and hold the Record P...

Страница 7: ...unction switch to USB 3 To skip a track press and release the Next Track button 4 To fast forward a track press and hold the Next Track button 5 To go to the previous track press and release the Previous Track button 6 To rewind a track press and hold the Previous Track button SD Card Playback Note If both a USB flash drive and SD card are inserted the unit will default to using the USB flash driv...

Страница 8: ...MHz are better received at night and for a few hours surrounding dawn and dusk and higher frequencies SW2 at 13 MHz and up are better received during the day Cassette Care To avoid tape jamming tape tangling or playback issues please follow these tips Check that there are no loose layers of tape visible through the cassette center window If there are manually wind up loose tape using a pencil or h...

Страница 9: ...ck in it Pairing a Bluetooth Device 1 Adjust the Function switch on Retro Rocker to the BT USB SD position Note If an SD card and or a USB flash drive is inserted remove these in order to pair to a Bluetooth device 2 Turn on your Bluetooth device 3 Navigate to your Bluetooth device s setup screen find Retro Rocker and connect A voice prompt will be heard saying Bluetooth pairing when pairing and B...

Страница 10: ... walls furniture etc Reset the Bluetooth connection on Retro Rocker to disconnect Retro Rocker from any other audio device and restart the search process If this does not work right away power off Retro Rocker and then power it back on See Pairing a Bluetooth Device for more information Reset the Bluetooth connection on your audio device by turning Bluetooth off and back on You can find this under...

Страница 11: ...Retro Rocker Cable de alimentación Guía de inicio rápido Manual sobre la seguridad y garantía Soporte Para obtener la información más reciente acerca de este producto documentación especificaciones técnicas requisitos de sistema información de compatibilidad etc y registrarlo visite ionaudio com Para obtener soporte adicional del producto visite ionaudio com support Prepara Los elementos que no se...

Страница 12: ...alida Headphone Output los altavoces se silencian 4 Pantalla del canal de radio Visualice aquí la estación de radio seleccionada 5 Cuadrante de sintonización Ajuste este cuadrante para sintonizar una estación de radio Panel lateral 1 Salida para auriculares Conecte sus auriculares a esta salida de 3 5 mm 1 8 pulg Cuando se utilizan auriculares los altavoces internos se silencian Nota Cuando se con...

Страница 13: ...ués de que se complete el rebobinado 8 Reproducción En modo Casete pulse este botón para reproducir el casete Nota Habrá un retraso en la reproducción durante unos segundos después de presionar el botón Play 9 Grabar En modo Casete pulse este botón Record para grabar en el casete 10 Modo Ajuste este interruptor para modificar el modo a casete radio y BT Bluetooth USB SD 11 Banda Ajuste este interr...

Страница 14: ... tira plástica el botón Record del Retro Rocker no funcionará al intentar grabar en el casete Para grabar en un casete que ya no posee su tira plástica utilice cinta adhesiva para cubrir la abertura de la cinta Grabación desde la radio al casete 1 Pulse Stop Eject para abrir la casetera 2 Inserte un casete vacío y cierre la casetera 3 Coloque el interruptor Function en Radio 4 Ajuste el interrupto...

Страница 15: ...no grabe correctamente si hay una unidad USB y una tarjeta micro SD conectadas al mismo tiempo 2 Coloque el interruptor Function en Radio 3 Ajuste el interruptor Band a la banda de frecuencias deseada AM FM SW1 o SW2 4 Ajuste del cuadrante Tune para seleccionar una estación de radio 5 Extienda y ajuste la antena para lograr una mejor recepción 6 Para comenzar la grabación mantenga pulsado el botón...

Страница 16: ...áticamente 3 Para saltear una pista pulse y suelte el botón Next Track 4 Para avanzar rápidamente por una pista mantenga pulsado el botón Next Track 5 Para pasar a la pista anterior o siguiente pulse y suelte el botón Previous Track 6 Para rebobinar una pista mantenga pulsado el botón Previous Track Reproducción de la tarjeta micro SD Nota Si se encuentran conectadas tanto la unidad de memoria USB...

Страница 17: ...rededor del amanecer y el atardecer y las frecuencias más altas SW2 a 13 MHz y más se reciben mejor durante el día Cuidado de los casetes Para evitar que los casetes se atasquen las cintas se enreden o sufran problemas de reproducción siga estos consejos Asegúrese de que no haya capas de cinta suelta visibles a través de la ventanilla central del casete Si las hay rebobine manualmente la cinta sue...

Страница 18: ...el interruptor Function del Retro Rocker a la posición BT USB SD Nota Si se inserta una tarjeta SD y o una unidad flash USB elimínelos para emparejarlos con un dispositivo Bluetooth 2 Encienda su dispositivo Bluetooth 3 Navegue a la pantalla de configuración Bluetooth de su dispositivo busque Retro Rocker y establezca la conexión Escuchará un aviso de voz que dice Bluetooth pairing apareamiento Bl...

Страница 19: ... Reinicie la conexión Bluetooth del Retro Rocker para desconectarlo Retro Rocker de cualquier otro dispositivo de audio y reinicie el proceso de búsqueda Si esto no funciona en seguida apague el Retro Rocker y luego vuelva a encenderlo Para más información consulte Aparear un dispositivo Bluetooth Reinicie la conexión Bluetooth de su dispositivo de audio apagando el Bluetooth y luego volviendo a e...

Страница 20: ...Retro Rocker Câble d alimentation Guide d utilisation rapide Consignes de sécurité et informations concernant la garantie Assistance Pour les toutes dernières informations concernant la documentation les spécifications techniques la configuration requise la compatibilité et l enregistrement du produit veuillez visiter ionaudio com Pour de l assistance supplémentaire veuillez visiter ionaudio com s...

Страница 21: ...emarque Lorsqu un casque d écoute est branché à la sortie casque les haut parleurs sont désactivés 4 Affichage de la station radio Indique la station radio sélectionnée 5 Bouton de syntonisation Ce bouton permet de syntoniser une station radio Panneau latéral 1 Sortie casque Cette sortie permet de brancher un casque d écoute 3 5 mm Lorsqu un casque d écoute est branché les haut parleurs internes s...

Страница 22: ...embobinage est terminé 8 Play En mode cassette cette touche permet de lancer la lecture de la cassette Remarque Il y aura un délai de lecture de quelques secondes après que vous avez appuyé sur le bouton Play 9 Rec En mode cassette cette touche et le bouton Record la cassette permet d enregistrer 10 Mode Ce sélecteur permet de basculer entre les sources Tape Radio et BT Bluetooth USB SD 11 Bande C...

Страница 23: ...ette de protection en plastique qui une fois retirée ne permet aucun enregistrement sur la cassette Lorsque la languette de protection en plastique a été retirée la touche d enregistrement de la Retro Rocker ne fonctionne plus pour l enregistrement sur cassette Pour enregistrer sur une cassette qui n a plus de languette de protection en plastique utilisez du ruban adhésif pour recouvrir l ouvertur...

Страница 24: ...ction sur BT USB SD 3 Maintenir la touche Record Play Pause enfoncée permet de lancer l enregistrement et de parler dans le microphone interne 4 Maintenir la touche Record Play Pause enfoncée de nouveau permet d arrêter l enregistrement La lecture de l audio enregistré commencera automatiquement Enregistrement de la radio sur clé USB ou sur carte micro SD 1 Insérez la clé USB dans le port USB ou i...

Страница 25: ...iveaux sur l affichage des niveaux 6 Pour lancer l enregistrement maintenir la touche Record Play Pause 7 Pour arrêter l enregistrement maintenir la touche Record Play Pause Enregistrement d une cassette sur clé USB ou sur carte micro SD 1 Appuyez sur la touche Stop Eject pour ouvrir le compartiment à cassette 2 Insérez une cassette et refermez le compartiment à cassette 3 Insérez la clé USB dans ...

Страница 26: ...a lancée automatiquement 3 Pour sauter une piste appuyez et relâchez la touche Next Track 4 Pour faire avancer rapidement une piste maintenez la touche Next Track enfoncée 5 Pour revenir à la piste précédente appuyez et relâchez la touche Previous Track 6 Pour faire un retour arrière sur une piste maintenez la touche Previous Track enfoncée Lecture d une carte micro SD Remarque Lorsqu une clé USB ...

Страница 27: ... et les hautes fréquences SW2 à 13 MHz et plus sont mieux reçues le jour Cassettes audio Afin d éviter que la bande magnétique se coince et s emmêle ou les problèmes de lecture veuillez suivre ces conseils Vérifiez à travers la fenêtre centrale de la cassette que la bande magnétique ne s est pas desserrée ou déroulée Si c est le cas enroulez manuellement la bande à l aide d un crayon ou d un stylo...

Страница 28: ...utes avant de réinsérer une cassette Jumelage d un périphérique Bluetooth 1 Réglez le sélecteur Function du Retro Rocker sur BT USB SD Remarque Si une carte SD et ou un lecteur flash USB est inséré retirez les afin de les associer à un périphérique Bluetooth 2 Mettez l appareil Bluetooth sous tension 3 Accédez à l écran de configuration de votre appareil Bluetooth recherchez Retro Rocker et appuye...

Страница 29: ...uetooth sur la Retro Rocker afin de supprimer toute connexion à la Retro Rocker et recommencer le processus de recherche d appareil Si cela ne fonctionne pas immédiatement mettez la Retro Rocker hors tension et de nouveau sous tension Veuillez consulter la section Jumelage d un périphérique Bluetooth afin d en savoir plus Réinitialisez la connexion Bluetooth sur l appareil audio en désactivant et ...

Страница 30: ...t 12 0 x 4 1 x 7 5 305 x 105 x 190 mm Weight 4 0 lbs 1 8 kg Specifications are subject to change without notice Bluetooth and wireless reception and range are affected by walls obstructions and movement For optimal performance place the product in the center of the room so it is unobstructed by walls furniture etc Battery life may vary based on temperature age and volume usage of product Trademark...

Страница 31: ...31 ...

Страница 32: ...ionaudio com Manual Version 1 4 ...

Отзывы: