4
Features
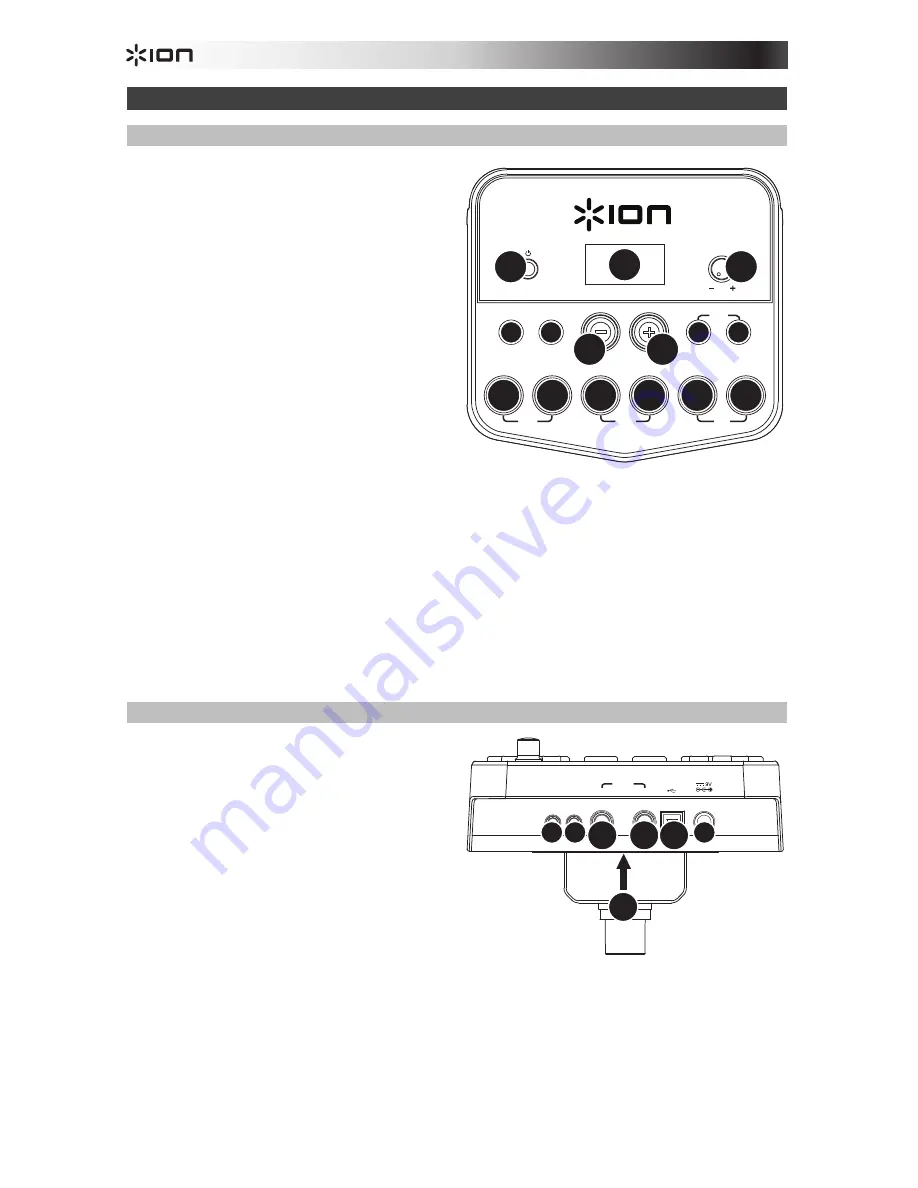
Front Panel
1.
Power Button:
Press this button to turn the
drum module on. Press and hold it for 2
seconds to turn the drum module off.
2.
Display:
This area shows values and text
relevant to the drum module's functions
and operation.
3.
Volume Knob:
Turn this knob to adjust the
volume of the Main Outputs and Phones
Output.
4.
– / + :
Press either of these buttons to
decrease or increase the value shown in
the display.
5.
Click Button:
Press this button to turn the
metronome ("click") on or off. See the
Using the Metronome (Click)
section for
more information.
6.
Start/Stop Button:
Press this button to
start or stop playback of a Pattern. See the
Playing Along With Patterns
section for more
information.
7.
Pattern Button:
Press this button to enter Pattern Mode. Press both this button and the Tempo
Button simultaneously to use the Built-In Drum Coach. See the
Playing Along With Patterns
and
Using the Built-In Drum Coach
sections for more information.
8.
Tempo:
Press this button to enter Tempo Mode, and use the – and + buttons to adjust the
tempo. Press both this button and the Pattern Button simultaneously to use the Built-In Drum
Coach. See the
Using the Metronome (Click)
and
Using the Built-In Drum Coach
sections
for more information.
9.
1-5/Variation Buttons:
Press any one of these buttons to enter Kit Mode and select a Kit.
When using the Built-In Drum Coach, you can use these buttons to select an exercise. See the
Using Kits
and
Using the Built-In Drum Coach
sections for more information.
Rear Panel
1.
Power Jack:
Use a power adapter
(included, 9 V, 500 mA, center pin-positive)
to connect this jack to your power outlet.
2.
Cable Snake Connector:
Connect your
cable snake (included) here, and connect
the cable snake's cables to your kit's
triggers (drum pads, cymbal pads, and
pedals).
3.
Main Outputs:
Use standard 1/4" mono
cables (not included) to connect these
outputs to your monitor, amplifier, or PA
system. Adjust the volume with the Volume
Knob on the top panel.
4.
Phones Output:
Connect standard 1/8" stereo headphones to this output. Adjust the volume
with the Volume Knob on the top panel.
5.
Aux In:
Use a 1/8" stereo cable (not included) to connect an external audio device
(smartphone, CD player, etc.) to this input.
6.
USB Port:
Use a standard USB cable (not included) to connect your computer to this port,
allowing you to send and receive MIDI messages to and from your computer. See the
Using
MIDI
section for more information.
PHONES
OUTPUT
AUX IN
USB
L/MONO
R
1
4 5
3
2
3 6
SLOW
GOOD
FAST
1
2
3
4
5
VARIATION
PATTERN
VOLUME
COACH
TEMPO
START
/STOP
CLICK
1
9 9 9 9 9 9
2
3
4
5
6
7
8
4
Содержание Redline
Страница 2: ......
Страница 48: ...ionaudio com Manual Version 1 1...


