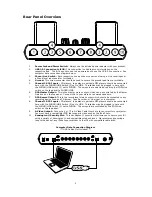
background image

Rear Panel Overview 


1.


Power Jack and Power Switch:

  Always use the included power adapter with your product. 

2.


USB 2.0 Connection to iPOD: 

This connection is used to access information on the 

respective iPod.  The iDJ does not need to be powered on to use the USB 2.0 connection.  See 
computer data connection diagram below. 

3.


Phono/Line Switch:  

Each respective line input has the option of using a Line Level input or 

a Phono level input used for turntables. 

4.


Ground:  

This screw connector should be used to secure the ground lead from a turntable. 

5.


Channel 2 RCA Inputs:

  CD players, tape players, portable MP3 players should be connected 

here with the PHONO/LINE Switch (3) set to LINE.  Turntables may be plugged in here with 
the PHONO/LINE Switch (3) set to PHONO.  These inputs are selected by setting the iPOD/Line 

switch on the top panel to PHONO/LINE. 

6.


RCA Master Output:

  This is the master stereo output, which can be controlled by the Master 

Gain knob on the top panel.  Connect this to your stereo or powered speakers. 

7.


RCA Record Output:

 This is the record level stereo output which should be connected to any 

recording device such as a CD burner, Tape Recorder, or Line input on a computer.  

8.


Channel 1 RCA Inputs:

  CD players, tape players, portable MP3 players should be connected 

here with the PHONO/LINE Switch (3) set to LINE.  Turntables may be plugged in here with 
the PHONO/LINE Switch (3) set to PHONO.  These inputs are controlled by the iPOD/Line 
switch on the top panel. 

9.


S-Video Output:

  Connect a 4 or 7 Pin S-Video Cable from here to your monitor or projector.  

You must have a compatible iPOD that supports video such as the iPod Photo. 

10.


Kensington ® Security Slot:  

This Kensington ® security slot allows you to secure your iDJ 

using a variety of Kensington ® and compatible notebook locks.  We recommend securing a 

loop to the back of any iPods to secure them to the iDJ with compatible cable locks. 


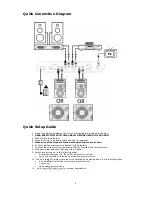
Computer Data Connection Diagram 

***USB Cables Not Included*** 


Содержание iDJ

Страница 1: ...er Inc registered in the U S and other countries The iPod is a trademark of Apple Computer Inc CONTENUTO DELLA CONFEZIONE iDJ ALIMENTAZIONE 2 ADATTATORI DOCKING iPod INHALT DER VERPACKUNG iDJ NETZTEIL...

Страница 2: ...input sources as indicated in the diagram 7 Connect the outputs to the power amplifier s monitors and or projectors 8 Plug your mixer and other devices into AC power 9 Switch everything on in the fol...

Страница 3: ...the master stereo output which can be controlled by the Master Gain knob on the top panel Connect this to your stereo or powered speakers 7 RCA Record Output This is the record level stereo output whi...

Страница 4: ...will notice two groves positions inside the iDJ docking well For example when using an iPod Mini the adapter should be in the forward groove and use the rear position for larger capacity iPods 9 Cros...

Страница 5: ...ader activates the PLAY and PAUSE function between one or two iPods the iPod s must be connected via the docking connector 5 CUE MIX This three position switch selects what output is sent to the headp...

Страница 6: ...wheel and there is a bottom connector there is limited functionality More information can be found on the top panel overview inside this manual or at Apple s website 6 What is that round hole on the...

Страница 7: ...ro 6 Conecte todas las fuentes de entrada como se indica en el diagrama 7 Conecte las salidas al los amplificador es de alimentaci n monitores y o proyectores 8 Enchufe su mezclador y otros dispositiv...

Страница 8: ...olumen se controla con la perilla Master Gain Ganancia maestra del panel superior 7 Salida RCA para grabaci n Conecte esta salida a cualquier dispositivo de grabaci n tal como una grabadora quemador d...

Страница 9: ...era Notar dos muescas posiciones dentro del pozo de acoplamiento de la unidad iDJ Por ejemplo si se usa un iPod Mini el adaptador debe estar en la muesca delantera y se debe usar la muesca trasera par...

Страница 10: ...utom ticamente el iPod de dicho extremo El o los iPod se deben conectar mediante el conector de acoplamiento 5 Mezcla de cue de auriculares Este conmutador selecciona la salida que se env a a los auri...

Страница 11: ...a 4ta generaci n tiene una funcionalidad limitada Se puede hallar m s informaci n en la vista del panel superior o en el sitio web de Apple 6 Para qu es ese orificio redondo de la parte inferior de la...

Страница 12: ...Fader auf Null stehen 6 Schlie en Sie alle Eingangssignalquellen wie in der Abbildung beschrieben an 7 Verbinden Sie die Ausg nge mit den Verst rkern 8 Verbinden Sie Ihren Mixer und die anderen Ger te...

Страница 13: ...6 RCA Master Ausgang Verbinden Sie diesen Ausgang mit Ihrer Stereoanlage oder mit aktiven Lautsprechern Die Lautst rke wird mit dem Master Gain Regler der Oberseite justiert 7 RCA Record Ausgang Schli...

Страница 14: ...ositionen Schieben Sie vorsichtig den Adapter hoch um Ihn herauszuziehen Sie werden zwei Rillen im iDJ sehen Verwenden Sie zum Anschluss des iPod Mini den Adapter mit den vorderen Rillen und den Adapt...

Страница 15: ...der betreffende iPod mit der Wiedergabe beginnt der die iPod s m ssen ber den Dockanschluss mit dem iDJ verbunden sein 5 Cue Kopfh rer Mix Dieser Schalter bestimmt welches Signal Sie im Kopfh rer h r...

Страница 16: ...nformieren Sie sich dazu auf der Seite auf der wir die Oberseite des iDJs beschreiben oder im Internet unter www apple com 6 Wozu ist das runde Loch am Boden meines iDJs a Das Runde loch dient dazu de...

Страница 17: ...urces tel qu indiqu sur le sch ma 7 Reliez les sorties aux amplificateurs de puissance aux moniteurs et ou aux projecteurs 8 Branchez la console de mixage et autres appareils une prise d alimentation...

Страница 18: ...du bouton de gain principal Master Gain sur le panneau sup rieur 7 Sortie RCA pour enregistrement Cette sortie permet le branchement d appareils d enregistrement tels que graveur de disques compacts m...

Страница 19: ...e glisser vers l ext rieur Il y a deux encoches positions l int rieur du socle de synchronisation du iDJ Par exemple lorsqu un iPod Mini est utilis l adaptateur doit tre plac la premi re encoche la de...

Страница 20: ...e ou l autre extr mit du crossfader Les iPods doivent tre branch s par le biais du socle de synchronisation 5 Mixe de pr coute casque d coute Utilisez ce commutateur pour s lectionner le signal que vo...

Страница 21: ...a limit e Pour plus d information veuillez consulter la section sur les caract ristiques du panneau sup rieur ou encore visitez le site Internet de Apple 6 quoi sert l orifice en dessous du iDJ a L or...

Страница 22: ...e tutti i fader si trovino su zero 6 Collegare tutte le sorgenti d ingresso come indicato nello schema 7 Collegare le uscite agli amplificatori monitor e o proiettori 8 Collegare il mixer e gli altri...

Страница 23: ...gli altoparlanti Il volume regolato dalla manopola Master Gain situata sul pannello superiore 7 Uscita registrazione RCA collegare questa uscita a qualsiasi dispositivo di registrazione quali masteriz...

Страница 24: ...farlo scorrere fuori Si noteranno due solchi posizioni a livello della presa di docking dell iDJ Ad esempio per utilizzare un iPod Mini l adattatore va nel solco anteriore mentre la posizione posterio...

Страница 25: ...ier a riprodurre automaticamente l iPod situato a quel capo L iPod o gli iPod deve essere collegato tramite il connettore docking 5 Cue Cuffia Mix questo interruttore seleziona l uscita inviata alle c...

Страница 26: ...Ulteriori informazioni si trovano nel paragrafo relativo al pannello superiore o sul sito web di Apple 6 A cosa serve il foro rotondo posto sul fondo dell iDJ a Il foro rotondo posto sul fondo dell iD...

Страница 27: ...27 This page intentionally left blank...

Страница 28: ...g Inputs 2 iPod with bottom connector 2 Phono Line Switchable 1 microphone with tone control 2 Ground posts for turntables Outputs Master RCA Line Level Record RCA 1 8 Headphone mini jack 1 4 Headphon...

Отзывы: