background image

7

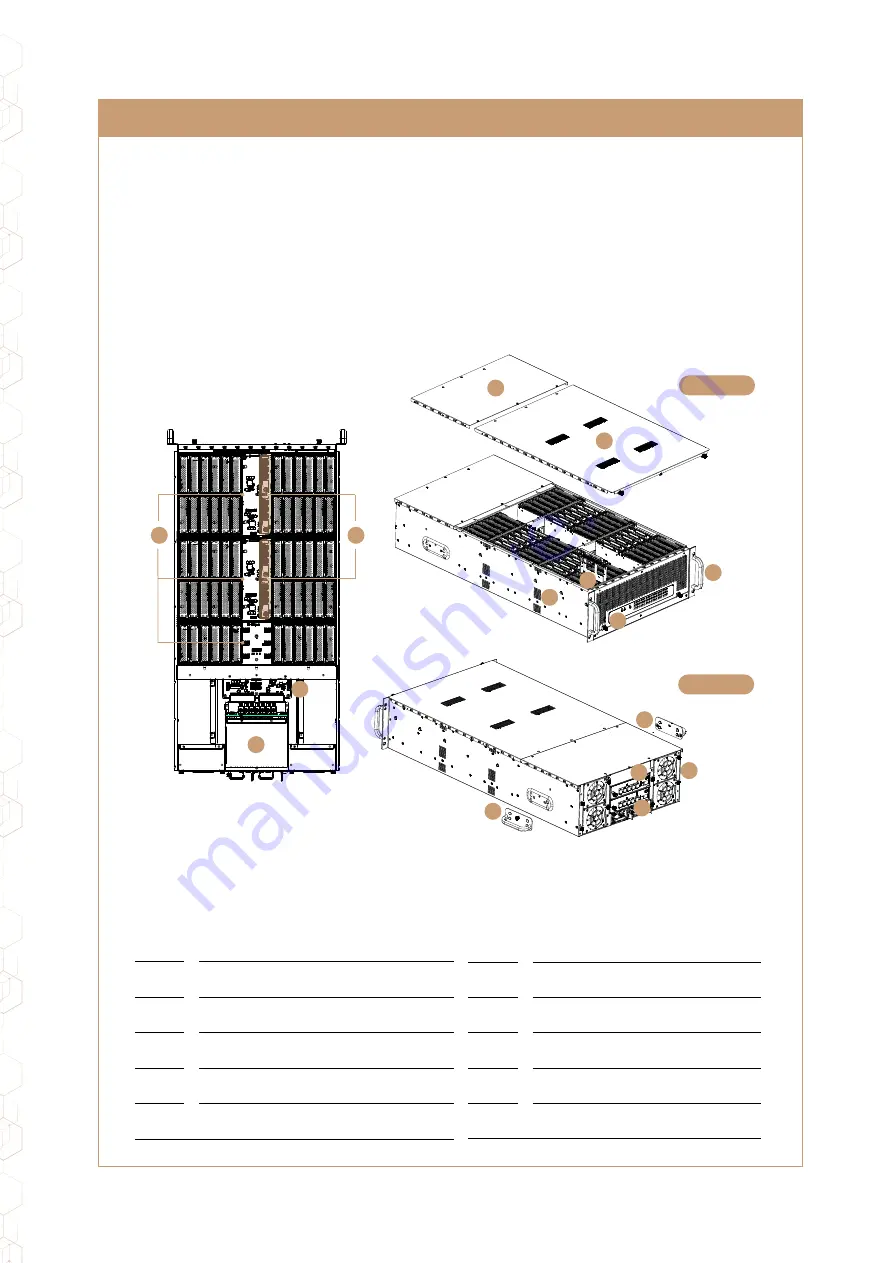
80 x 38mm PWM Fan x 4

8

Bridge expanders x 2

9

1200W PSUs x 2

10

Middle plane 

11

Backplane x 3 

12

Edge expanders (1&2) x 2 

1

Top cover

2

Pull handles x 2

3

Front panel  

4

2.5"/3.5" drive bays x 60 

5

Slide rail mounting area

6

Support Handle x 2 

6

Designed for high scalability and high availability in storage applications, the IW-RJ460-08 JBOD 
enclosure is a high density 4U rackmount storage chassis with 60 tool-less bays, dual hot-swap SAS 
12Gbps expander modules, five Mini-SAS HD (SFF-8644) for each 12Gbps expander module, high-
speed cooling fans for excellent thermal performance, dual redundant 1200W power modules, and 
GUI supports via Ethernet board. 

1.3  General Information

1

1

2

3

4

8

8

6

6

5

12

11

10

9

7

Front View

Rear View

1

2

When you open the chassis, it should reflect the diagram’s image.

Содержание IW-RJ460-08

Страница 1: ...4 U H i g h D e s t i n e y J B O D User Manual IW RJ460 08 ...

Страница 2: ...te SAFETY INFORMATION The system is designed to operate in a typical office environment The location should be clean dry and free of airborne particles It should be placed in a well ventilated room and away from sources of heat including direct sunlight and radiators It should be kept away from sources of vibration or physical shock The space should be accommodated with a properly grounded wall ou...

Страница 3: ...electrical conditions can be present on in power supply units and their cables Disconnect the power cord and any other devices attached to the server before opening the case Failing to follow safety procedures will increase the risk of personal injury or equipment damage In most cases ESD may damage disk drives electronic boards and other parts We recommend that you conduct installation only at an...

Страница 4: ...4 When you open the IW RJ460 08 box the contents should include following 1 1 Box Contents 1 Product Introduction ...

Страница 5: ...ies Box No Item 1 M5 x L20 Screws x 4 for Rack 2 3 5 HDD Screws x 60 3 2 5 HDD Screws x 120 4 Cable Clamps x 2 No Item 5 Cables Ties x 10 6 Power Cords x 2 7 RS 232 D Sub 9 Pin to 3 5mm Audio Jack Serial Cable 8 Support Handles x 2 ...

Страница 6: ...n storage applications the IW RJ460 08 JBOD enclosure is a high density 4U rackmount storage chassis with 60 tool less bays dual hot swap SAS 12Gbps expander modules five Mini SAS HD SFF 8644 for each 12Gbps expander module high speed cooling fans for excellent thermal performance dual redundant 1200W power modules and GUI supports via Ethernet board 1 3 General Information 1 1 2 3 4 8 8 6 6 5 12 ...

Страница 7: ...n System maintenance PSU fan malfunction 4 Drives Status LEDs for Bays 1 60 Follow the table below Bay LED dual color Indicates current state of the hard disk drives Blue LED implies drives are operational and functioning properly while a red LED signals a warning error or failure Blue LED steady ON hard disk is installed and powered Blue LED in 4 Hz blinking hard disk is accessed or in activity R...

Страница 8: ...pander Module 6 Secondary Bridge Expander Module 7 CRPS Power Module 1 8 CRPS Power Module 2 No Item 1 Fan Module 1 2 Fan Module 2 3 Fan Module 3 4 Fan Module 4 8 1 3 2 Rear Panel Configuration PSU Status LED Power Standby Power On Loss of Power ...

Страница 9: ...ernal downlink connect to cascading JBOD 5 Expander Module Status LED Heartbeat 6 ID LED Button Press the button to activate chassis identification 7 Network Management Port Connect to ethernet remote monitoring 8 Expander Serial Port RS 232 RS 232 support 9 1 3 2 1 Expander Bridge Configuration SAS Port LEDs Expander Module Status LED ID LED Heartbeat ID on SAS Connection On SAS Activity ...

Страница 10: ...sk expander modules The top expander is primary and the bottom expander will be the secondary The host expander module includes an Ethernet management module which allows users to monitor and maintain the system Also the redundant module can minimize downtime should any of the expanders fail NOTE NOTE 2 3 Power Supply Installation 2 4 Removing and Installing the Host Disk Expander Module 1 This un...

Страница 11: ...ack Align the chassis sidewall standoffs to the inner rail keyholes Slide the inner rail toward the front until the standoff snaps into place securing the rail to the chassis Repeat the same action on the other side When removing the inner rail Pull up the latch and slide the inner rail forward Remove the keyhole from the standoff to detach the inner rail Action and in the figure 2 5 2 Slide Rail ...

Страница 12: ... the rack post holes Pull the rail bracket pins that go into the front post holes on the rack until they click The other side is the same process Repeat the installation steps 1 4 Once you would like to detach the bracket pull outward on the front and the rear hooks of the outer rail to release the bracket Repeat the same action to the other side Step 1 Step 2 Step 3 Step 4 Step 5 Step 6 2 5 2 3 M...

Страница 13: ... or pushing the tab back to continue Release the blue slide tab again to continue until reaching the second stop position Push the chassis into position on the rack completely Make sure that the front end of the chassis is aligned with the edge of the rack to complete the installation Step 1 Step 2 Step 3 Step 4 Step 5 Step 6 NOTE Heavy Handle with Care Use the removable support handle rivets into...

Страница 14: ...ing Interface Mini SAS HD Connector 3 PD1 PD5 PHY LINK Activity LED 4 PD6 Status System Error LED 5 SL1 ID Button ID LED 6 MJ1 Management LAN Port 7 JN2 Ethernet JTAG Header 8 FAN1 Expander Fan Connector 9 JD2 EXP Debug Console Mode Connector 10 JD1 EXP Smart Console Mode Connector 14 3 Expander Board Introduction Host Disk 3 1 Expander Board Host ...

Страница 15: ... SAS HD Connector 2 CN3 External Downlink Expansion Facing Interface Mini SAS HD Connector 3 JD2 EXP Debug Console Mode Connector 4 JD1 EXP Smart Console Mode Connector 5 FAN1 Expander Fan Connector 6 PD1 Status System Error LED 7 DB1 DB3 PHY LINK Activity LED 15 3 2 Expander Board Disk ...

Страница 16: ...bility list All the components are tested in InWin s lab and are assured the components are compatible with InWin s chassis You can download the latest updated device compatibility list from InWin s website ipc in win com If you need help with installation or troubleshooting you can contact your local InWin reps or send an e mail to InWin s local contacts for technical assistance ...

Страница 17: ...Copyright In Win Development Inc All Rights Reserved ...

Отзывы: