Invision SL7D Скачать руководство пользователя страница 21

19

SL7D REAR SEAT VIDEO HEADREST SYSTEM  


Owner’s Manual

SYSTEM SETUP SUB-MENUS (continued)

FM MODULATOR 

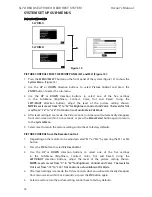
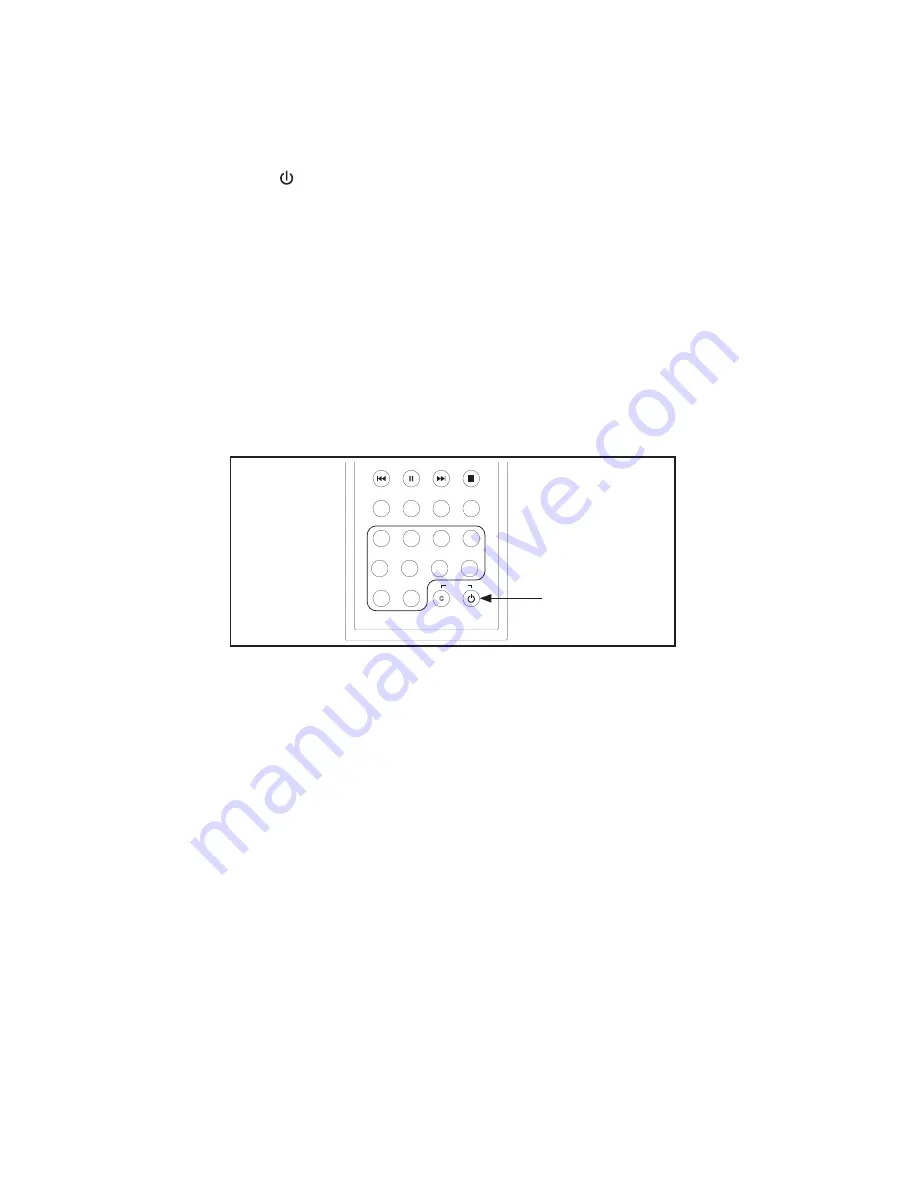
FM MODULATOR ON/OFF Direct Access Button on the Remote Control (Figure 16):


1�  Press the 

FMM 

(   )

 button on the remote control to turn the FM Modulator ON and OFF� 

(Figure 16) When 

ON

 is selected, the channel/frequency (FMM xxxxMHz) the system is set 

to will be displayed on the lower left-side of the main screen� When 

OFF

 is selected, 

FMM 

OFF 

will be displayed on the lower left-side of the main screen� The displayed selection 

will automatically disappear from main screen within 5 or 6 seconds� 

2�  Press the 

button to display a the list of  available frequencies� Use the 

UP 

or

 DOWN 

or 

LEFT

 and 

RIGHT 

direction buttons to select the best channel/frequency from a four page 

list of one hundred possibilities then press the 

MENU/SELECT

 button to enter selection�  

NOTE: 

When a channel/frequency is selected, the screen will display the channel/

frequency in the lower left corner and will turn on the FM Modulator. 

Figure 16

FMM ON/OFF 

BUTTON

DVD

MUTE

SOURCE

TV

VOL

PIX

DVD

SOURCE

ZOOM

SYSTEM

MENU

DISC

MENU

REPEAT

SUBTITLE

SETUP

AUDIO

DISPLAY

9

0

1

2

3

4

5

6

7

8

EJECT

POWER

M1

M2

C

STOP

FMM

A-B

ENTER

IRT 

ON/OFF

Содержание SL7D

Страница 1: ...SL7D Rear Seat Video Headrest System Owner s Manual...

Страница 2: ......

Страница 3: ...tem Menu 14 System Setup Sub Menus 15 DVD Playback Settings and Adjustments 24 DISC Basics 29 DVD Region Codes 30 AV Inputs AV Outputs HDMI MHL and USB Port Information 31 MVGP1 Game Module Package Op...

Страница 4: ...may be installed in a motor vehicle and visible to the driver if the LCD Panel or Video Monitor is used for vehicle information system control rear or side observation or navigation If the LCD Panel...

Страница 5: ...e used within a line of sight from the transmitter as infrared transmission like visible light travels only in an unrestricted line of sight PRODUCT FEATURES 6 Remote IR sensors for the wireless remot...

Страница 6: ...nds or turn the vehicle OFF 1 Press the POWER button on each monitor The control keys will light up blue 2 Insert a DVD CD or MP3 disc into the disc slot located on top of the M1 or M2 monitor disc la...

Страница 7: ...disc will load automatically and begin to play NOTE Somediscsmaystartattherootmenu where Play must be selected to start movie Notes on Discs Do not touch the disc surface Handle the disc by the edge I...

Страница 8: ...Covers Used to protect and cover the HDMI jack and USB port when not in use 5 USB PORT This port is used to connect a USB device for playback of content To view content select USB as the video source...

Страница 9: ...he DVD menu 5 DOWN q Button This button is used to navigate selections on the screen and can also be used to navigate the DVD menu 6 MENU SELECT Button Press to display and select options in the Syste...

Страница 10: ...y operate the SL7D Rear Seat Video Headrest System It is not a universal remote control and will not control other equipment Remote control Back View PUSH OPEN CR2025 Protective Pull Tab Clear Plastic...

Страница 11: ...epairs Do not drop remote controls and headphones or expose to strong impacts Do not expose monitors remote controls and headphones to direct sunlight for extended periods of time Always ensure that t...

Страница 12: ...anual REMOTE CONTROL OPERATION Figure 8 DVD MUTE SOURCE TV VOL PIX DVD SOURCE ZOOM SYSTEM MENU DISC MENU REPEAT SUBTITLE SETUP AUDIO DISPLAY 9 0 1 2 3 4 5 6 7 8 EJECT POWER M1 M2 C STOP FMM A B ENTER...

Страница 13: ...a disc has more than one Chapter Track or File you can move to another Chapter Track File Press this button briefly during play to step back to the previous Chapter for DVD video orTrack File for MP3...

Страница 14: ...MUTE SOURCE TV VOL PIX DVD SOURCE ZOOM SYSTEM MENU DISC MENU REPEAT SUBTITLE SETUP AUDIO DISPLAY 9 0 1 2 3 4 5 6 7 8 EJECT POWER M1 M2 C STOP FMM A B ENTER IRT ON OFF 17 19 21 23 18 20 22 24 25 26 27...

Страница 15: ...his button repeatedly to change the search speed from 2 4 8 and 16 times the normal speed Figure 9 24 IRT ON OFF This button is used to turn the Infrared Transmitter ON and OFF for the Wireless IR Hea...

Страница 16: ...modified or reset to the factory default settings NOTE System Menu changes are best made without a DVD inserted into the unit This section describes how to adjust and set settings using the five setu...

Страница 17: ...and press the ENTER button select the Sub Menu screen NOTE SelectedItemsintheSystemMenuandtheSub Menuswillbehighlightedingreen 3 Use the UP DOWN LEFT and RIGHT direction buttons to select an item in...

Страница 18: ...main screen within 5 or 6 seconds or press the Menu Select button again to return to the System Menu 5 Select reset to return the picture setting control back to factory defaults PICTURE CONTROL from...

Страница 19: ...M Modulator ON OFF and press ENTER button to enter selection 4 Use the UP or DOWN direction buttons to select FM Modulator ON or OFF and press the ENTER button to enter selection When ON is selected t...

Страница 20: ...ttons to select FM Channel and press ENTER button to enter selection 4 Use the UP DOWN LEFT and RIGHT direction buttons to select the best channel frequency from a four page list of one hundred possib...

Страница 21: ...splayed selection will automatically disappear from main screen within 5 or 6 seconds 2 Press the C button to display a the list of available frequencies Use the UP or DOWN or LEFT and RIGHT direction...

Страница 22: ...rom a four page list of one hundred possibilities then press the ENTER button to confirm the selection NOTE When a channel frequency is selected the screen will display the channel frequency in the lo...

Страница 23: ...ENTER button to enter the sub menu 3 Use the UP or DOWN direction buttons to select the desired language then press the ENTER to save the setting OSD LANGUAGE from the Remote Control 4 Select M1 on th...

Страница 24: ...or M2 on the Remote Control 5 Press the System Menu button then use the UP or DOWN direction buttons Figure 11 to select IRT ON OFF and press the ENTER button to enter the sub menu 6 Use the UP or DOW...

Страница 25: ...Menu 2 Use the UP or DOWN direction buttons to select DEFAULT DVD ON OFF and press the ENTER button to enter the sub menu 3 Use the UP or DOWN direction buttons to select DEFAULT DVD ON or OFF and pr...

Страница 26: ...s 3 Press to open the sub menu that contains the different options available Press the UP or DOWN direction buttons to highlight the desired option and press ENTER to confirm the selection 4 Repeat st...

Страница 27: ...and bottom of the screen 16 9 This displays a wide picture with black bands on the upper and lower portion of the screen The bandwidth will vary depending on the aspect ratio of the disc SCREEN SAVER...

Страница 28: ...ol rating Press the cursor button to move the highlight to the parental level sub menu Press to select the desired level of parental control and press ENTER Figure 25 To change the password to your ow...

Страница 29: ...ion page allows the user to select the language for the OSD The user can either select ENGLISH FRENCH SPANISH GERMAN ITALIAN CHINESE THAI or OFF to be displayed on the screen during playback of a disc...

Страница 30: ...ia source can be manually selected by pressing the front panel Source S button or the SOURCE button on the remote control 2 When a disc is inserted the system will switch to DVD mode immediately regar...

Страница 31: ...ts However due to the variety of disc manufacturers and software playback cannot be guaranteed NOTE The following discs CANNOT be used with this player Mini Disc Laserdisc CD 1 CD ROM DVD ROM Super Au...

Страница 32: ...nt region cannot be played in this unit and the unit will display WRONG REGION Figure 31 Region 1 USA Canada Region 2 Japan Europe South Africa Middle East Greenland Region 3 S Korea Taiwan Hong Kong...

Страница 33: ...one manufacturer to determine which type of output your device supports NOTE SomeadapterscanbepoweredfromtheUSBportonthefrontpaneloftheunit Powering the adapter will charge the smartphone when using t...

Страница 34: ...y See your mobile phone service provider for details NOTE Go to www voxxelectronics com for more information on available adapters USB PORT INFORMATION USB Port The USB port provides two functions 1 M...

Страница 35: ...TTERY COVER TAB BATTERY COMPARTMENT Rear Side of the Game Controller COVER SCREW Figure 32 Functional Description 1 Select the game source using the Source button S on the front panel of the system Fi...

Страница 36: ...eslisttochoose from and six games are for two players One Player The games can be selected from either the M1 monitor or the M2 monitor Whichever viewer selects the game source becomes Player 1 and us...

Страница 37: ...a DVD Distorted picture Check the disc for fingerprints and clean with a soft cloth wiping from center to edge Sometimes a small amount of picture distortion may appear This is not a malfunction Canno...

Страница 38: ...information and credits at the beginning of a movie you won t be able to This part of the movie is often programmed to prohibit skipping through it HDMI MHL input not working for the HDMI MHL enabled...

Страница 39: ...cifications Type TFT Active Matrix LCD Resolution 2400 W x 480 H Pixels 1 152 000 Back Light LED Power Source 12 VDC Power Consumption 28W Operating Temperature 32 F 125 F 0 C 55 C Storage Temperature...

Страница 40: ...orized change or modifications to this device would void the user s authority to operate this device Notice Disposal of Old Electrical Electronic Equipment Applicable in the European Union and other E...

Страница 41: ...39 SL7D REAR SEAT VIDEO HEADREST SYSTEM Owner s Manual NOTES...

Страница 42: ...40 SL7D REAR SEAT VIDEO HEADREST SYSTEM Owner s Manual NOTES...

Страница 43: ......

Страница 44: ...42 2014 VOXX International Corp 150 Marcus Blvd Hauppauge NY 11788 128 9272...

Отзывы: