


13
SL7D REAR SEAT VIDEO HEADREST SYSTEM
Owner’s Manual
REMOTE CONTROL OPERATION (continued)
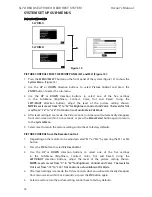
17. FM Modulator Channel Select (C)
(M1 Monitor only)
The SL7D has a 100 channel built-in
wireless FM Modulator� The FM Modulator
can be set from 88�1 MHz to 107�9 MHz in
0�2 MHz steps, i�e� 88�1, 88�3, 88�5, 88�9,
90�1 etc� Pressing the C button will display
the FM Modulator frequency setting
OSD� Use the cursor buttons to select the
frequency� Refer to the SYSTEM SETTINGS
AND ADJUSTMENTS for more details�
(Figure 9)
18. FMM ON/OFF ( ) (M1 Monitor only)
This button is used to turn the wireless
FM Modulator ON and OFF� (Figure 9)
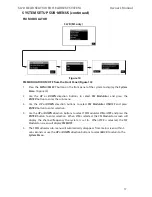
19. A-B REPEAT
Allows user to repeat the playback from
point A to point B of a DVD� Press the
A-B button once to select a starting point
(A) and again to select a end point (B)�
The DVD will only play the selection from
point A to point B� Press the A-B button
again to cancel selection and return to
normal playback of the DVD� (Figure 9)
20. REPEAT
Press this button to switch the
repeat mode options of CHAPTER,
TITLE, ALL and cancel while playing
DVD-video� Other disc types such
as CD have two repeat modes that
can be selected: TRACK and ALL�
(Figure 9)
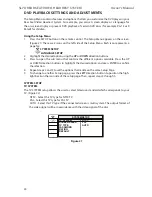
21. NEXT ( )
When a disc has more than one Chapter,
Track, or File, you can move to another
Chapter/Track/File� Press this button
briefly during play to step forward to the
next Chapter for DVD-video or Track/File
for MP3, CD, etc� (Figure 9)
22. STOP ( )
Press this button to stop playback of disc�
(Figure 9)
23. SCAN FORWARD Button ( )
Press this button to search in the forward
direction� Press this button repeatedly to
change the search speed from 2, 4, 8, and
16 times the normal speed� (Figure 9)
24. IRT ON/OFF
This button is used to turn the Infrared
Transmitter ON and OFF for the Wireless
IR Headphones� Pressing M1 then the
IRT ON/OFF button will control the IR
Transmitter for M1� Pressing M2 then
the IRT ON/OFF button will control the IR
Transmitter for M2� (Figure 9)
25. AUDIO (DVD MODE ONLY)
Press this button to display and select
the available AUDIO languages� Each
time you press the button, the audio
language changes� (Figure 9)
NOTE:
The audio languages vary from
disc to disc.
26. SUBTITLE (DVD MODE ONLY)
If the DVD playing has different
subtitle options press this button to
display and select the desired available
subtitle language� (Figure 9)
NOTE:
The subtitle selections vary from
disc to disc.
27. DISC MENU
Press this button to access the
DVD root menu� Press again
to resume playing the movie�
In photo mode, press once for a
thumbnail view� Press and hold 3 to 4
seconds to go to the Directory/ Preview
modes� (Figure 9)
28. ZOOM
Press this button to enlarge the
picture when playing a DVD disc� Press
repeatedly to change the zoom from
Zoom 2, Zoom 3, Zoom 4, Zoom 1/2,
Zoom 1/3, Zoom 1/4 and Zoom OFF�
(Figure 9)
29. VOLUME DOWN ( - ) or UP ( + )
Not applicable on this model� (Figure 9)
NOTE:
These buttons can be used with
the PIX button for adjusting the picture
controls.
30. DVD Mode Select
Press this button to control DVD
functions� (Figure 9)
31. MUTE
Press this button to mute the sound
transmitted to the headphones and the
FM Modulator� “MUTE” will be displayed
on the screen� Pressing the button again
restores sound to the previously set level�
(Figure 9)
32. EJECT ( )
Press this button to eject the disc from
the disc slot� (Figure 9)
Содержание SL7D
Страница 1: ...SL7D Rear Seat Video Headrest System Owner s Manual...
Страница 2: ......
Страница 41: ...39 SL7D REAR SEAT VIDEO HEADREST SYSTEM Owner s Manual NOTES...
Страница 42: ...40 SL7D REAR SEAT VIDEO HEADREST SYSTEM Owner s Manual NOTES...
Страница 43: ......
Страница 44: ...42 2014 VOXX International Corp 150 Marcus Blvd Hauppauge NY 11788 128 9272...