background image

2

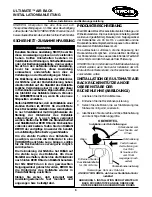
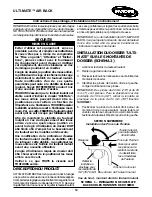
INSTALLING ULTI-MATE AIR BACK
TO LOWER BACK CANES
(FIGURES 1 AND 2)

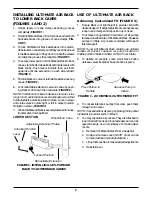
1. Unlock levers on cane clamps exposing grooves

completely (FIGURE 1).

2. Hold Ulti-Mate Air Back in front of canes and rest both

back extensions into grooves of cane clamps (FIG-
URE 1
).

3. To lock Ulti-Mate Air Back extensions into position,

close levers on cane clamps until they cover the groove
in the Back extension. If they do not, loosen the screws
and align the grooves then retighten (FIGURE 1).

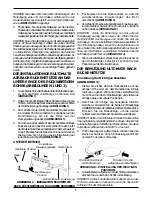
4. To secure lower portion of Ulti-Mate Air Back to back

canes, stand behind wheelchair and locate levers with
black knobs. Push levers inwards then pull them
upwards until one extension on each side retracts
(FIGURE 2).

5. Position Back so curve of retractable extensions hug

canes (FIGURE 2).

6. Lock retractable extensions around canes by push-

ing black knobs down then outwards (FIGURE 2).

NOTE: If distance from lower extensions to canes is too
long or short, unzip the back cover and locate screws that
hold adjustable extension plates in place. Loosen screws
and slide extension plate right or left to adjust position.
Retighten screws (FIGURE 2).

7. When Ulti-Mate Air Back is securely fastened to canes,

transfer client to wheelchair.

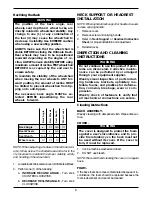
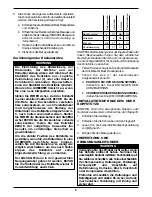
Press Button to

Deflate

Squeeze Pump to

Inflate

FIGURE 3 - ACHIEVING CUSTOMIZED FIT

4. To conceal lateral air pumps from view, push them

through slot in cover.

NOTE: Conceal lumbar air pump by placing it into pocket
located at top central portion of Back.

5. You may reposition air pockets. They are attached to

inner shell with hook and loop fasteners and can be
repositioned up, down or sideways. To make adjust-
ments:

a. Remove Ulti-Mate Air Back from wheelchair.

b. Unzip and remove cover (

NOTE: Cover can be

removed without removing hardware.).

c. Lift up foam cushion to make desired adjustments.

d. Reinstall cover.

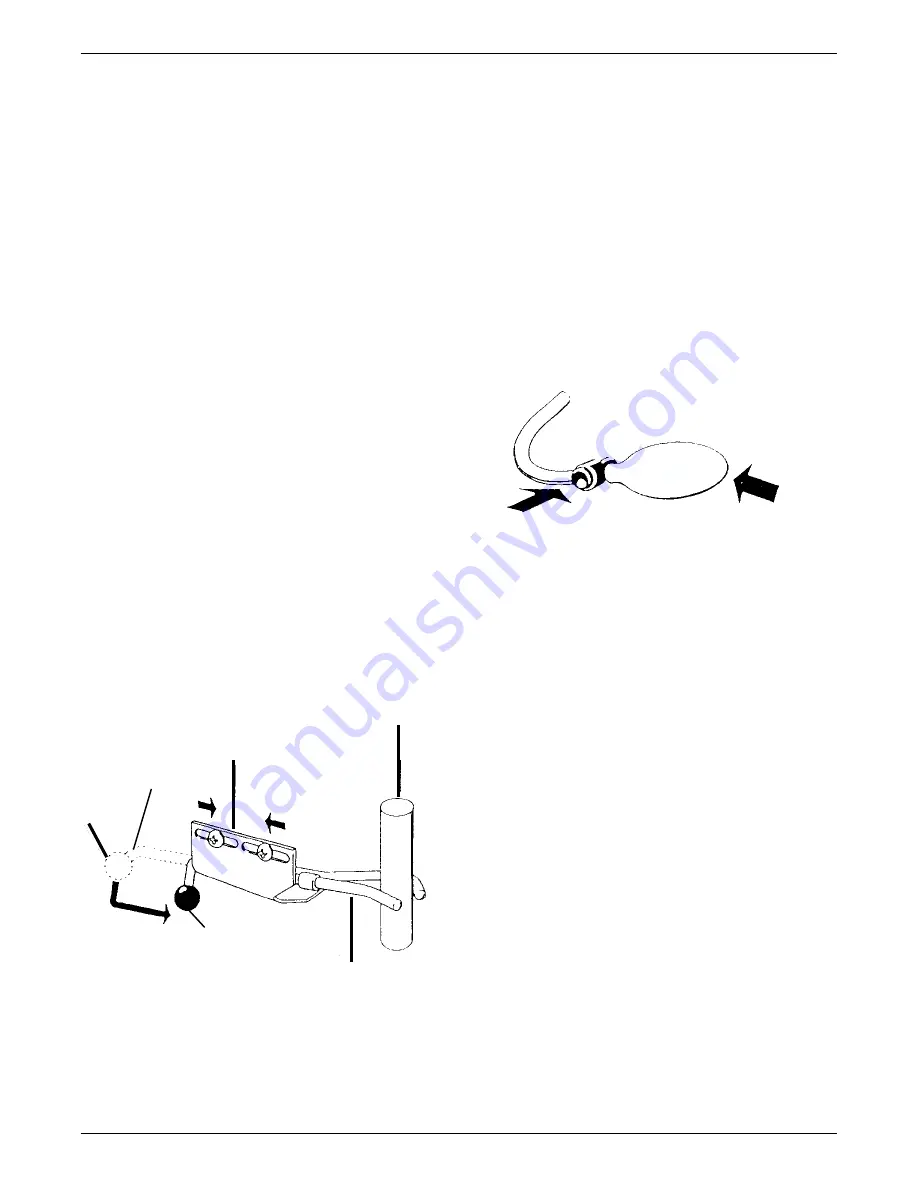
Adjustable Extension Plates

Wheelchair Cane

LOWER SECTION

Retractable Extension

FIGURE 2 - INSTALLING  ULTI-MATE AIR

BACK TO LOWER BACK CANES

Locked Position

Unlocked Position

Lever

USE OF ULTI-MATE AIR BACK

Achieving  Customized Fit (FIGURE 3)

1. Ensure Back is at right height to provide client with

desired support. If height adjustments are necessary,
loosen cane clamps and reposition up or down.

2. To achieve a snug lateral fit, locate two (2) air pumps

fastened on either side of Ulti-Mate Air Back. Squeeze
pumps to inflate air pockets contained within each
lateral support.

NOTE: If your Ulti-Mate Air Back contains an optional
lumbar air pocket, squeeze air pump located on
middle portion of Back to inflate. DO NOT over inflate.

3. To deflate air pockets, press small black button

(release valve) located at base of each air pump.

Содержание Ulti-Mate Air Back

Страница 1: ...Y WARNING DO NOT use this equipment without first reading and understanding these instructions If you are unabletounderstandtheWarnings Cautions and Instructions contact equipment supplier before atte...

Страница 2: ...ze Pump to Inflate FIGURE 3 ACHIEVING CUSTOMIZED FIT 4 To conceal lateral air pumps from view push them throughslotincover NOTE Conceallumbarairpumpbyplacingitintopocket located at top central portion...

Страница 3: ...ASSEMBLY Weekly cleaning with dampened cloth Wipe entire sur face COVER WARNING The cover is designed to protect the foam against a user s incontinence and to pro vide fire retardency so the back must...

Страница 4: ...ed for warranty inspection using the serial number when applicable as identification within thirty 30 days of return authorization date DO NOT return products to our factory without our prior consent...

Страница 5: ...being limited to such repair or replacement For warranty service please contact Invacare UK s Service Department Invacare Service Representative during normal working hours Upon receiving notice of a...

Страница 6: ...enSiesich beieventuellenReklamationendirektanIhrenFachh ndler SICHERHEIT ZUSAMMENFASSUNG WARNUNG Benutzen Sie diese Ausr stung NICHT bevor Sie diese Anweisungen gelesen und verstanden haben Sollten Un...

Страница 7: ...e von der Sicht zu verstecken stecken Sie sie in die Tasche im mittleren Teil der R ckenst tze Einstellbare Erweiterungsplatten Rollstuhlrohr UNTERERBEREICH Zur ckziehbare Erweiterung ABBILDUNG 2 INST...

Страница 8: ...ellen Siek nnenaufw rts abw rtsundseitw rtsverstellt werden Die Verstellung erfolgt wie folgt a EntfernenSiedieUlti MateAirBackR ckenst tze vom Rollstuhl b ffnenSiedenRei verschlu desBezugesund entfer...

Страница 9: ...ngels den Invacare Deutschland GmbH zu vertreten hat tr gt Invacare Deutschland GmbH die zum Zwecke der Nachbesserung erforderlichen Aufwendungen insbesondere Transport Wege Arbeits und Materialkosten...

Страница 10: ...derugleuningwaarbijdehendelopdeklemnaar bovenisgerichtendeschroefvandestoel afgericht is Herhaalditaandelinkerkant NB Controleeralledelenopbeschadigingtijdensvervoer Alserbeschadigingenzijn NIETgebrui...

Страница 11: ...VAN DE RUGLEUNINGSTOKKEN Vast stand Los stand Hendel 6 Zetdeintrekbareverlengstukkenvastronddestokken door de zwarte knoppen naar beneden en dan naar buitenteduwen FIGUUR2 NB Alsdeafstandvandeonderste...

Страница 12: ...it VOORDAT u de maximale achteroverleuning gebruikt TEST voor de veiligheid de rolstoel VOORDAT hij door de uiteindelijke gebruiker wordt gebruikt Om de stabiliteit van de rolstoel vast te houden bij...

Страница 13: ...wordt teuggestuurd ofwel naar de Invacare fabriek of naar een servicecentre zoals aangegeven door de vertegenwoordiger van Invacare Service Onderdelen met defecten moeten binnen dertig 30 dagen na da...

Страница 14: ...donneralesinstructionsn cessaires SECURITE MISES EN GARDE viter d utiliser cet quipement sans au pr alable avoir lu et compris ces instructions Si vous n tes pas m me de comprendre les Mise en garde A...

Страница 15: ...du Dossier 5 Vous pouvez d placer les poches air Elles sont attach es lastructureint rieurepardesbandesauto agrippantes et peuvent tre d plac es vers le haut verslebasoulat ralement Pourr alisercesr...

Страница 16: ...de re positionner les roues arri re vers l avant Angle du dossier Roues arri re Profondeur d assise Blocage des roues Angle du dossier NVT Roues arri re NVT Profondeur d assise NVT Blocage des roues I...

Страница 17: ...tie veuillez contacter le Service Consommateur du Repr sentant Invacare POIRIER Groupe Invacare pendant les heures de travail normales A la r ception d une information au sujet d un pr tendu d faut de...

Страница 18: ...ste equipo sin haber le do y entendido previamente las instrucciones Si no entiende las Advertencias Precauciones e Instrucciones p ngase en contacto con su suministrador an tes de tratar de utilizar...

Страница 19: ...N INFERIOR Extensi n replegable FIGURA 2 INSTALACI N DEL RESPALDO ULTI MATE EN LOS MONTANTES TRASEROS INFERIORES Posici n de bloqueo Posici n desbloqueada Palanca NOTA Si la distancia desde las extens...

Страница 20: ...UJASDELRELOJ b DISMINUYAEL NGULODERECLINACI N Girelaempu aduraENELSENTIDODELAS AGUJASDELRELOJ ngulo de respaldo N P Ruedas traseras N P Profundidaddelasiento N P Frenosdelasruedas ngulo de respaldo Ru...

Страница 21: ...sustituci n Para los servicios de garant a por favor p ngase en contacto con el Departamento de Servicio del suministrador durante horas de oficina Al recibir aviso de un posible defecto en un product...

Страница 22: ...MENTO NON usare questa apparecchiatura senza aver prima letto e compreso queste istruzioni Se non capite gli avvertimenti gli avvisi e le istruzioni mettetevi in contatto con il fornitore delle appare...

Страница 23: ...re nuovamente le viti FIGURA 2 Premere il bottone per sgonfiare Schiacciare la pompa per gonfiare FIGURA 3 OTTENIMENTO DI UN ACCOMODAMENTO PERSONALIZZATO 4 Pernasconderelepomped arialaterali spingerle...

Страница 24: ...are lamanopolainsensoORARIO Angolo schienale N A Rotelle posteriori N A Profondit sedile N A Angolo schienale Rotelle posteriori Profondit sedile Dispositivi di blocco delle rotelle Dispositivi di blo...

Страница 25: ...i prega contattare il Reparto Assistenza Invacare du rante le ore normali di ufficio Su ricevimento di una notifica di un presunto difetto in un prodotto Invacare emetter una autorizzazione di restitu...

Страница 26: ...fornecedor PRECAU ES AVISO N O use o equipamento sem antes ler e compreender estas instru es Se n o compreender os avisos as precau es e as instru es contacte o fornecedor antes de tentar usar o equi...

Страница 27: ...pt culo no cimo da parte central do Encosto 5 Os sacos de ar s o facilmente adapt veis Est o presos arma o interior com tiras em la o e ganchos quepodemposicionar separacima para baixo e para os lados...

Страница 28: ...dos pontos seguintes a Aumente o ngulo de reclina o girando a ma anetaemsentidoinversoaodosponteiros dorelogio b Diminua o ngulo de reclina o girando a ma anetanadirec odosponteirosdorelogio INSTALA...

Страница 29: ...favor contacte o Departamento de Servi os da Invacare Invacare Service Representative durante o hor rio de trabalho normal Ap s receber notifica o sobre um produto alegadamente defeituoso a Invacare I...

Страница 30: ...BESKRIVNING Ulti Mate Air Back r utvecklad att ge anv ndaren b ttre h llning och st d f r ryggen Den kan justeras s att anv ndarenkan ndrarygglutningsvinkelnfr n90till115 utanattstigaavrullstolen Mont...

Страница 31: ...appen f r att t mma luftkudden Tryck p pumpen f r att fylla luftkudden FIGUR 3 HUR MAN F R EN BEKV M ST LLNING 4 F r att de laterala luftpumparna inte skall synas tryck dem genom h let in i verdraget...

Страница 32: ...GSGRADEN vrid vredet MEDSOLS MONTERING AV NACKST D ELLER HUVUDST D OBS N rettm jligtnackst dellerhuvudst danv nds ta bort b rhandtaget 1 Ta bort verdraget 2 Ta bort skruven och b rhandtaget 3 Se Instr...

Страница 33: ...ntant F r garantiservice v nligen kontakta Invacare AB Service Representanter under arbetstid N r Invacare Service Representant f r uppgift om en felaktig produkt kommer den att be er returnera produk...

Страница 34: ...stabilitet genindstil baghjulene i bagudg ende retning af rullestolen F R De benytter k restolen Den n dvendige bagvinkel SKAL udv lges F R genindstillingen af baghjulene fremad V r sikker p at al mas...

Страница 35: ...Skruskruernefastigen FIGUR2 7 N rUlti MateLuftrygl nersikkertfastgjorttilr rene overf rdakliententilk restolen Pres p knappen for at lukke luften ud Klem p pumpen for at puste op FIGUR 3 OPN ELSE AF...

Страница 36: ...siden af Ulti Mate Luftrygl n 2 Udf r en 1 af de f lgende a FOR G TILBAGEL NINGSVINKELEN drej knappen MOD URET b FORMINDSKTILBAGEL NINGSVINKELEN DrejknappenMEDURET NAKKEST TTE ELLER HOVEDHVILER INSTAL...

Страница 37: ...v r venlig at kontakte Invacare UK s Service Afdeling Invacare Ser vice Repr sentant i normal arbejdstid Ved modtagelsen af meddelelsen om en p st et defekt i et produkt vil Invacare Service Repr sen...

Страница 38: ...rioita Mik li niiss on kuljetusvaurioita l k yt osia Otayhteytt valmistajaanlis ohjeitavarten YHTEENVETO TURVAOHJEISTA VAROITUS L k yt t t laitetta ellet ole ensin lukenut ja ymm rt nyt k ytt ohjetta...

Страница 39: ...ytt j py r tuoliin Paina nappia kun haluat tyhjent tyynyn Puserra pumppua kun haluat t ytt tyynyn KUVA 3 K YTT J N MUKAAN S DETT V SELK TUEN K YTT 4 Halutessasisivullasijaitsevatpumputpoisn kyvist vo...

Страница 40: ...osassa 2 Toimi seuraavasti a Selk tuen laskemiseksi paina nappia vastap iv n b Selk tuen nostamiseksi paina nappia my t p iv n P TUEN TAI NISKATUEN ASENNUS Huom Kun k yt t niska tai p tukea poista kan...

Страница 41: ...aikana Invacaren Ison Britannian osastoon valtuutettuun Invacare myyj n Saatuaan tiedon tuoteen viallisuudesta Ison Britannian Invacare valtuutettu Invacare myyj antaa sarjanumeroihin perustuvan pala...

Страница 42: ...42 NOTES...

Страница 43: ...43 NOTES...

Страница 44: ...nce l Phone 33 2 47 62 64 66 Fax 33 2 47 42 12 24 INVACARE CANADA l 5970 Chedworth Way l Mississauga Ontario Canada L5R 3T9 l Phone 905 890 8300 1 800 668 5324 Fax 905 890 5244 YEAR OF MANUFACTURE For...

Отзывы: