SECTION 10—ELECTRONICS
79
SECTION 10—ELECTRONICS
Controller Calibration
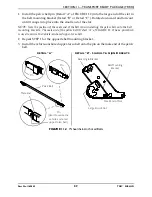
NOTE: For this procedure, refer to FIGURE 10.1.
1. Connect the programer to the charger/programming port.
2. Refer to MK6i electronics field reference guide part number 1141471 for controller
calibration information.
FIGURE 10.1
Removing/Installing the Controller
NOTE: For this procedure, refer to FIGURE 10.2 on page 80.
Removing
1. Remove the rear shroud. Refer to Removing/Installing the Wheelchair Shrouds on
2. Disconnect the right and left motor cables from the controller.
3. Disconnect the joystick cable from the controller.
4. Disconnect the battery cable from the controller.
5. Lift the controller up until the two 9/16 ID x 1-1/16 OD x 3/8-inch washers release from
the base frame.
6. Pull the controller away to remove from the wheelchair frame.
7. If necessary to replace the controller mounting hardware, perform the following:
A. Remove the two 8-32 x 1.00-inch pan head screws and 8-32 locknuts that secure the
controller mounting washers and 9/16 ID x 1-1/16 OD x 3/8-inch washers to the
controller.
B. Remove the two controller mounting washers from the two 9/16 ID x 1-1/16 OD x
3/8-inch washers.
MPJ Joystick
SPJ Joysticks
Charger/Programming
Port
Charger/Programming Port
(On Underside of Joystick)


