background image

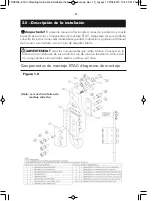
2.0 - Descripción de la instalación

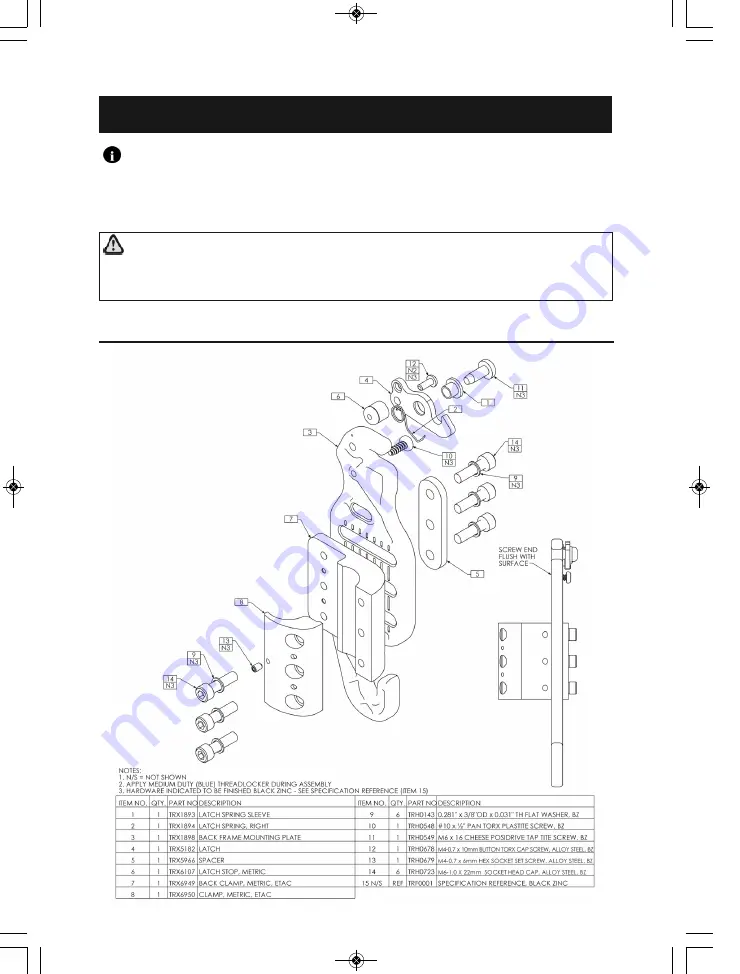
Componentes de montaje ETAC: diagrama de montaje

Figura 1.0

(Nota: se muestra la forma de

montaje correcta)

¡ADVERTENCIA!

Todos los componentes que utiliza Motion Concepts en la

fabricación e instalación de sus productos son de máxima resistencia. Utilice solo
los componentes suministrados, 

no 

los sustituya por otros.

¡Importante! 

El presente manual ofrece instrucciones de instalación y ajuste

específicas para los componentes de montaje ETAC. Asegúrese de que también
consulta las instrucciones adicionales de seguridad, instalación y ajuste en el Manual
del usuario suministrado con el cojín de respaldo Matrx

.

TRD0305- ETAC Mounting Hardware Installation Instructions- Europe, Rev 1.0_Layout 1  29/02/2012  12:43 PM  Page 21

- 21 -

Содержание Matrx TRD0305-ETAC

Страница 1: ...utilisation 8 DE Gebrauchsanweisung 14 ES Manual de usuario 20 PT Manual de utiliza o 26 IT Manuale Utente 32 DA Brugsanvisning 38 SE Bruksanvisning 44 FI K ytt opas 50 TRD0305 ETAC Mounting Hardware...

Страница 2: ...our MaTRx PB and Matrx PB Elite Back Cushions onto an ETAC wheelchair The ETAC hardware utilizes a unique mounting clamp specially designed to install onto the back canes of an ETAC wheelchair The re...

Страница 3: ...Use only the hardware provided do not substitute hardware Important This manual provides installation and set up instructions specific to the ETAC mounting hardware Please also be certain to read thr...

Страница 4: ...mounting hardware the left right push handle assemblies must be exchanged so that the clamp assembly is re positioned to the outside of the back canes Refer to steps 1 and 2 below 4 0 Hardware and Ma...

Страница 5: ...ghtened after the back is installed and all final adjustments have been made Installation Instructions cont d Mounting Clamp Assembly Latch opening must face the front of the wheelchair Mounting Plate...

Страница 6: ...ments to the back height if necessary via clamp hardware ensuring that both clamps are adjusted equally 7 With the back height set fully tighten all clamp assembly hardware to secure the back into pos...

Страница 7: ...pensate for revised back cane angle Adjusting the Recline Angle of the Back Canes NOTE For users that require maximum depth for their back cushion it may be necessary to adjust the recline angle of th...

Страница 8: ...e nos coussins de dossiers MaTRx PB et Matrx PB Elite sur un fauteuil roulant ETAC Le mat riel ETAC utilise une bride de fixation unique con ue sp cialement pour tre install e sur les tiges de dossier...

Страница 9: ...ourni ne remplacez pas le mat riel par celui d un autre fabricant Important Le pr sent manuel fournit des instructions d installation et de mise en place sp cifiques du mat riel de fixation ETAC Veuil...

Страница 10: ...fixation du dossier Matrx il est n cessaire d intervertir les poign es de pouss e gauche et droite pour que la bride soit repositionn e vers l ext rieur des tiges de dossier Reportez vous aux tapes 1...

Страница 11: ...tion du dossier et une fois tous les r glages finaux effectu s Instructions d installation suite Bride de fixation L ouverture du verrouillage doit tre orient e vers l avant du fauteuil roulant Plaque...

Страница 12: ...ssier si n cessaire via le mat riel de fixation en vous assurant que les deux brides sont r gl es de la m me mani re 7 Une fois la hauteur du dossier r gl e serrez fond tout le mat riel de fixation af...

Страница 13: ...gle modifi des tiges de dossier R glage de l angle d inclinaison des tiges de dossier REMARQUE Pour les utilisateurs ayant besoin d une profondeur maximale pour leur coussin de dossier il se peut qu i...

Страница 14: ...R ckenpolstern auf dem ETAC Rollstuhl zu er m glichen Die ETAC Teile werden durch Befestigungsklemmen gehalten die speziell entwickelt wurden um an dem hinteren Gest nge eines ETAC Rollstuhls befesti...

Страница 15: ...reitgestellten Teile verwenden Sie keinesfalls Ersatzteile Wichtig Dieses Handbuch bietet spezifische Anweisungen ber Montage und Einrichtung der ETAC Teile Lesen Sie bitte das Handbuch das mit Ihrem...

Страница 16: ...belassen m ssen der linke und rechte Schiebegriff ausgetauscht werden sodass die Befestigungsklemme au erhalb des hinteren Gest nges positioniert ist Siehe unten Schritte 1 und 2 Wichtig Vor der Monta...

Страница 17: ...werden nachdem die R ckenlehne montiert ist und alle Einstellungen vorgenommen wurden Installationsanweisungen Fortsetzung Befestigungsklemme Montage Die Riegel ffnung muss zur Vorderseite des Rollstu...

Страница 18: ...olster angebracht ist Dabei muss sichergestellt werden dass die Klemmen gleichm ig angepasst sind 7 Ziehen Sie alle Klemmen fest wenn die R ckenlehnenh he eingestellt ist um die R ckenlehne in ihrer P...

Страница 19: ...igungsplatten evtl auch angepasst werden um den angepassten Winkel des hinteren Gest nges auszugleichen Einstellen des Neigungswinkels des hinteren Gest nges HINWEIS Benutzer die die maximale Sitztief...

Страница 20: ...er montar los cojines para respaldos ETAC MaTRx PB y Matrx PB Elite para si llas de ruedas Los componentes ETAC utilizan una abrazadera de montaje nica especialmente dise ada para instalarla en los m...

Страница 21: ...Utilice solo los componentes suministrados no los sustituya por otros Importante El presente manual ofrece instrucciones de instalaci n y ajuste espec ficas para los componentes de montaje ETAC Aseg...

Страница 22: ...los componentes de montaje del respaldo Matrx es necesario cambiar los conjuntos de empu adura izquierda y derecha para recolocar el conjunto de abrazaderas en el exterior de los m stiles del respaldo...

Страница 23: ...una vez que el respaldo est instalado y se hayan realizado todos los ajustes finales Instrucciones de instalaci n continuaci n Montaje del conjunto de abra zadera El pestillo de apertura debe estar en...

Страница 24: ...espaldo si procede con la abrazadera asegur ndose de que ambas abrazaderas tienen el mismo ajuste 7 Con los elementos de ajuste de la altura del respaldo apriete firmemente todos los componentes del c...

Страница 25: ...compensar el ngulo rectificado del m stil del respaldo Ajuste del ngulo de reclinaci n de los m stiles del respaldo NOTA para los usuarios que necesiten la profundidad m xima para el coj n del respal...

Страница 26: ...sibilitar a fixa o das Almofadas de encosto MaTRx PB e Matrx PB Elite a uma Ca deira de rodas ETAC As ferragens ETAC utilizam um grampo de fixa o nico especificamente desenhado para ser instalado nas...

Страница 27: ...ncia utilize apenas as ferragens facultadas n o utilize ferragens de substitui o Importante Este manual faculta instru es de instala o e configura o es pec ficas para a ferragem de fixa o ETAC certif...

Страница 28: ...Matrx Back as unidades de pega esquerda e direita devem ser trocadas de maneira que a unidade do grampo seja reposicionada para fora das barras posteriores Consulte os passos 1 e 2 abaixo 4 0 Instala...

Страница 29: ...encosto ser instalado e de todos os ajustes finais terem sido efectuados Instru es de instala o continua o Grampo de fixa o Montagem A abertura de fecho deve estar orientada para a frente da cadeira...

Страница 30: ...altura do encosto mediante a ferragem do grampo assegurando que ambos os grampos est o ajustados uniformemente 7 Com a altura do encosto definida aperte completamente todas as ferragens de montagem do...

Страница 31: ...lo revisto da barra posterior Ajustar o ngulo de reclina o das barras posteriores NOTA Para utilizadores que requerem uma profundidade m xima para a sua almofada de encosto pode ser necess rio ajustar...

Страница 32: ...ggio dei nostri cuscini per schienali per carrozzine MaTRx PB e Matrx PB Elite su una carrozzina ETAC Gli elementi ETAC utilizzano un morsetto di fissaggio particolare progettato appositamente per l i...

Страница 33: ...sistenza Usare solo gli elementi forniti in dotazione non sostituire gli elementi Importante Questo manuale fornisce istruzioni di installazione e configurazione specifiche per gli elementi di fissagg...

Страница 34: ...saggio per schienale Matrx i gruppi maniglie di spinta sinistro e destro devono essere scambiati in modo che il gruppo morsetto sia riposizionato verso l esterno dei tubi dello schienale Fare riferime...

Страница 35: ...azione dello schienale e dopo tutte le eventuali sue regolazioni Istruzioni d installazione continua Gruppo morsetti di fissaggio L apertura del meccanismo di chiusura deve essere rivolta verso la par...

Страница 36: ...llo schienale se necessario tramite gli elementi a morsetto assicurandosi che entrambi i morsetti siano regolati in modo uniforme 7 Effettuata la regolazione dell altezza dello schienale serrare a fon...

Страница 37: ...angolo dei tubi dello schienale Regolazione dell angolo di reclinazione dei tubi dello schienale NOTA Per gli utilizzatori che richiedono la profondit massima per il cuscino dello schienale pu essere...

Страница 38: ...af vores MaTrx PB og Matrx PB Elite rygl nspuder p en ETAC k restol ETAC beslaget bruger en s rlig monteringsklemme der er specialudviklet til montering p en ETAC k restols bagr r De resterende beslag...

Страница 39: ...meget h j styrke Brug derfor ALTID kun de medf lgende beslag Vigtigt Denne vejledning giver s rlige anvisninger i montering og ops tning af ETAC monteringsbeslaget L s den medf lgende brugsanvisning t...

Страница 40: ...ene til Matrx rygl net skal venstre og h jre skubbeh ndtag byttes om s klemmen flyttes til ydersiden af bagr rene Se trin 1 og 2 nedenfor 4 0 Montering af beslag og Matrx rygl n Vigtigt Inden monterin...

Страница 41: ...kan sp ndes helt til n r rygl net er monteret og alle justeringer er foretaget Vejledning i installation fortsat Monterings klemme L sens bning skal vende mod k restolens forende Monte ringsplade H JR...

Страница 42: ...n dvendigt via klemmebeslaget S rg for at klemmerne er justeret ens 7 N r du har indstillet h jden p rygl net skal du sp nde alle klemmebeslag helt til for at holde rygl net p plads i den nskede posi...

Страница 43: ...rne for at kompensere for den ndrede bagr rsvinkel Indstilling af bagr renes rygkipsvinkel BEM RK For brugere der har behov for maksimal dybde til deres rygpude kan det v re n dvendigt at indstille ET...

Страница 44: ...av ryggst dsdynorna MaTRx PB och Matrx PB Elite p en ETAC rullstol ETAC monteringsmaterialet inneh ller en s rskild monteringskl mma som har utformats speciellt f r att monteras p ryggst dsr ren p en...

Страница 45: ...e monteringsmaterialet Anv nd inte annat monteringsmaterial Viktigt Den h r bruksanvisningen inneh ller s rskilda instruktioner f r mon tering och inst llning av ETAC monteringsmaterialet Se till att...

Страница 46: ...nteringsmaterialet till Matrx ryggst det m ste v nster och h ger k rhandtag byta plats s att kl manordningen hamnar p utsidan av ryggst dsr ren Se steg 1 och 2 nedan Monteringsanvisningar 1 Ta bort be...

Страница 47: ...elt n r ryggst det har monterats och alla sista justeringar r gjorda Monteringsanvisningar forts Kl manordning L s ppningen m ste vara riktad fram t p rullstolen Monte ringsplatta H GER H GER PLATTA K...

Страница 48: ...med ryggst dsdynan p plats och med hj lp av monteringsmaterialet till kl mman Se till att b da kl mmorna justeras p samma s tt 7 N r ryggst dsh jden r inst lld ska du sp nna t alla kl manordningar s...

Страница 49: ...n ndrade vinkeln p ryggst dsr ren Justera ryggst dsr rens lutningsvinkel OBS F r brukare som beh ver maximalt djup f r ryggst dsdynan kan lutningsvinkeln p ryggst dsr ren beh va justeras s att sittdju...

Страница 50: ...iinnitystarvikkeet on tarkoitettu MaTRx PB ja Matrx PB Elite selk noja pehmusteiden asentamiseen ETAC py r tuoliin ETAC tarvikkeissa on yksil llinen asennuskiinnike joka asennetaan ETAC py r tuolin ta...

Страница 51: ...tyt tarvikkeet ovat vahvoja K yt vain toimitettuja tarvikkeita l vaihda tarvikkeita T rke T ss oppaassa on ETAC kiinnitystarvikkeita koskevia asennus ja valmisteluohjeita Muista lukea my s Matrx selk...

Страница 52: ...kkeille on tarpeeksi tilaa vasen ja oikea ty nt kahva on vaihdettava niin ett kiinnike sijoittuu takakeppien ulkopuolelle Katso vaiheita 1 ja 2 j ljemp 4 0 Tarvikkeiden ja MaTRx selk nojan asennus T r...

Страница 53: ...maa Kiinnikkeet voidaan kirist kokonaan kun selk noja on asennettu ja kaikki lopulliset s d t on tehty Asennus ohjeet jatkoa Asennus kiinnike Salvan aukon on oltava py r tuolin etupuolta kohti Kiinnit...

Страница 54: ...illaan s d selk nojan lopullinen korkeus tar vittaessa kiinnikkeen avulla Varmista ett s d t molempia kiinnikkeit samoin 7 Kun selk nojan korkeus on asetettu kirist kokonaan kaikki kiinnikekokoonpanot...

Страница 55: ...hk s dett v kompensoimaan muuttunutta takakepin kulmaa Takakeppien kallistuskulman s t minen HUOMAA jos selk nojapehmuste on asennettava enimm issyvyydelle voi olla tarpeen s t ETAC takakeppien kallis...

Страница 56: ...esvingen 9 Postboks 6230 Etterstad N 0603 Oslo Tel 47 0 22 57 95 00 Fax 47 0 22 57 95 01 norway invacare com island invacare com Italia Invacare Mecc San s r l Via dei Pini 62 I 36016 Thiene VI Tel 39...

Отзывы: