background image

- 12 - 


PUMP DRAINING

P


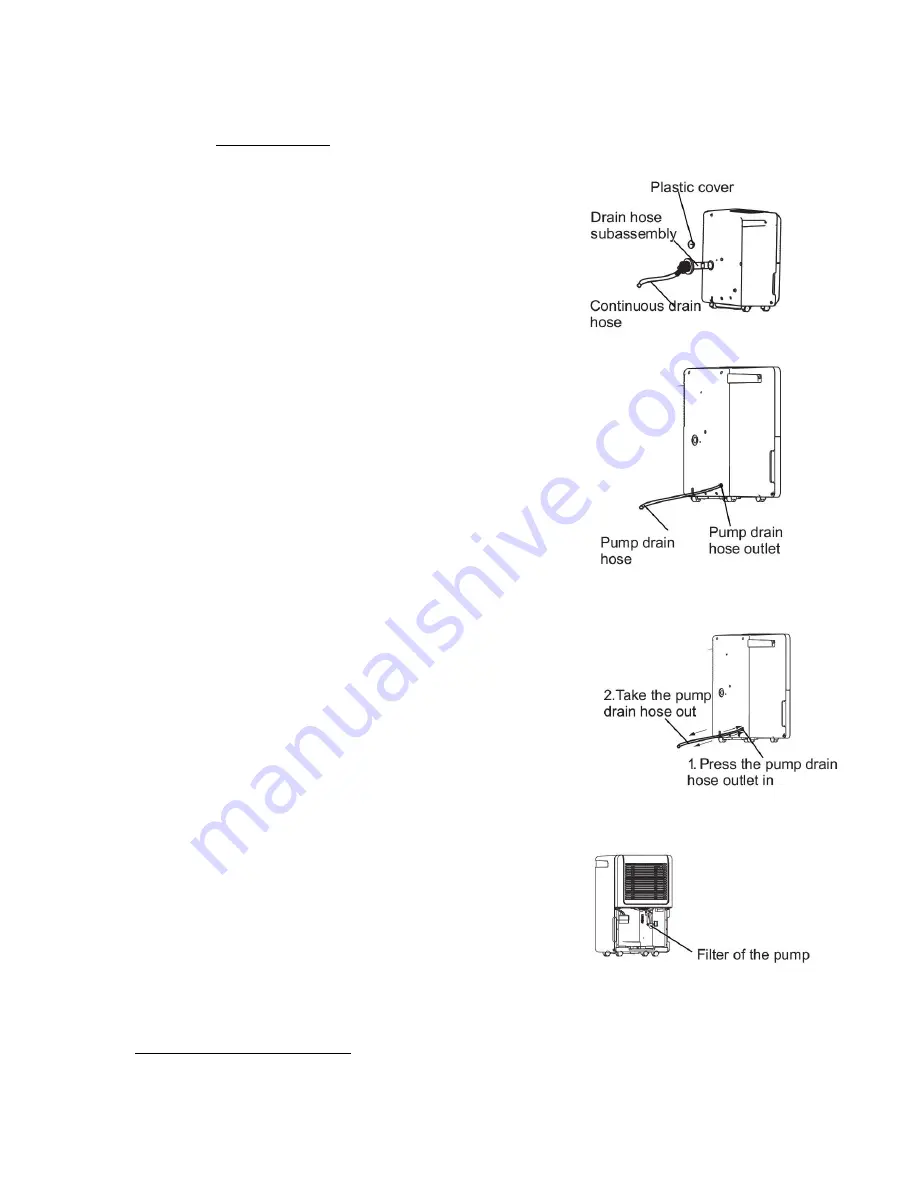
Water  can  automatically  be  emptied  into  a  floor  drain  or  an  appropriate  drainage 
facility by attaching a pump drain hose

*

 to the pump drain hose outlet on the rear side 

of the unit. 
Installation Steps 

1.  Remove  the  continuous  drain  hose  and  the  drain 

hose subassembly from the unit.


2.  Install the plastic cover to the continuous hose outlet 

of the unit by using the two screws included.


3. 

Insert the pump drain hose at least ½’’ into the pump 
drain hose outlet.


4.  Make sure the hose is secure so there are no leaks.


5.  Lead  the  water  hose  to  a  floor  drain  or  an 

appropriate drainage facility. 


6.  Make  sure  there  are  no  kinks  in  the  hose  that  stop 

water from flowing properly.


7.  Place  the  end  of  the  hose  into  the  drain  and  make 

sure the end of the hose is level or pointed down to 
let water flow smoothly.

  Do  not  let  the  hose  point 

up. 

8.  Press  the  Pump  Button  to  enable  the  pump 

operation. The  Pump Light  will illuminate to indicate 
the  pump  operation  is  enabled.  The  pump  will 
automatically turn on when the bucket is full.


NOTE:  The  pump  operation  may  be  loud  when  it 
starts working for the first 3-5 minutes.


9.  Select the desired humidity setting and fan speed on 

the unit to start normal operation.


10.  To  remove  pump  drain  hose,  press  the  hose  in  to 

release then pull to remove the pump drain hose. Be 
careful when removing the hose to make sure water 
does not spill or drip out onto the floor.


NOTES:  

o


Do  not  use  this  operation  when  the  outdoor 
temperature  is  less  than  or  equal  to  32°F/0°C. 
Water  may  freeze  inside  the  hose  blocking  the 
flow of water and causing the unit to fail. 

o


The 

highest  water  can  be  pumped  is  6’  (2 

meters). 

o


Make  sure  to  empty  the  bucket  once  a  week 
while using the pump draining feature. 

o


When  the  pump  draining  feature  is  not  being 
used,  remove  the  pump  drain  hose  from  the 
outlet. 

o


If  the  Pump  Light  blinks,  an  error  with  the 
pump  has  occurred.
  If  this  happens,  turn  off 
and unplug the unit. Do the following things: 
1.  Make sure the pump filter is clean. To clean, 

remove the bucket and take down the pump 
filter. 

2.  Make  sure  the  pump  drain  hose  is  properly 

connected and secured to the unit. 

3.  Empty any water inside the bucket. 
4.  Reinstall  the  pump  hose  if  removed  and 

properly place the bucket back into the unit. 

5.  If error repeats, call for service. 


P


Pump version only 

*

 Pump drain hose included 

Содержание DH450SM

Страница 1: ...DEHUMIDIFIER USER MANUAL 950 0188 revE 04 25 17 For Models DH450SM DH470SM DH470SMP DH470SMA DH470SMPA...

Страница 2: ...slightly different from the ones described in this manual but will not affect proper operation and usage Please read carefully the sections corresponding to the specific model you have and keep the m...

Страница 3: ...icates the possibility of injury or damage to property only WARNING Follow all grounding and electrical requirements as shown on page 4 Turn unit OFF and disconnect power cord from receptacle prior to...

Страница 4: ...place water tank after emptying to prevent water damage to property and unit Do not operate unit with wet hands Close all doors and windows to the room where the dehumidifier is to be operated Dehumid...

Страница 5: ...dedicated circuit serving only this appliance For your personal safety this appliance must be grounded This appliance has a power supply cord with a grounding plug To minimize possible shock hazard t...

Страница 6: ...ont 1 Control panel 2 Air intake grill 3 Air outlet grill 4 Air filter behind the grill 5 Water bucket 6 Handle both sides Rear 1 Continuous drain hose outlet 2 Caster 3 Power cord and plug 4 Band use...

Страница 7: ...eration NOTE Make sure the pump drain hose is installed and the continuous drain hose is removed before the pump operation is activated CAUTION DO NOT PUMP TO ANY AREA WHERE THE TEMPERATURE IS LESS TH...

Страница 8: ...Shows the room humidity level in a range of 30 RH to 90 RH with a 5 accuracy Shows the desired humidity level 35 85 while being adjusted Shows the AutoStart Stop time 0 24 while being adjusted Error C...

Страница 9: ...Filter Light AUTO RESTART If the unit turns off unexpectedly such as a power outage it will resume operation with the previous settings when the power resumes FAN SELECTION Select two fan speeds TANK...

Страница 10: ...uables are stored Use the dehumidifier in a basement to help prevent moisture damage The dehumidifier must be operated in an enclosed area to be most effective Close all doors windows and other outsid...

Страница 11: ...the unit The bucket must be in the proper position for the dehumidifier to operate 6 If on the unit will resume operation once the bucket is in the proper position NOTES o When removing the bucket do...

Страница 12: ...e two screws included 5 Install the female threaded end of the water hose garden hose not included into the adaptor 6 Make sure the hose is secure so there are no leaks 7 Lead the water hose to a floo...

Страница 13: ...loud when it starts working for the first 3 5 minutes 9 Select the desired humidity setting and fan speed on the unit to start normal operation 10 To remove pump drain hose press the hose in to relea...

Страница 14: ...250 hours of operation or more often if necessary To remove Remove the bucket grasp the filter edge and pull it straight down and out To clean Clean the filter with warm soapy water Rinse and let the...

Страница 15: ...sources i e clothes dryer etc Look for sources of humidity and correct if necessary Ambient temperature to low Moisture removal is best at higher room temperature Lower room temperatures will reduce t...

Страница 16: ...ght 36 3 LBS 39 6 LBS 40 7 LBS EEV 1 85 L kWH 1 85 L kWH 1 85 L kWH HP PSIG 540 PSI 540 PSI 540 PSI LP PSIG 300 PSI 300 PSI 300 PSI Model DH470SMA DH470SMPA Capacity 70 Pints Day 70 Pints Day Tank Siz...

Страница 17: ...ovides free replacement of defective parts only Labor is not covered under this warranty Replacement as a result of normal wear and tear is not covered under this warranty Additional claims are exclud...

Отзывы: