background image

Configuring the Radio

3-3

3

This chapter explains how to configure your radio.

Configuring the 802.11b HR Radio

1. Establish a Web browser connection. For more information, see “Establishing a

Web Browser Session” on page 2-3.

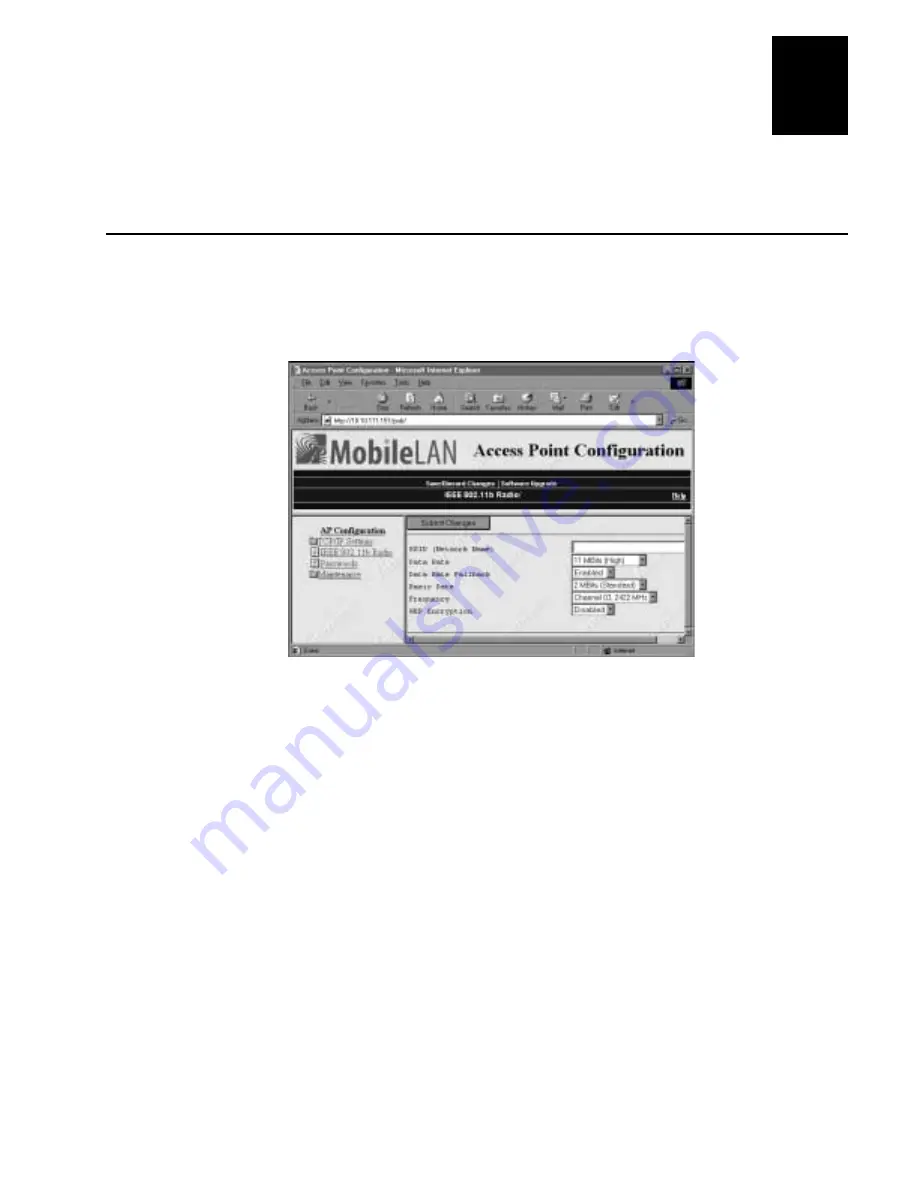
2. Click IEEE 802.11b Radio. The IEEE 802.11b Radio screen appears.

3. Configure the parameters for the radio. When you have finished, click Submit

Changes and follow the instructions that appear on your screen to save your
changes.

The table on the next page explains each parameter.

Содержание MobileLAN access 2102 S

Страница 1: ...P N 072021 001 User s Guide MobileLAN access2102S...

Страница 2: ......

Страница 3: ...P N 072021 001 User s Guide MobileLAN access2102S...

Страница 4: ...sed for any other purpose without written permission of Intermec Information and specifications in this manual are subject to change without notice 2001 by Intermec Technologies Corporation All Rights...

Страница 5: ...Mounting the 2102 S Access Point 1 6 Positioning the Antenna 1 7 Setting the IP Address of the 2102 S Access Point 1 8 Resetting the 2102 S to Factory Defaults 1 9 Configuring the 2102 S Establishing...

Страница 6: ...the Radio 4 10 Commonly Asked Technical Support Questions 4 11 Getting Help with Your Installation 4 11 Specifications and Default Settings Physical Specifications A 3 Other Specifications A 3 Radio S...

Страница 7: ...Contents v Configuring HereUAre About HereUAre C 3 Index C I...

Страница 8: ......

Страница 9: ...seriously injured and equipment and data can be damaged if you do not follow the safety warnings and cautions Do not repair or adjust alone Do not repair or adjust energized equipment alone under any...

Страница 10: ...tances About This Guide The MobileLAN access 2102 S User s Guide provides information about the features of this product and how to install configure and troubleshoot it You must be familiar with your...

Страница 11: ...Getting Started 1...

Страница 12: ...adsf...

Страница 13: ...ss the Web browser menus to make further configuration changes The 2102 S ships with these items Power supply Part No 3 304029 01 and AC power cord Mounting bracket Safety information Antenna The 2102...

Страница 14: ...Understanding the Ports The following illustration identifies the ports on the 2102 S 10BaseT Ethernet port Serial port Power port MPA002U eps The following table describes the ports on the 2102 S Por...

Страница 15: ...ing Install wired LAN cabling within node limit and cable length limitations Use an uninterruptible power supply when the AC power system is not reliable See Appendix B for information about antenna p...

Страница 16: ...ersity antenna Part No 071489 Contact your Intermec representative for more information about ordering access point accessories The following instructions explain how to mount the 2102 S using the mou...

Страница 17: ...the 2102 S until it clicks into the clip at the bottom of the mounting bracket Positioning the Antenna The 2102 S features a built in antenna that rotates 180 as shown in the next illustration Use th...

Страница 18: ...2102 S using the MobileLAN access utility 1 Install the MobileLAN access utility on your PC a Place the MobileLAN access utility CD ROM in the CD ROM drive of your PC The setup program runs automatic...

Страница 19: ...ration process is complete click Configure AP to launch a Web browser to further configure the access point Resetting the 2102 S to Factory Defaults This section explains how to reset the 2102 S to it...

Страница 20: ...asdf...

Страница 21: ...Configuring the 2102 S 2...

Страница 22: ...sadf...

Страница 23: ...h remote access to your access point remember that if you have a username and password configured for the access point your session terminates if you do not use it for 15 minutes The Web browser inter...

Страница 24: ...word To ensure security to your access point you can make changes to your access point security parameters after you establish a Web browser session To change the user name and password 1 Establish a...

Страница 25: ...point contains a simple DHCP server that you can use to provide DHCP server functions for small installations where no other DHCP server is available The DHCP server will offer IP addresses to any DH...

Страница 26: ...le the server a In the TCP IP Settings screen click the DHCP Mode down arrow and choose This AP is a DHCP Server b Click Submit Changes and follow the instructions that appear on your screen to save y...

Страница 27: ...Router Gateway Specifies what IP router DHCP will be offering to clients If NAT has been automatically enabled the access point will use the lowest DHCP address to provide an IP router that performs...

Страница 28: ...s AP is a DHCP Server in the DHCP Mode field 4 Click DHCP Server Setup and verify that the range of NAT addresses that are automatically assigned will be valid for your environment If you need to chan...

Страница 29: ...Configuring the Radio 3...

Страница 30: ...sdf...

Страница 31: ...For more information see Establishing a Web Browser Session on page 2 3 2 Click IEEE 802 11b Radio The IEEE 802 11b Radio screen appears 3 Configure the parameters for the radio When you have finished...

Страница 32: ...nger range In an installation with mixed speed settings this parameter must be set no higher than the maximum speed of the lowest rate terminal which must receive Multicast traffic Frequency The frequ...

Страница 33: ...France It also includes Switzerland Iceland Norway Czech Republic Slovenia Slovakia Turkey Russia and the United Arab Emirates Mexico and Singapore use the same channels as France The 802 11b HR chann...

Страница 34: ...missions from end devices that are not using WEP Unencryption Allowed Allows transmissions from end devices that are not using WEP Encryption Required Prevents transmissions from end devices that are...

Страница 35: ...Maintaining and Troubleshooting the 2102 S 4...

Страница 36: ...asdf...

Страница 37: ...formation on these screens may be needed when you call Intermec Technical Support Viewing AP Connections AP Connections shows information about the end devices connected to the access point To view in...

Страница 38: ...access point has transmitted and received since it was last booted To view port statistics 1 Establish a Web browser connection For more information see Establishing a Web Browser Session on page 2 3...

Страница 39: ...Status screen appears listing all available in use and expired IP addresses Viewing the Configuration Summary The Configuration Summary screen summarizes the major configuration settings and installed...

Страница 40: ...the access point including software version radio version and MAC address To view information about the access point 1 Establish a Web browser connection For more information see Establishing a Web B...

Страница 41: ...erforms internal diagnostics The next table describes the LED activity during the boot process Power Radio Wired LAN Error Description On Off Off On Flash checksum being calculated On On Off On Flash...

Страница 42: ...ess Utility in the next section a Web browser session For more information see Using a Web Browser later in this chapter Using the MobileLAN access Utility To upgrade the firmware using the MobileLAN...

Страница 43: ...a Web browser session you must first install the firmware release on your PC and then upload the release to your access point For more information about the firmware see the release notes that accompa...

Страница 44: ...ade to start the upgrade The upgrade may take up to three minutes to complete 5 When the upgrade is complete reboot the access point to activate the new firmware Troubleshooting the Radio If the radio...

Страница 45: ...the signon screen appears You cannot connect to the access point using a Web browser If you access the Internet through a proxy server be sure you have added the IP address of the access point to the...

Страница 46: ...ing a Web Browser Session on page 2 3 2 Click Maintenance and then click About this Access Point The About this Access Point screen appears You should have the information on this screen available whe...

Страница 47: ...Specifications and Default Settings A...

Страница 48: ...asdf...

Страница 49: ...to 0 5A 50 to 60 Hz Weight 232 g 0 51 lb Height 9 32 cm 3 67 in Length 14 66 cm 5 77 in Width 3 53 cm 1 39 in Other Specifications Architecture Transparent bridge Ethernet interfaces 10BaseT twisted...

Страница 50: ...d wide Radio type Direct sequence spread spectrum Radio power output 32 mW 15 dBm Default Settings The factory default settings for the 2102 S are listed in this section You can record the settings fo...

Страница 51: ...IEEE 802 11b HR Radio Menu Defaults Parameter Name Range Default Site Setting SSID Network Name 0 to 32 characters INTERMEC Data Rate 1 2 5 5 or 11 Mbits 11 Mbits Data Rate Fallback Enabled or disabl...

Страница 52: ...aasdf...

Страница 53: ...Using External Antennas B...

Страница 54: ...asdf...

Страница 55: ...the built in antenna and attach an antenna cable directly to the radio card in the access point The following steps explain how to attach an antenna cable to the 2102 S For more information about ante...

Страница 56: ...t port is the receive only port Note that the antenna diversity system uses only one antenna at a time Intermec recommends that you use two antennas for optimal performance of your 802 11b HR radio If...

Страница 57: ...ate with Do not position the two antennas around a corner or so that a wall is between them The recommended antenna separation is listed in the following table You should choose the greatest distance...

Страница 58: ...Bi Dual Flat 063363 Antenna 2 4 GHz 5dBi Omni 063365 Antenna 2 4 GHz 15dBi Yagi 065349 Antenna 2 4 GHz 9dBi Omni 067263 Antenna 2 4 GHz 9dBi Flat Panel 071121 Antenna diversity 071122 Antenna corner 0...

Страница 59: ...Configuring HereUAre C...

Страница 60: ...asdf...

Страница 61: ...UAre Setup screen appears 3 Configure the parameters When you are finished click Submit Changes and follow the instructions that appear on your screen to save your changes The following table explains...

Страница 62: ......

Страница 63: ...Index I...

Страница 64: ...sadf...

Страница 65: ...B 6 address DNS 2 7 high 2 7 IP broadcast 2 7 low 2 7 MAC viewing 4 6 analyzing the 2102 S 4 3 antenna accessories list of B 6 adapter cables B 6 attaching B 3 diversity B 4 external using B 3 guideli...

Страница 66: ...F factory defaults settings list of A 4 resetting 1 9 FAQs 4 11 faulty radio LED pattern 4 10 FCC countries 3 5 filtering rate A 3 filters A 3 other A 3 protocol A 3 firmware confirming version 4 12 i...

Страница 67: ...b HR radio 3 4 DHCP server 2 7 HereUAre C 3 WEP 3 6 password changing 2 4 menu defaults A 5 Passwords screen 2 5 physical specifications A 3 placement guidelines antenna B 4 port control menu defaults...

Страница 68: ...unsupported DHCP options 2 7 upgrading firmware using a Web browser 4 9 using the MobileLAN access utility 4 8 uploading firmware 4 9 user name changing 2 4 menu defaults A 5 using the MobileLAN acce...

Отзывы: