background image

Intermec EasyCoder F4 – Installation & Operation Ed. 3


13


Chapter 2     Printing a Label

Printing Human Readables

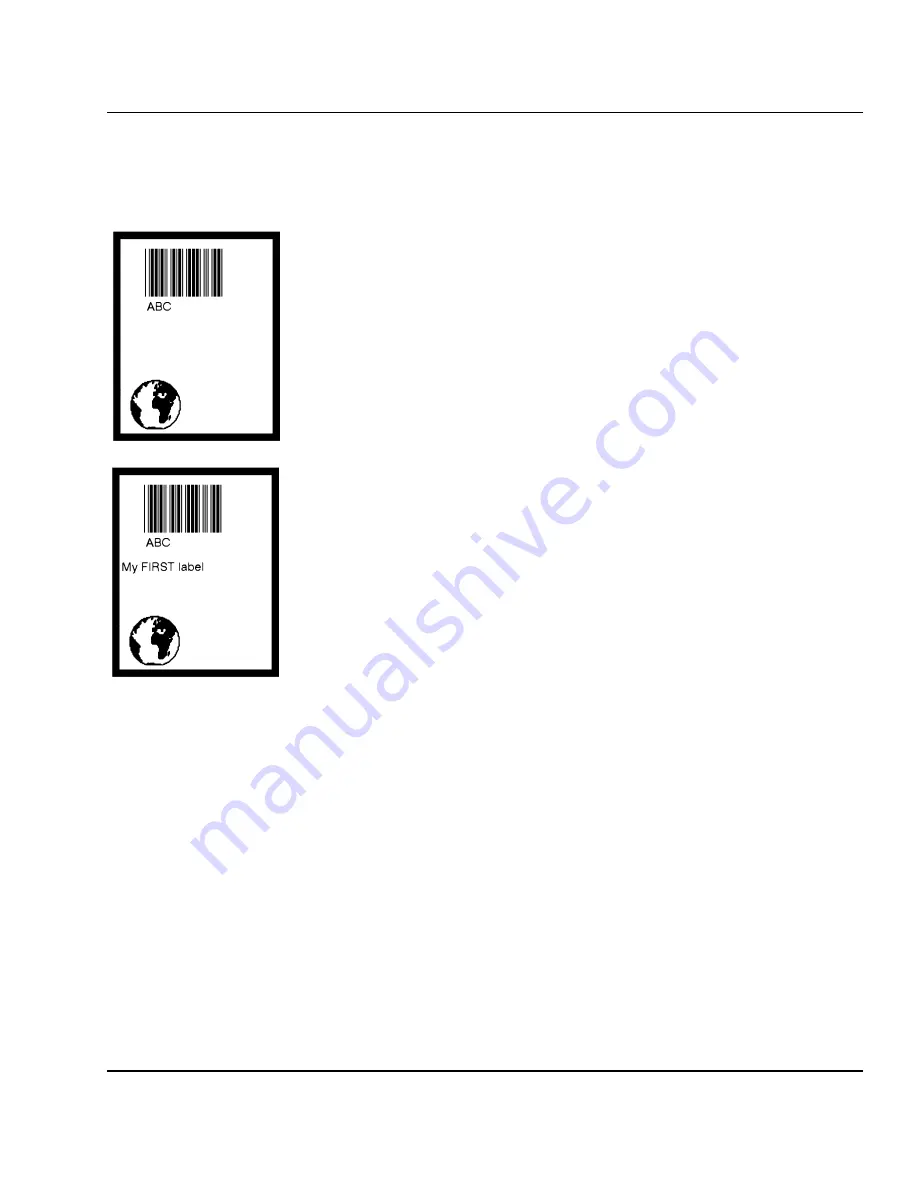
To get human readable text printed below the bar code, add these lines 
which enable bar code interpretation and select a font for it:

1     BARFONT ON 

2     BARFONT "Swiss 721 BT",6 

RUN 

Printing a Line of Text

Add a line of text at position X=25; Y=220, select a font, and fi nally 
provide the actual text:

80    PRPOS 25,220 

90    FONT "Swiss 721 BT", 6 

100   PRTXT "My FIRST Label" 

RUN 

Listing the Program

To view the whole program, type:

LIST 

The lines will be listed in ascending order on the screen of your 
PC:

1     BARFONT ON
2     BARFONT "Swiss 721 BT", 6
10  

PRPOS 

10,10

20  

PRBOX 

430,340,15

30  

PRPOS 

30,30

40  

PRIMAGE 

"GLOBE.1"

50  

PRPOS 

75,270

60  

BARTYPE 

"CODE39"

70  

PRBAR 

"ABC"

80  

PRPOS 

25,220

90    FONT "Swiss 721 BT", 6
100  PRTXT "My FIRST label"
200 PRINTFEED
300 END
ok

Using Intermec 
Fingerprint, cont.

Содержание EasyCoder F4

Страница 1: ...EasyCoderF4 BarCodeLabelPrinter Installation Operation P N 1 960467 02 Edition 3 September 2000 ...

Страница 2: ...nt 12 Using Intermec Direct Protocol 15 3 Installation Unpacking 16 Front View 17 Rear View 18 Media Compartment 19 Print Mechanism 22 Connections 23 Power 23 Computer 23 Controls and Indicators 24 Control Lamps 24 Display 24 Keyboard 24 Beeper 25 4 Starting Up Startup Files 26 Electronic Keys 26 Memory Card 27 Switching On 27 Display Messages at Startup 28 5 Media Load Tear Off Straight through 2...

Страница 3: ... Control 47 New Line 48 Receive Buffer 48 Transmit Buffer 48 Net Communication 49 New Line 49 Feed Adjust 49 Startadjust 49 Stopadjust 49 Media 50 Media Size 50 Media Type 52 Paper Type 52 Contrast 56 Testfeed 56 Print Defines 56 Head Resistance 56 Testprint 56 Print Speed 58 LTS Label Taken Sensor 59 Network 59 IP Selection 59 IP Address 59 Netmask 59 Default Router 59 8 Setup Mode Entering the S...

Страница 4: ...odel 79 Side Doors and Megatop 79 Integral Liner Takeup Unit 79 Media Supply Hub 79 3 inch Adapter 79 Quick Load Guides 80 Label Taken Sensor 80 EasySet Bar Code Wand 80 Real Time Clock 80 Interface Boards 81 11 Troubleshooting Troubleshooting List 82 12 Maintenance Printhead Cleaning 84 External Cleaning 86 Cleaning the Media Guides 87 Printhead Replacement 88 13 Adjustments Narrow Media Adjustme...

Страница 5: ...poration Torx is a registered trademark of Camcar Division of Textron Inc TrueDoc is a registered trademark of Bitstream Inc TrueType is a trademark of Apple Computer Inc Unicode is a trademark of Unicode Inc Windows is a trademark of Microsoft Corporation Appendix 2 cont Media 99 Non Adhesive Strip 99 Self Adhesive Strip 100 Self Adhesive Labels 101 Tickets with Gap 102 Tickets with Black Mark 10...

Страница 6: ...nication REGULATIONS COMPLIANCE DOC A This digital apparatus does not exceed the class A limits for radio noise emissions from a digital apparatus as set out in the radio interference regulations of the Canadian Department of Communication Ministère des Communications du Canada CONFORMITE DE REGLEMENTS DOC A Le présent appareil numérique n émet pas de bruits radio électriques dépassant les limites...

Страница 7: ...ing standards EMC EN 50 081 1 1992 EN 55 022 1994 EN 61 000 3 2 1995 class A EN 50 082 2 1995 EN 61 000 4 2 1995 EN 61 000 4 3 1996 ENV 50 204 1995 EN 61 000 4 4 1995 EN 61 000 4 6 1996 Electrical Safety EN 60 950 following the provisions of Directives 89 336 EEC and 73 23 EEC Mölndal 1999 09 01 Mats Gunnarsson President 1 Intermec assumes no responsibility regarding the CE Directive if the printe...

Страница 8: ...Coder F4 supports the unique and flexible Intermec Fingerprint v7 40 programming language which allows the user or third party developer to create custom made application programs and label formats in a BASIC like environment It is also designed to work with the Intermec Direct Protocol programming language and with the Intermec InterDriver The InterDriver allows you to design labels using standar...

Страница 9: ...left hand cover Dangerous voltage Do not remove the bottom plate Dangerous voltage Do not put your fingers inside the print mechanism when the power is on Place the printer on an even surface which can support its weight of approximately 7 kg 15 5 pounds plus supplies Donotspraytheprinterwithwater Ifyouareusingahosetoclean the premises in an industrial environment remove the printer or protect it ...

Страница 10: ...any other printer to produce printouts from any standard Windows program Connecting Printer and Host In the following examples we assume that you are using an ASCII terminal or a PC with a terminal program for example Microsoft HyperTerminal as a host We also assume that you are using the standard RS 232 serial interface to connect your printer with the host The printer contains a powerful micropr...

Страница 11: ... transfer ribbon see Chapter 6 If the printout becomes too light or too dark you will need to change the paper type parameter For help see Chapter 8 Setup Mode Startup and Communications Check Switch on the printer Provided the printer is not fitted with any custom madestartupprogram afterinitializationtheIntermecShell countdown menu will appear in the display window ENTER SHELL 5 sec v 4 4 4 sec ...

Страница 12: ...00 The printer will feed out a short piece of the label Then order the printer to pull back the label to its original position by typing FORMFEED 300 After loading a new type of label stock the printer should always be allowed to adjust itself according to the size and characteristics of the labels and liner Type TESTFEED The printer will feed out at least two labels while adjusting its sensors an...

Страница 13: ... does not execute the program until you have typed RUN Printing an Image Now we add the image GLOBE 1 after changing the print coordinates to X 30 Y 30 NotethatthecharactersenclosingthewordGLOBE 1arequotation marks ASCII 034 decimal 22 hex and indicate a string expression text as opposed to a numeric expression value The same applies to bartypes bar code input data barfonts text fonts and input to...

Страница 14: ...25 Y 220 select a font and finally provide the actual text 80 PRPOS 25 220 90 FONT Swiss 721 BT 6 100 PRTXT My FIRST Label RUN Listing the Program To view the whole program type LIST The lines will be listed in ascending order on the screen of your PC 1 BARFONT ON 2 BARFONT Swiss 721 BT 6 10 PRPOS 10 10 20 PRBOX 430 340 15 30 PRPOS 30 30 40 PRIMAGE GLOBE 1 50 PRPOS 75 270 60 BARTYPE CODE39 70 PRBA...

Страница 15: ...pt issue the following com mand SAVE LABEL1 Your program will be saved in the printer s permanent memory under the name LABEL1 PRG Loading the Program If you want to use this label later for example after having created more programs type LOAD LABEL1 PRG RUN A new copy of the label will be printed The Intermec Fingerprint offers many more advanced functions that allow you to create sophisticated a...

Страница 16: ...ter 9 First create a format LAYOUT INPUT tmp LABEL1 startformatrecorder BF ON enable bar code interpretation BF Swiss 721 BT 6 select bar code font PP 10 10 insertion point for boxfield PX 430 340 15 create a box PP 30 30 insertion point for imagefield PM GLOBE 1 select image PP 75 270 insertion point for bar codefield BT CODE39 selectbarcode type PB VAR1 variable input data to bar codefield PP 75...

Страница 17: ...As standard the box contains Intermec EasyCoder F4 printer Two sets of Quick Load guides wide and narrow Power cord at least one depending on model Quality check card Cleaning card Short strip of labels1 Adapter for 3 inch media roll core only in models fitted with a rotating media supply hub Starter pack of thermal transfer ribbon thermal transfer models only 1 User s Guide multilingual Installat...

Страница 18: ...the keyboard These features allow the operator to control and set up the printer manually in addition to the remote control facilitiesofferedbytheIntermecFingerprintprogramminglanguage and Intermec Shell The printed labels tickets or tags are presented at the front of the print mechanism Keyboard Display Window Side Door Print Key Control Lamps Print Mechanism ...

Страница 19: ...Off switch the AC power cord receptacle and various interface connectors and slots On Off Switch AC Power Cord Receptacle Memory Card Slot Machine Label RS 232 Serial Interface uart1 Provision for one Optional Interface Board Bar Code Wand Socket Provision for 1 or 2 Electronic Keys USB Socket for future applications ...

Страница 20: ... covers the print mechanism and gives easy access to the media stock The door is held by a magnetic lock It can be opened 180 to provide full access to the media compartment The media supply can be from a supply post or from an external supply of fan folds behind the printer There is also an optional rotating media supply hub Also see Chapter 10 Options Media Supply Roll Post w Guide Long Side Doo...

Страница 21: ...es since it can be moved vertically in the slot in the center section The bottom position is for small cores and the top position is for large cores The post is locked by a straight slot screw and has a moveable edge guide to fit various media widths To move the post to a different slot remove the screw twist the post a quarter of a turn and pull it out To fit the post rotate it a quarter of a tur...

Страница 22: ...alongsidedoor regardlessoftheexistenceofanyintegralliner takeup unit Maximum roll size is 152 mm 6 inches Position 2 is used when the printer has a short side door that only encloses the print mechanism but does not have an integral liner takeup unit Maximum roll size is 213 mm 8 38 inches Position 3 is used when the printer has a short side door and an integral liner takeup unit This position is ...

Страница 23: ...performance 8 dots per mm 203 2 dots per inch thermal printhead with quick mount fittings to facilitate replacement The thermal transfer ribbon mechanism is omitted in dedicated direct thermal printing models Ribbon Supply Hub Tear Bar Pressure Arm Printhead Lift Lever Edge Guide Platen Roller Thermal Printhead Ribbon Rewind Hub ...

Страница 24: ...lass B connector for the USB interface port see Appendix 3 RS 232 Serial Interface UsetheserialinterfacewithIntermecDirectProtocolorIntermec Fingerprint programming language because you can receive error messages from your printer Before you can use the serial interface you may need to set up the communication parameters such as baud rate parity etc as described in Chapter 7 Setting Up the Printer...

Страница 25: ...window contains an LCD Liquid Crystal Display with background illumination and two lines of text each with 16 characters It guides the operator through the setup and indicates possible errors during printing The Intermec Fingerprint programming language and the Intermec Direct Protocol allow custom made messages to be composed and displayed according to the requirements of the application The keyb...

Страница 26: ...en an error has occurred and acknowledges that a key has been pressed The Intermec Fingerprint programming language allows the key acknowledge signal to be turned off The frequency and duration of other signals can be specified Thus it is possible to create different signals for different conditions or even to make the printer play simple melodies ...

Страница 27: ...of the printer s memory If there are startup files stored in more than one part only one will be selected with the following priority 1 An autoexec bat file stored in a memory card provided the card was inserted in the printer before startup 2 An autoexec bat file stored in the read write part of the printer s permanent memory device c 3 The pup bat file Intermec Shell in the read only part of the...

Страница 28: ...d has been removed Firmware Cards automatically replace the printer s firmware usually with an updated version Important Always switch off the power before inserting or removing a memory card The manufacturer s logotype should face right when viewing the card as in the illustration above Before switching on the printer make the necessary connections insert any memory card you want to use and check...

Страница 29: ...in the display window immediately after initialization A Intermec Shell Startup Program standard printers ENTER SHELL 5 sec v 4 4 4 sec v 4 4 3 sec v 4 4 2 sec v 4 4 1 sec v 4 4 Refer to Chapter 9 for more information on Intermec Shell The digits in the lower right corner of the display window indicate the version of Intermec Shell B Custom Made Application Program non standard printers Any other ...

Страница 30: ...against the printer s tear bar This method is also known as straight through printing Use the Feed key see figure 10 when loading the same type of media When switching to a new type of media or if the printer does not feed out the media properly simultaneously press the Shift and Feed keys to perform a testfeed Tear off can be used for Non adhesive continuous stock Self adhesive continuous stock w...

Страница 31: ...empty core from the media supply roll post 4 3 6 Route the media through the print mechanism Then push it inwards as far as it will go This diagram shows the media path Fit a new roll of media on the supply post and adjust the edge guide so the roll becomes flush with the center section 2 1 4 3 2 1 4 3 ...

Страница 32: ...ad Tear Off cont Turn the printhead lift lever counterclockwise to engage the printhead Adjust the position of the green edge guide so the media is guided with a minimum of play 7 8 Close the side door 9 10 Press the Feed key to advance the media and adjust the media feed ...

Страница 33: ...Intermec EasyCoder F4 Installation Operation Ed 3 32 Chapter 5 Media Load Tear Off cont To tear off the media grab the outer edge and pull downwards 11 ...

Страница 34: ...m 3 15 inches wide The narrow type allows a media width as narrow as 40 mm 1 57 inches but it may be less suited for wide and thin media Illustrations in this chapter show the narrow type of guides Quick Load cannot be combined with peel off self strip opera tion Use the Feed key see figure 5 when loading the same type of media When switching to a new type of media or if the printer does not feed ...

Страница 35: ...ust the outer Quick Load guide to fit the width of the media Insert the media between the guides and feed it forward until the media reaches the platen roller and cannot be inserted any further 3 4 To tear off the media grab the outer edge and pull downwards Keep pushing the media forward while pressing the Feed key 5 6 ...

Страница 36: ...wound up on an integral liner takeup hub This is also known as Self strip operation Peel off operation cannot be performed when Quick Load guides are fitted Use the Feed key see figure 13 when loading the same type of media When switching to a new type of media or if the printer does not feed out the media properly simultaneously press the Shift and Feed keys to perform a testfeed Peel off can onl...

Страница 37: ...en remove any liner Remove any empty core from the media roll supply post Remove the edge guide if neces sary 3 Remove labels from the first 50 cm 20 inches of the liner Route the liner through the print mechanism and push it inwards Fit a new roll of labels on the supply post and adjust the edge guide so the roll becomes flush with the center section 6 5 ...

Страница 38: ...iner drive roller and back under the print mechanism and guide shaft Insert the start of the liner under the lip of the takeup hub then rotate the hub counterclock wise a few turns to wind up some of the liner 7 8 This diagram shows the media and liner paths 9 10 Turn the printhead lift lever counterclockwise to engage the printhead ...

Страница 39: ...Operation Ed 3 38 Chapter 5 Media Load Peel Off cont Adjust the position of the green edge guide so the media is guided with a minimum of play 11 12 Close the side door 13 Press the Feed key to advance the media and adjust the media feed ...

Страница 40: ...h short and long side doors and there is no need to remove the media supply roll post When using an external media supply take care to protect the media from dust dirt or other foreign particles that can impair the printout quality or cause unnecessary wear to the printhead All direct thermal media are more or less sensitive to heat direct sunlight moisture oil plasticizers fat and other substance...

Страница 41: ...hermal transfer printing the printer must be fitted with a transfer ribbon mechanism Thermal transfer printing makes it possible to use a wide range of receiving face materials Make sure to select a type of ribbon that matchesthetypeofreceivingfacematerial seeAppendix2 Media Specification and to set up the printer properly see Chapter 7 Setting Up the Printer The EasyCoder F4 can use transfer ribb...

Страница 42: ...termec thermal transfer ribbon Slide the ribbon roll onto the supply hub so the ink coated side faces down when the ribbon is routed through the print mechanism Route the ribbon through the print mechanism and pull out approximately 20 cm 8 inches of ribbon 3 4 5 6 In case of ribbon reload remove any used ribbon and empty ribbon core ...

Страница 43: ...se to engage the printhead and lock the ribbon Slide the empty cardboard core onto the ribbon rewind hub so the ribbon is wound up when the hub rotates counterclockwise Manually advance the ribbon until all of the transparent leader has passed the printhead and the ribbon becomes tight 7 8 9 10 Turn the printhead lift lever clockwise to raise the printhead and release the ribbon ...

Страница 44: ...Intermec EasyCoder F4 Installation Operation Ed 3 43 Chapter 6 Thermal Transfer Printing Ribbon Load cont Turn the printhead lift knob counterclockwise to engage the printhead Close the side door 11 12 ...

Страница 45: ...ntermec Fingerprint SETUP instruction to enter the Setup Mode See Chapter 8 Setup Mode in this manual Intermec Shell Use Terminal Setup option to change the setup remotely from the host Note that Intermec Shell automatically sets up the printer in regard of communication when an application is selected See Chapter 9 Intermec Shell in this manual Intermec Fingerprint Use setup strings to change ind...

Страница 46: ... Media type Label w Gaps Paper type Thermal Transfer Ribbon constant 90 Ribbon factor 25 Label offset 0 Low diameter 36 Contrast 0 Print Defines Print speed 100 mm sec Reading the Current Setup The printer s current setup values can be read from the printer s display window by browsing through the Setup Mode or from the host by browsing through the Terminal Setup of Intermec Shell You can list the...

Страница 47: ...n the printer and presents additional sets of communication setup menus depending on type of communication refer to diagrams 3 5 in Chapter 8 Setup Mode The serial communication parameters have no effect on parallel communications on Ethernet communications or on the IN and OUT ports on the optional Industrial Interface Board For the serial communication channel uart1 the following parameters can ...

Страница 48: ...The parity decides how the firmware will check for transmission errors There are five options None default Even Odd Mark Space Stop Bits The number of stop bits specifies how many bits will define the end of a character There are two options 1 default 2 Flow Control RTS CTS RTS CTS is a protocol where communication is controlled by currentsthroughseparatelinesinthecablebeingseteithertohigh or low ...

Страница 49: ...ds XON XOFF XOFF is sent from the printer when its receive buffer is filled to 75 and the transmission from the host is held waiting for an XON character When enough data have been processed so the receive buffer is filled only to 50 the printer sends an XON character and the host resumes transmitting data The same principles apply to XON XOFF sent by the host even if the percentage figure may dif...

Страница 50: ...dia will be fed out before the printing starts Thus the origin is moved further back from the forward edge of the copy A negative start adjustment means that the specified length of media will be pulled back before the printing starts Thus the origin is moved towards the forward edge of the copy Stop Adjust The Stop Adjust value is given as a positive or negative number of dots 1dot 0 125mm 4 9mil...

Страница 51: ...r the origin will be moved outwards away from the inner edge of the media path In other words the larger the X start value the wider the inner margin and the less available print width Width Specifies the width of the printable area in number of dots from the origin Thus the sum of the X start and width values gives the outer margin of the printable area The width should be set to prevent printing...

Страница 52: ...atically stopped to avoid feeding out a whole roll of media because of an LSS malfunction By setting up the X start the Width and the Length you will create a print window inside which the printing can be performed Any object or field extending outside the print window in any direction will either be clipped or cause an error condition Error 1003 Field out of label see Intermec Fingerprint v7 31 o...

Страница 53: ...found indicates that the last ordered label or ticket was successfully printed but no more labels tickets can be printed because of an empty media stock Paper Type The Paper Type parameters control the heat emitted from the printhead to the transfer ribbon or direct thermal media in order to produce the dots that make up the printout image Start by choosing between two alternatives Thermal Transfe...

Страница 54: ...r of the new label material General Paper Type Settings Guide Sensitivity1 Label Constant Label Factor Max Speed3 Low 100 115 40 100 Standard 86 99 40 125 High 70 85 40 175 Ultra high 50 69 40 200 1 Please note that preprint and varnish decrese the sensitivity of direct thermal media Thermal Transfer Printing Keep the Ribbon Factor for each ribbon type at the recommended value Decreaseorincreaseth...

Страница 55: ...te Coated 100 25 0 200 200 Transfer Premium 85 25 0 200 200 Premium Tag3 105 25 0 150 150 High Gloss White 95 25 0 150 150 Polyethylene Matt 75 25 0 150 150 Polyethylene Gloss 95 25 0 200 200 HP07 Matte Coated 100 25 0 150 150 Transfer Premium 95 25 0 200 200 Premium Tag3 105 25 0 150 150 High Gloss White 110 25 0 150 150 Polyethylene Matt 90 25 0 150 150 Polyethylene Gloss 100 25 0 200 150 HP05 M...

Страница 56: ...ag3 70 25 0 200 200 Duratran VG 70 25 0 150 150 Kimdura 70 25 0 200 200 Kimdura Tag 70 25 0 200 200 Syntran 65 25 0 200 200 Standard Duratran II 65 25 0 150 150 4085 Duratran II Tag3 75 25 0 150 150 Kimdura 80 25 0 150 150 Kimdura Tag 80 25 0 150 150 Syntran 70 25 0 150 150 Premium Duratran II 65 25 0 150 150 5050 Duratran II Tag3 75 25 0 150 150 Kimdura 80 25 0 150 150 Kimdura Tag 80 25 0 150 150...

Страница 57: ...er setting for the LSS At the same time the front edges of the labels tickets etc are detected so the feed control can position the media according to the Feedadjust parameter same as the Intermec Fingerprint statement TESTFEED The comparator and amplifier values of the LSS are displayed read only information Head Resistance The printhead resistance is measured automatically at startup read only i...

Страница 58: ...LINE CR LF REC BUF 300 TRANS BUF 300 PRINT CONFIG STARTADJ 0 STOPADJ 0 XSTART 24 WIDTH 808 LENGTH 1200 MEDIA TYPE LABEL w GAPS PAPER TYPE TRANSFER LABEL CONSTANT 85 LABEL FACTOR 40 RIBBON CONSTANT 90 RIBBON FACTOR 25 LABEL OFFSET 0 LOW DIAMETER 36 CONTRAST 0 TESTFEED 12 3 HEAD RESIST 681 PRINT SPEED 100 Odometer km 0 Model F4 Hardware version 3 0 Ram 4096 k Flash 0 2048 k External 0 k c 1819504 by...

Страница 59: ...larger media roll 152 mm 6 inches diameter and or narrow media width in combination with high print speed 150 mm 6 inches per sec could cause jerks in the media feed Such jerks will compress text and spoil the readability of ladder style bar codes placed close to the front edge of the label In case of batch printing only the first label in the batch will be affected Negative startadjust values ten...

Страница 60: ...TS will work Press Enter again and you will proceed to the LTS Test menu LTS Test Press Enter Alabelisfedout Removethelabelandanewlabel should be fed out automatically Repeat until you are sure the LTS works properly Then press Enter to stop and exit LTS Value Press Enter You can enter a new value in the range indicated in the LTS Adjust menu see above Min max values are in the range 0 to 10 If an...

Страница 61: ...splay shows the message Enter Shell x sec press Enter Press Setup this facility can be used anywhere within Intermec Shell Set up the printer as described in this chapter Return to Intermec Shell by pressing Setup EasyCoder F4 with a custom made application program Normally there is no need to enter the Setup Mode for custom made application programs Necessary provisions for changing the setup man...

Страница 62: ...in the Setup Mode Clear erroneously entered values Acknowledge and move to next menu Perform testfeeds in the Testfeed menu Print test labels in the Test Label menu Move down one level or scroll forward in a stack of options1 Display error message at test label printing failure Navigating in Setup Mode While going through the setup procedure you are guided by texts in the printer s display You can...

Страница 63: ...E RTS CTS DISABLE FLOWCONTROL ENQ ACK ENABLE ENQ ACK DISABLE FLOWCONTROL XON XOFF XON XOFF DATA TO HOST ENABLE DATA TO HOST DISABLE XON XOFF DATA FROM HOST ENABLE DATA FROM HOST DISABLE CR LF SER COM UART1 NEW LINE NEW LINE CR LF SER COM UART1 REC BUF REC BUF 300 SER COM UART1 TRANS BUF TRANS BUF 300 DETECTION FEEDADJ SETUP FEEDADJ FEEDADJ STOPADJ STOPADJ 0 STARTADJ 0 Continued on next page LEGEND...

Страница 64: ...E LABEL w GAPS 2 4 6 8 10 MEDIA TYPE 10 8 6 4 2 CONTRAST 0 PRINT DEFS HEAD RESIST SETUP PRINT DEFS SETUP NETWORK HEAD RESIST nnn PRINT DEFS TESTPRINT ENTER PRINT F5 NEXT 1 Read only value Printhead resistance is automatically set at startup The LTS setup menus are only displayed if an optional LTS Label Taken Sensor is installed in the printer Continued from previous page PRINT SPEED 100 PRINT DEF...

Страница 65: ...OM UART2 TRANS BUF TRANS BUF 300 If an optional Double Serial or Industrial Interface Board is installed in the printer additional menus will be displayed in case of Double Serial Interface Board also see Overview Part 4 The selected type of hardware connection on uart2 is displayed as one of the following alternatives read only RS232 422 NON ISOLATED 422 ISOLATED RS485 These menus are only displa...

Страница 66: ...FLOWCONTROL XON XOFF XON XOFF DATA TO HOST ENABLE DATA TO HOST DISABLE XON XOFF DATA FROM HOST ENABLE DATA FROM HOST DISABLE CR LF SER COM UART3 NEW LINE NEW LINE CR LF SER COM UART3 REC BUF REC BUF 300 SER COM UART3 TRANS BUF TRANS BUF 300 If an optional Double Serial Interface Board is installed in the printer additional menus will be displayed The selected type of hardware connection on uart3 i...

Страница 67: ...iew Part 2 Standard Setup Mode See Overview Part 2 Use and 0 9 to set netmask Use C to erase Use and 0 9 to set IP address Use C to erase Read Read Set NETWORK IP SELECTION SETUP NETWORK NETWORK IP ADDRESS IP ADDRESS 192 168 1 79 NETMASK 255 255 255 0 NETWORK NETMASK Use and 0 9 to set default router Use C to erase NETWORK DEFAULT ROUTER DEFAULT ROUTER 192 168 1 1 RARP BOOTP DHCP IP SELECTION MANU...

Страница 68: ...rinting setup onlabel Testfeed formfeeds auto adjustof theLSS Test Label printing of test labels Defaultsetup resettingall setup parameters to default UpdatePC card downloading data from a computer to a PC card inserted in the printer or upgrading the printer s firmware from aPC card Reboot restartingtheprinter Intermec Shell is factory installed in the printer s permanent memory device rom Ifyoui...

Страница 69: ...l will be opened If you use the same application all the time you will only need to switch on the power once the application has been selected If no other application has yet been selected the current version of Intermec Fingerprint will be opened with the standard RS 232 port uart1 selected as std I O channel see Intermec Fingerprint manuals When the countdown is completed you will see these line...

Страница 70: ...requires that you also select a standard IN OUT channel which is the channel you want to use for communication between the printer and the computer Normally you select uart1 Refer to the Intermec Fingerprint manuals Intermec Direct Protocol is an easy to use printer protocol for downloading label formats and variable input data to a printer from a host computer This option requires that you also s...

Страница 71: ...ent The labels are presented in an infinite loop so you can print the series over and over again Press Enter for each new label Default Setup allows you to reset all setup parameters to their default values as listed in Chapter 7 Setting Up the Printer Software Update is used for two purposes UpdatePC cardallowstheprintertobeusedasaFlashPCcard programmingdevice UsingtheZmodemcommunicationtool file...

Страница 72: ...HELL 5 sec v 4 4 ENTER SHELL 4 sec v 4 4 ENTER SHELL 3 sec v 4 4 ENTER SHELL 2 sec v 4 4 ENTER SHELL 1 sec v 4 4 Last selected application is started Default Fingerprint 7 40 w std I O uart1 Last selected application is started The selected application is started POWER ON Return to previous menu Proceed to next menu Accept displayed option and proceed or execute displayed option Perform a Testfeed...

Страница 73: ...change the printer s setup in the Setup Mode which you can enter by pressing the Setup key on the printer s built in keyboard Proceed as described in Chapter 8 Setup Mode Among the facilities in Intermec Shell you will also find a number of options that allow you to read or change the communication setup of the printer Setup This is another way of entering the Setup Mode where you can browse throu...

Страница 74: ... you transmit the triple T TTT or ttt to the printer the following message will appear on the printer s display SETUP FROM TERMINAL On the host screen another message will appear Welcome to SHELL v 4 4 in terminal mode Answer Y CR for Yes CR for No SHELL SEL APPLICATION Y N B From here on you can move around in Intermec Shell according to the diagram in the chapter Using Intermec Shell by answerin...

Страница 75: ...t application SHELL SEL APPLICATION Y N B Y SEL APPLICATION CURRENT APPL Y N B N SEL APPLICATION LABELSHOP Y N B N SEL APPLICATION WINDOWS DRIVER Y N B N SEL APPLICATION Fingerprint 7 40 Y N B Y STD I O CHANNEL UART1 Y N B Y When you have answered the final prompt the printer will start the selected application Terminal Setup cont Selecting an Application ...

Страница 76: ...the same principles as when using the printer s own keyboard see overviews in Chapter 8 Key Action u Move one menu to the left on the same level same as F1 d Move one menu to the right on the same level same as F2 e Display error message at test label printing failure same as F3 b Move up one level or scroll back in a stack of menus same as F4 f Move down one level or scroll forward in a stack of ...

Страница 77: ...t the Terminal Setup program step through all the facility options and select Reboot as illustrated below SHELL PRINT SETUP Y N B N SHELL TESTFEED Y N B N SHELL TEST LABEL Y N B N SHELL DEFAULT SETUP Y N B N SHELL SOFTWARE UPDATE Y N B N SHELL REBOOT Y N B Y Terminal Setup cont Exiting Terminal Setup ...

Страница 78: ...rs the transmission terminated and prints out a label As long as a continuous string of characters is being received the program wraps the lines until the label is full and then starts to print another label At the bottom of each label the following information is printed Page number Number of characters printed on the label Total number of characters received so far The Line Analyzer is displayed...

Страница 79: ...ions can easily be installed by the operator however a few should be installed by an authorized service technician or are only available as factory installed options Liner Takeup and Guide Shaft 3 inch Adapter Narrow Quick Load Guides Label Taken Sensor Short Side Door 1 5 inch Rotating Supply Hub Long Side Door Covers used when a transfer ribbon mechanism or liner takeup is not fitted Supply Roll...

Страница 80: ...ia Load Tear off with Quick Load The integral liner takeup unit is an optional device for peel off self strip operation which means the labels are separated from a liner backing paper after printing and the liner is wound up on an internal hub The unit also includes a guide shaft Peel off cannot be combined with Quick Load guides see below The rotating media supply hub is designed to fit media rol...

Страница 81: ...ns of the instructions LTS ON and LTS OFF respectively in Intermec Fingerprint and the Intermec Direct Protocol The EasySet bar code wand is primarily intended to facilitate paper type setup but it can also be used to change all other setup parameters This is done by scanning a pre printed Code 128 bar code created according to a special standard FNC3 in the bar code input data specifies a setup p...

Страница 82: ...rds are either factory fitted or can easily be fitted by an authorized service technician The EasyCoder F4 can accommodate one interface board The interface boards for the EasyCoder F4 are Parallel Interface Board IEEE 1284 Double Serial Interface Board Industrial Interface Board EasyLAN 100i Interface Board Ethernet Refer to Appendix 3 Interfaces for more information on interface boards ...

Страница 83: ...head Chapter 12 White lines along media path Printhead dirty Clean printhead Chapter 12 Missing dots on printhead Replace printhead Chapter 12 Large part of dot line missing Wrong X start or Width parameter Change parameter Chapter 7 Failing printhead Replace printhead Chapter 12 Failing strobe signal Check CPU board Call Service Printout missing along inner edge Bad media alignment Adjust Chapter...

Страница 84: ... replace thew ribbon and media This section describes how to clean the printhead using cleaning cards If additional cleaning is required for example removing adhesive residuefromtheplatenrollerortearbar useacottonswabmoistened with isopropyl alcohol Warning Isopropyl alcohol CH3 2 CHOH CAS 67 63 0 is a highly flammable moderately toxic and mildly irritating substance Open the side door Turn the pr...

Страница 85: ...thead Cleaning cont Remove any media and transfer ribbon Open the cleaning card envelope and pull out the cleaning card Read the warning text 3 4 Pull out the cleaning card 1 and raise the printhead 2 Insert most of the cleaning card under the printhead 1 Engage the printhead 2 6 5 ...

Страница 86: ... approx 30 seconds to allow the cleaning fluid to dissolve the residue Insert most of the cleaning card under the printhead 1 Engage the printhead 2 9 Allow the cleaned parts to dry before loading any media and ribbon Pull out the cleaning card If necessary repeat the process with a fresh cleaning card 8 7 10 ...

Страница 87: ...ys remove the power cord before cleaning Wipe external surfaces with a soft cloth slightly moistened with water or a mild detergent 3 Never use any sharp tools for removing stuck labels The printhead and rollers are delicate Never spray the printer Protect it from water when cleaning the premises 2 4 ...

Страница 88: ...r guide as described below and check for any object that may block the beam of light dust stuck labels adhesive residue etc If necessary clean the guides using a cleaning card or a soft cloth soaked with isopropyl alcohol Do not use any other chemicals Be careful not to scratch the guides Warning Isopropyl alcohol CH3 2 CHOH CAS 67 63 0 is a highly flammable moderately toxic and mildly irritating ...

Страница 89: ...ing printing Thus the printhead will require periodic replacement Time between printhead replacements depends on the print images the type of direct thermal media or thermal transfer ribbon in use the amount of energy to the printhead the print speed the ambient temperature and several other factors Caution While replacing the printhead the power should be off Open the side door Turn the printhead...

Страница 90: ...e magnet in the pressure arm 3 4 Disconnect the printhead bracket from the print mechanism as indicated by the arrows and pull out the printhead as far as the cables allow 6 5 Disconnect the cables from the printhead Note the snap lock on the inner connector Pull at the connectors not the cables Remove any media and transfer ribbon Snap lock ...

Страница 91: ...ect the two cables to the replacement printhead Put back the printhead in reverse order and check that the printhead cables run freely 9 Load a new supply of media and ribbon as described earlier in this manual Turn the printhead lift lever counterclockwise so the magnet engages the printhead bracket 8 7 10 ...

Страница 92: ...he media path To adjust the pressure arm proceed as follows Loosen the straight slot screw that holds the pressure arm Move the arm inwards or outwards until the arrow on the tip of the arm becomes centered with the media While moving the arm push at the part where the screw is situated not at the tip If the arm is hard to move lift the printhead and pull the printhead bracket free from the magnet...

Страница 93: ...d positions There is one part of the sensor on top of the upper media guide and another partunderneaththelowerguide Thesemustbeadjustedindividually to the same position Using a small screwdriver push them inwards as far as they go and then pull them out one at the time while counting the clicks from the snap locks A hole in the bottom plate gives access to the lower sensor part The various detecti...

Страница 94: ...ntscrewclockwise for more pressure or counterclockwise for less pressure Print a few labels preferably test labels see Chapter 7 Setting Up the Printer and check the printout Increased pressure generally gives a darker printout and vice versa Repeat until the desired result is obtained To return to the factory setting tighten the screw as far as it goes and then loosen it six full turns Caution Do...

Страница 95: ...t screw that is located immediately behind the front ribbon break shaft If the ribbon tends to slide outwards turn the screw carefully clockwise fw to move the outer end of the break shaft forward If the ribbon tends to slide inwards turn the screw carefully counterclockwise bw to move the outer end of the break shaft backward Important Before readjusting the break shaft make sure that there is no...

Страница 96: ...r 25 4mm 1 00inches PrintDirections 4 ModesofOperation Tear Off Straight through Yes Peel Off Self strip Optional withlinertakeupunit Firmware OperatingSystem IntermecFingerprintv7 40 Incl DirectProtocol SmoothFonts TrueDocandTrueTypefonts Built inscalablefonts std 15 Unicodefonts2 Built inbarcodesymbologies std 36 StartupProgram std IntermecShellv4 4 PhysicalMeasures Dimensions WxLxH 244x397x178m...

Страница 97: ...orpeel offoperation RotatingMediaSupplyHub Option Replacessupplypost 3 inchAdapterforMediaSupplyHub Option ShortSideDoor Option3 LongSideDoor Option3 LongSideDoorwith8 inchMegatop Option3 LabelTakenSensor Option RealTimeClock Option 10 yearslife RS 232Cable Option EasySetBarCodeWand Option Forquicksetup ParallelInterfaceBoard Option IEEE1284 DoubleSerialInterfaceBoard Option IndustrialInterfaceBoa...

Страница 98: ...ermal transfer printing in a wide range of quality grades Uncoatedpapersforeconomicalhigh volumeprintingtobeused with GP Basewax Standard ribbons Examples Vellum Coated papers with various coat weight smoothness and gloss to be used with HP Premium and GP Basewax Standard ribbons Examples Matte Coated Duratran VG Transfer Premium Duratran II Premium Tag Duratran II Tag High Gloss White Polyethylen...

Страница 99: ... mm 8 38 inches Max width 114 3 mm 4 50 inches Min width standard 25 mm 1 00 inches Min width Quick Load 40 80 mm 1 57 3 15 inches Max media thickness 175 µm 0 007 inches The maximum recommended media thickness is 175µm Thicker media may be used but print quality will be reduced The stiffness isalsoimportantandmustbebalancedagainstthicknesstomaintain print quality Media rolls to be loaded inside t...

Страница 100: ...Media Specifications Non Adhesive Strip Media a Media Width Maximum 114 3 mm 4 50 inches Minimum standard 25 0 mm 1 00 inches Minimum narrow Quick Load 40 0 mm 1 57 inches Minimum wide Quick Load 80 0 mm 3 15 inches Media Type Setup Fix length strip Var length strip ...

Страница 101: ...narrow Quick Load 40 0 mm 1 57 inches Minimum wide Quick Load 80 0 mm 3 15 inches b Liner The liner must not extend more than a total of 1 6 mm 0 06 inches outside the face material and should protrude equally on both sides c Media Width excluding liner Maximum 112 7 mm 4 43 inches Minimum 23 8 mm 0 94 inches Media Type Setup Fix length strip Var length strip Self Adhesive Strip Media cont ...

Страница 102: ...inimum label length of 4 mm 0 16 inches could be used It requires the sum of the label length d and the label gap e to be larger than 7 mm 0 28 inches that batch printing is used and that no pull back of the paper is performed Intermec does not guarantee that such short labels will work but it is up to the user to test this in his unique application e Label Gap Maximum 21 3 mm 0 83 inches Recommen...

Страница 103: ...and that no pull back of the media is performed Intermec does not guarantee that such short tickets will work but it is up to the user to test this in his unique application c LSS Detection Position Five fixed positions distance from inner edge of the media 3 mm 0 118 inches 8 mm 0 315 inches 12 mm 0 472 inches 16 mm 0 639 inches 20 mm 0 787 inches d Detection Slit Length The length of the detecti...

Страница 104: ...ength Maximum 21 3 mm 0 83 inches Common 12 5 mm 0 5 inches Minimum 5 0 mm 0 2 inches f Black Mark Y Position It is recommended that you place the black mark as close to the front edge of the ticket as possible and use a negative Stop Adjust value to control the media feed so the tickets can be properly torn or cut off Media Type Setup Ticket w mark Important Preprint that may interfere with the d...

Страница 105: ...ed papers and synthetic face materials High Resistance HR Super Premium transfer ribbons give an extremely durable printout which is resistant to most chemical agents and high temperatures However such transfer ribbons set high demands on the receiving face material which must be very smooth such as polyesters The use of HR Super Premium ribbons requires the print speed andtheenergysuppliedbythepr...

Страница 106: ...ial interface settings see Chapter 7 Setting Up the Printer Interface Cable Computer end DB 9pin or DB 25pin female connector PC Printer end DB 25pin male connector Host EasyCoder F4 Host Signal DB 9 DB 25 Signal DB 25 DB 25 Signal 1 1 1 1 shield RXD 2 2 TXD 2 3 RXD TXD 3 3 RXD 3 2 TXD CTS 8 4 RTS 4 5 CTS RTS 7 5 CTS 5 4 RTS 6 DSR 6 20 DTR GND 5 7 Signal GND 7 7 GND 16 5V1 16 DSR 6 20 DTR 20 6 DSR...

Страница 107: ...from a PC you need a special USB printer driver installed in your PC Using an USB Class A B cable connect the Class A end to your PC or hub and the Class B end to your EasyCoder F4 printer USB Universal Serial Bus USB Class A connector Connect to PC or hub USB Class B connector Connect to USB receptacle on the printer s rear plate Note The USB interface is presently not supported by the Intermec F...

Страница 108: ...t uart1 is both standard IN and OUT port 1 uart2 uart3 RS 232 RS 232 RS 422 Non isolated RS 422 Non isolated RS 422 Isolated 20 mA Current Loop RS 485 uart2 Serial Port The communication ports uart2 uses a DB 25pin female connector Pin SignalName Description 1 Notconnected 2 TxD RS 232Transmitter 3 RxD RS 232Receiver 4 RTS RS 232RequestToSend 5 CTS RS 232ClearToSend 6 DSR RS 232DataSetReady 7 GND ...

Страница 109: ...oop 10 20M1 20mAcurrentloop 11 TXD TXD20mAcurrentloop 12 TXD TXD20mAcurrentloop 13 20M2 20mAcurrentloop printeractivereceiver 14 20M2 20mAcurrentloop printeractivereceiver 15 RS422I RS 422Receive 16 5V 5Voltforexternaluse max 200mA 1 17 RS422I RS 422Receive 18 RxD TXD20mAcurrentloop 19 RS422O RS 422Transmit 20 DTR RS232DataTerminalReady 21 RS422O RS 422Transmit 22 RI RS 232RingIndicator 23 Shield ...

Страница 110: ... F4 can optionally be fitted with an IEEE 1284 I compatible parallel interface board1 The parallel port is addressed in Intermec Fingerprint as device centronics Select centronics as the standard IN port using the instruction SETSTDIO by default uart1 in standard IN port 2 Interface Cable Connectors Computer end Depends on type of host computer Printer end 36 pin IEEE 1284B Centronics socket Pin S...

Страница 111: ...ost can be configured for one of these options RS 232 RS 422 Non isolated RS 422 Isolated RS 485 This port is identical to uart2 on the double serial interface board The Industrial Interface Board also has a DB 44pin female connector with 8 digital IN ports with optocouplers 8 digital OUT ports with optocouplers 4 OUT ports with relays Refer to the installation instructions for the Industrial Inte...

Страница 112: ...ports most major computer systems and environ ments You can assign passwords to restrict both login and printer access The internal EasyLAN 100i Web pages allow you to con tinuously monitor printer status and to upgrade the flash memory of the printer when new firmware becomes available EasyLAN 100i supports SNMP for remote monitoring When an EasyLAN 100i interface board is installed in the printe...

Страница 113: ... theprinter emitsashortbeepandthe Ready controllamp on the printer s front blinks briefly 2 Read the appropriate bar code to set up the printer Hold the wand like a pencil and move it swiftly across the bar code 4 This manual only contains a selection of setup options Forinformationonhowtoproduceyour ownsetupbarcodes pleaserefertotheIntermec Fingerprint v7 xx Reference Manual Connect here Connecti...

Страница 114: ...Intermec EasyCoder F4 Installation Operation Ed 3 113 Appendix 4 EasySet Bar Code Wand Setup Serial Communication on uart1 Baud Rate Parity Char Length ...

Страница 115: ...ntermec EasyCoder F4 Installation Operation Ed 3 114 Appendix 4 EasySet Bar Code Wand Setup Serial Communication on uart1 cont No of Stop Bits RTS CTS XON XOFF Data to Host Reset comm to default ENQ ACK ...

Страница 116: ...ermec EasyCoder F4 Installation Operation Ed 3 115 Appendix 4 EasySet Bar Code Wand Setup Start and Stopadjust Peel Off Tear Off XON XOFF Data from Host New Line Serial Communication on uart1 cont Default ...

Страница 117: ...Intermec EasyCoder F4 Installation Operation Ed 3 116 Appendix 4 EasySet Bar Code Wand Setup Contrast ...

Страница 118: ...Intermec EasyCoder F4 Installation Operation Ed 3 117 Appendix 4 EasySet Bar Code Wand Setup Media Width Test Labels ...

Страница 119: ...Intermec EasyCoder F4 Installation Operation Ed 3 118 Appendix 4 EasySet Bar Code Wand Setup Media Length ...

Страница 120: ...Intermec EasyCoder F4 Installation Operation Ed 3 119 Appendix 4 EasySet Bar Code Wand Setup Print Speed Media Type ...

Страница 121: ...Intermec EasyCoder F4 Installation Operation Ed 3 120 Appendix 4 EasySet Bar Code Wand Setup Direct Thermal Printing Europe Paper Type Direct Thermal Printing USA ...

Страница 122: ...Intermec EasyCoder F4 Installation Operation Ed 3 121 Appendix 4 EasySet Bar Code Wand Setup Thermal Transfer Printing Europe Paper Type cont ...

Страница 123: ...Intermec EasyCoder F4 Installation Operation Ed 3 122 Appendix 4 EasySet Bar Code Wand Setup Thermal Transfer Printing Europe cont Paper Type cont ...

Страница 124: ...Intermec EasyCoder F4 Installation Operation Ed 3 123 Appendix 4 EasySet Bar Code Wand Setup Thermal Transfer Printing Europe cont Paper Type cont ...

Страница 125: ...Intermec EasyCoder F4 Installation Operation Ed 3 124 Appendix 4 EasySet Bar Code Wand Setup Thermal Transfer Printing U S A Paper Type cont ...

Страница 126: ...Intermec EasyCoder F4 Installation Operation Ed 3 125 Appendix 4 EasySet Bar Code Wand Setup Thermal Transfer Printing U S A cont Paper Type cont ...

Страница 127: ...Intermec EasyCoder F4 Installation Operation Ed 3 126 Notes ...

Отзывы: