background image

‐ 

41

 ‐ 

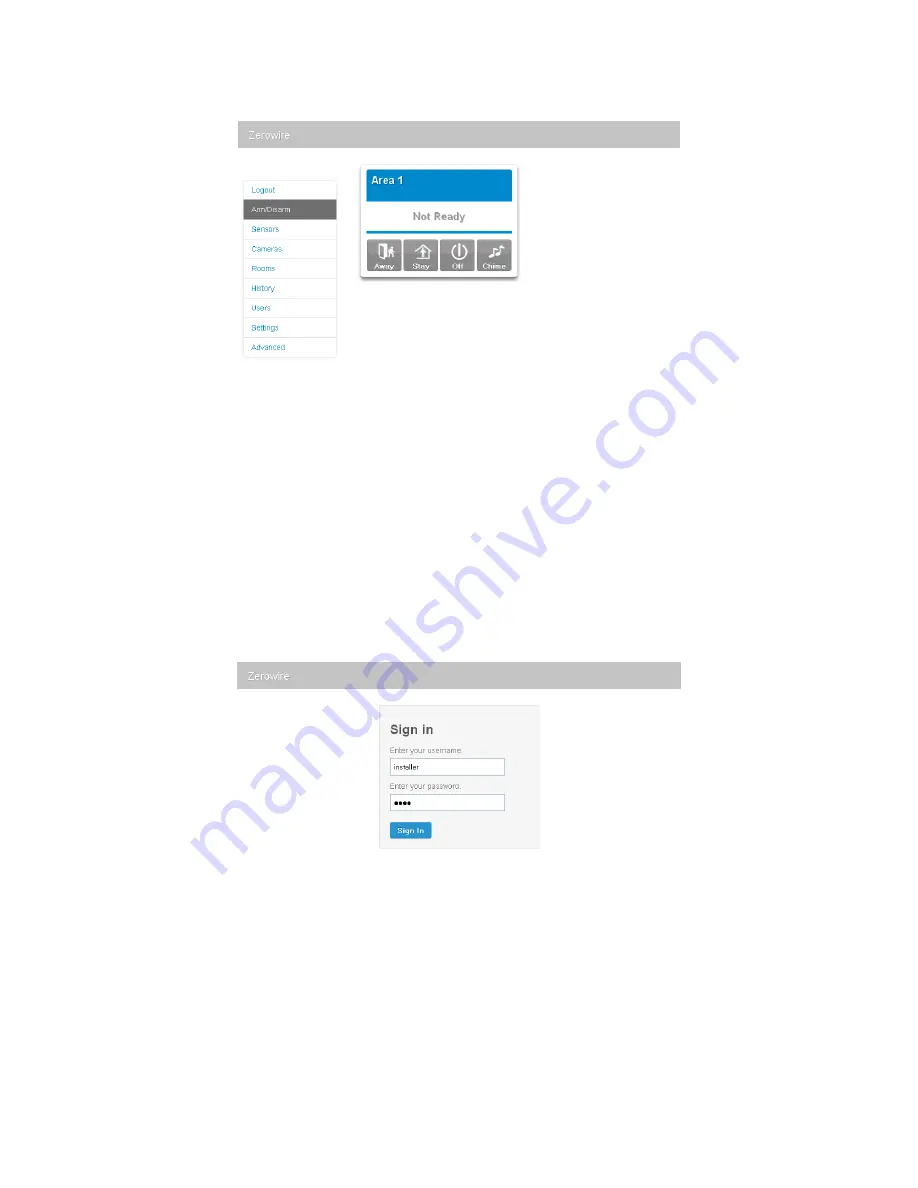
7.


You


should


now


see


a


screen


similar


to


below:


Wired


Setup


1.


Connect


power


to


your


ZeroWire.


2.


If


this


ZeroWire


was


previously


connected


via


WiFi,


switch


connection


mode


to


switch


to


Ethernet


by


pressing


Menu,


9,


Master


PIN,


7.


Press


7


again


if


it


announces


“WiFi


is


on”.


The


ZeroWire


will


announce


“Ethernet


is


on”


when


this


is


set


correctly.


Press


Menu,


Menu


to


exit.


3.


Connect


an


Ethernet


cable


to


the


rear


of


the


ZeroWire


and


wait


10


sec


for


the


local


router


to


assign


the


ZeroWire


an


IP


address.


4.


On


the


ZeroWire


press


Menu,


8,


[Master


PIN],


6


and


note


the


IP


address


announced.


If


you


hear


“IP


address


is


not


configured”


then


wait


a


further


30s


and


repeat


this


step.


5.


Open


your


web


browser.


6.


Enter


the


IP


address


from


step


3


and


the


ZeroWire


login


screen


should


appear.


Some


browsers


may


require


you


to


enter


http://


before


the


IP


address.


7.


Enter


your


username


and


password,


by


default


this


is


installer


and


9713

.


Содержание ZeroWire ZW-6400H

Страница 1: ...USER MANUAL ...

Страница 2: ... 2 ...

Страница 3: ... 3 Contents Welcome 4 1 Basic Features 8 2 Add Users Key Fobs 15 3 Smartphone App 20 4 Customize Your ZeroWire 25 Maintenance 33 Reference 36 ...

Страница 4: ... on your system 1 Arming and Disarming 2 Add users key fobs 3 Smartphone App 4 Customize your system Read through this guide to get the most out of your system The level of security ZeroWire can provide is dependent on The quantity quality and placement of security devices attached to this security system And the regular use of features including performing a weekly test ...

Страница 5: ... These parts should be provided Quick Reference Guide User Manual this document ZW 6400 ZeroWire with Wall Bracket Backup Battery Pack installed inside ZeroWire 9VDC Power Pack Optional Parts ZW ANT3M Extension Antenna ZW DS01 Desk Stand ZW HSPA Cellular Modem User Manual Quick Reference Guide ...

Страница 6: ... Key Colour Description Green steady All sensors are ready and the system can be armed in Away or Stay mode Green flashing Some sensors are unsealed but system is force armable If these sensors are not sealed by the end of the exit time the system will go into alarm READY Not lit System cannot be armed press the STATUS key for more info BYPASS Press the BYPASS key if you wish to isolate ignore a s...

Страница 7: ... 7 Back of ZeroWire ...

Страница 8: ...ors are not secure but you can still arm your security system Read more about the Forced Arming Feature on page 9 If the Status Key is not green press the Status Key to hear what sensors are not secured You may arm your system using your user PIN code 1 READY STATUS Check ready key is green Check status key is green 2 AWAY Select the Away Mode 3 4 Leave the premises To silence the Exit Delay beepi...

Страница 9: ... protected after it is fully closed as you leave If your service provider has enabled the forced arming feature you will be able to arm your security system even if pre selected sensors are not secure The Ready Light will flash green to indicate this feature is available Press Status key to hear which sensors are not secure Check with your installer to confirm how Forced Arming has been set up for...

Страница 10: ...not secure but you can still arm your security system Read more about the Forced Arming Feature on page 9 You may arm your system by entering your user PIN code 1 STATUS Check status key is green Close all protected doors and windows If you have movement sensors in your stay mode have everyone leave those partitions 2 STAY Select the Away Mode 3 4 Stay within the protected partitions or if your se...

Страница 11: ...d in Menu 8 by a master user Away and Stay modes can be configured with different entry delay times ask your service provider for further details Depending on how your system has been set up entry through a non designated door may cause the alarm to sound immediately for greater security 1 Enter the premises through a designated entry exit door 2 Approach the ZeroWire if you are detected by a sens...

Страница 12: ...eset and cleared from memory when your security system is next armed disarmed Your security system must be disarmed turned off before being able to bypass sensors After bypassing your selected sensors your security system must be armed turned on in either the away or stay mode to secure the remaining sensors The status light will turn to yellow to indicate there are one or more bypassed sensors To...

Страница 13: ...elect History Menu 2 3 Listen to the last alarm memory event 4 Exits from Chime Menu It is recommended you record user names sensor names and outputs names in Menu 8 Recordings This will make reviewing any events much clearer as ZeroWire will announce the recorded name You may also review all events recorded by your security system 1 HISTORY Select History Menu 2 3 Listen to the last alarm memory ...

Страница 14: ...esponse by a central monitoring station To cancel an emergency activation 1 Enter you code after an emergency key has been activated Sensor Reset Detection devices such as smoke detectors shock sensors and some glass breaks latch their alarm lights to indicate an alarm condition The alarm will stay on until it is reset by an authorized user Use this menu to acknowledge and clear the alarm Example ...

Страница 15: ... PIN code your ZeroWire will announce PIN code is occupied select a new user PIN code Add a Username The UltraConnect app requires a username and PIN code to function If you do not have these details login to ZeroWire Web Server to view or program usernames 1 On the ZeroWire press Menu 8 PIN 6 and note the IP address announced 2 Open your web browser and enter the IP address Some browsers may requ...

Страница 16: ...ult this is installer and 9713 4 You should now see a screen similar to below 5 Click Users 6 Enter a First Name this will be the username for the user on the UltraConnect app 7 Enter a PIN this will be the PIN for the user on the UltraConnect app ...

Страница 17: ...s User Configuration menu 2 3 Selects configure user PIN 4 Select user 4 5 Sets user 4 PIN code as 2580 6 Exits from Advanced system configuration Note User must have a unique PIN code If the new PIN code you enter is the same as another user s PIN code your ZeroWire will announce PIN code is occupied select a new user PIN code ENTER ENTER ENTER MENU MENU MENU 5 5 5 5 YOUR 4 OR 6 DIGIT MASTER CODE...

Страница 18: ...Configuration menu 2 3 Selects configure user type 4 Select user 6 5 Sets master user type 6 Exits from Advanced system configuration Add Keyfobs Keyfobs require special programming depending on your requirements Contact your security provider to purchase additional keyfobs Reset Installer Code The default installer code is 9713 If you forget this and need to reset it 1 Unplug the power pack and r...

Страница 19: ...instruction to do this Users created on the physical ZeroWire unit via the menus will not be assigned a username These users will not have remote access to the ZeroWire e g over the internet or using the smartphone app If you wish to give remote access to a user then you must assign a username via ZeroWire Web Server see Add a Username on page 15 or DLX900 desktop software If you have many users t...

Страница 20: ...pp When it is set to 00000000 the app is prevented from connecting Example View Web Access Code or change it to a new one 1 Select Sensor Configuration 2 3 Select Web Access Code 4 Web Access Code will be flashed on the key pad 5 Enter a new 8 digit Web Access Code or skip 6 Exits from Advanced system configuration User Name and PIN The UltraConnect app requires any username and PIN code to functi...

Страница 21: ...existing site 6 Enter the details of your security system this should be on the back of this manual if not please contact your service provider or builder for assistance The serial number is printed on the back of the ZeroWire unit Alternatively login to ZeroWire Web Server and go to Settings Details to view it The default Web Access Passcode of 00000000 disables remote access To change it login t...

Страница 22: ...isarm partitions by touching Away Stay or Off From this screen you can also enable or disable Chime mode The menu bar is located along the bottom of the app Touch Sensors to view sensor status From the Sensors screen you can touch Bypass to ignore a sensor or touch it again to restore it to normal operation You may also add or remove a sensor from the Chime feature ...

Страница 23: ...a live view of the camera Touch Latest Clip to view the last recorded clip by that camera You can also access video clips linked to History events by touching Play Video Clip from the History screen If you have Z Wave devices installed touch Rooms to view and control them ...

Страница 24: ... 24 Finally you may also change your PIN code by touching Change PIN Touch Save to update your PIN code If the user has Master User type then they will also be able to change PIN codes of other users ...

Страница 25: ...menu annunciation on off 4 Exits from Advanced system configuration Full Menu Annunciation Turning this feature On gives full descriptions to all the options within the main menu Turning this feature Off shortens the descriptions 1 Select main menu Option 8 Basic system configuration 2 3 4 Toggles voice annunciation on off 5 Toggles full menu annunciation on off 4 Exits from Advanced system config...

Страница 26: ...ght level 3 Set brightness level to 1 4 Exit menu Change Time and Date Time and date are normally automatically updated with an internet time server Example Manually set the time as 9 30AM and the date as 19 6 2014 1 Select main menu Option 8 Basic system configuration 2 3 Select time and date configuration 4 1 To configure the time and date 2 To configure the date 5 Enter the hours value 6 Enter ...

Страница 27: ... up to eight words to achieve your desired description Example Configure sensor 1 name as Dining Room Sensor 1 Select main menu Option 8 Basic system configuration 2 3 Select sensor name recording 4 Select sensor 1 5 Select word Dining from word library Select word Room from word library Select word Sensor from word library 6 Exits from Advanced system configuration If you do not require all eight...

Страница 28: ...rd User Names To make the system user friendly users 1 40 can have a recorded name Example Record user name for user 3 1 Select main menu Option 8 Basic system configuration 2 3 Select user name recording 4 Select user 3 5 Activate recording mode 6 Record voice maximum 2 seconds 7 Stop recording mode 8 Exits from Advanced system configuration SPEAK NAME HOLD DOWN HISTORY ENTER 1 ENTER RELEASE HIST...

Страница 29: ...cord an Entry or Exit Message 1 Select main menu Option 6 Voice Message Recording 2 3 1 Select exit message recording 2 Select entry message recording 4 History Activate recording mode Bypass Delete message 5 Record voice maximum 10 seconds 6 Stop recording mode 7 Exits from Advanced system configuration SPEAK HOLD DOWN HISTORY ENTER RELEASE HISTORY 1 MENU MENU MENU YOUR 4 OR 6 DIGIT MASTER CODE 6...

Страница 30: ... Toggle Chime Mode on or off 3 Exits from Chime Menu Add Sensor to Chime Group You can add and delete sensors from the chime group offering a flexible chime mode feature The sensors you have selected to be in the chime group stay in memory and are not cleared when the security system is armed and disarmed 1 CHIME Select Chime Menu 2 Select a sensor number 3 Add or remove the sensor to the Chime Gr...

Страница 31: ... 31 Add Z Wave Devices 1 Log in to ZeroWire Web Server or UltraConnect app 2 Click Settings Rooms and edit Room Names 3 Click Settings Z Wave Add Remove ...

Страница 32: ...f a Z Wave device has been added before or to another system you must first remove it before adding it to this system To do this click Remove then activate LINK or REMOVE mode on the device 7 Click Rooms 8 Check you can see the device you just added Click a button such as ON or OFF to verify you can control the device ...

Страница 33: ... to perform are Perform a Walk Test This is an important test to use regularly to verify that each sensor is working correctly Example How to perform a sensor walk test 1 Select main menu Option 4 System Test 2 3 Select sensor walk test 4 Walk past each motion sensor open and close windows and doors with sensors The ZeroWire will chirp the siren and announce the sensor name and the signal level of...

Страница 34: ... It provides temporary power to the ZeroWire when mains power is not available This may occur during a power outage or an intruder cutting power to a property The ZeroWire will automatically test the battery each day If the battery fails then your system can no longer protect your property in a power outage This is why replacing it when needed is very important The battery is a consumable part of ...

Страница 35: ...r communicator no sirens will sound and a test message will be sent to the central monitoring station Example Perform a communicator test 1 Call your central monitoring station and tell them you are performing a communicator test 2 Select main menu Option 4 System Test 3 4 Select communicator test 5 The central monitoring station will confirm the test message was received 6 Exits from System Test ...

Страница 36: ...h each menu and announce what options are available There are 9 main features used for customizing your security system Some menus require a Master User PIN code to access 1 Volume Level 2 Backlight Level 3 User Configuration 4 System Test 5 Sensor Configuration 6 Voice Message Recording 7 Sensor Reset 8 Basic System Configuration 9 Advanced System Configuration ...

Страница 37: ... forced arm 66 foyer 67 freezer 68 front 69 games 70 garage 71 gas 72 gate 73 glass 74 glass break 75 ground 76 guest 77 gun 78 gym 79 hall 80 hallway 81 heat 82 heating 83 hold up 84 home 85 home theatre 86 infra red 87 inside 88 instant 89 interior 90 key switch 91 Keychain 92 kitchen 93 lounge 94 laundry 95 lift 96 light 97 living 98 location 99 master 100 medicine 101 meeting 102 motion 103 ni...

Страница 38: ...e first detection device has been activated Forced Arming An option that permits arming even when there are unsealed pre selected sensors Generally assigned to sensors that cover the ZeroWire eg motion sensors front door reed switches allowing the user to arm the security system without the need to wait for those sensors to be sealed A security system that is ready to be force armed will flash the...

Страница 39: ... servicing your security system Unsealed A sensor in an abnormal state is unsealed The security system monitors each sensor for changes in state from sealed to unsealed and can respond with certain actions such as sounding the siren For example when a PIR sensor detects movement it will change from a sealed state to an unsealed state User Code A PIN code that is used by a user to arm or disarm the...

Страница 40: ...d a router supporting 802 11 b or 802 11g 1 Power on Connect power to your ZeroWire 2 Enable WiFi on ZeroWire On the ZeroWire press Menu 9 PIN 8 This will enable WiFi Discovery Mode for 10 min 3 Enable WiFi on your device Turn on WiFi on your device such as a smart phone tablet computer or laptop 4 Connect to ZeroWire Browse for available WiFi networks and select the ZeroWire_xxx network to connec...

Страница 41: ...Menu to exit 3 Connect an Ethernet cable to the rear of the ZeroWire and wait 10 sec for the local router to assign the ZeroWire an IP address 4 On the ZeroWire press Menu 8 Master PIN 6 and note the IP address announced If you hear IP address is not configured then wait a further 30s and repeat this step 5 Open your web browser 6 Enter the IP address from step 3 and the ZeroWire login screen shou...

Страница 42: ... unable to get an IP address then your wireless router may not be configured for automatic DHCP or certain security settings may be enabled Check your router settings and try again Cannot see local WiFi access point from smartphone Ensure your WiFi access point is able to accept 802 11b or 802 11g Some 802 11n access points may not accept 802 11g connections ...

Страница 43: ...n Name Is On in the away mode This partition is armed in the away mode Is On in the stay mode This partition is armed in the stay mode Is ready This partition is secure and ready to be armed Is not ready This partition is NOT ready to be armed a zone is not secure All partitions are on in the away mode All partitions in this multi partition system are armed in the away mode All partitions are on i...

Страница 44: ...displayed can be Saved Program Success Name Saved Sensors Page No Sensors Configured For Your Access Displayed on Sensors page when there are no sensors available to view WiFi Connection Was lost before a response was received Sent when No response received on a WiFi network change Data Entry Errors Data must only contain the following characters Date must be of the form YYYY MM DD Day must be fro...

Страница 45: ...quickly Modern self contained unit all in one box Battery backup your property is still protected if there is a loss of power 802 11 b g WiFi enables remote access via a web browser or smart phone IEEE 802 3 Compliant Ethernet use hardwired cable instead of wireless the choice is yours 3G Cellular radio support allows reporting alarm messages without a fixed line telephone service Full Reference G...

Страница 46: ...Degrees Celsius Back Up Battery Rechargeable Ni MH battery pack Current Draw 210 mA maximum 165 mA without voice Inputs 2x sensor inputs up to 6 6V seal with 3 3k EOL Outputs 2x open collector outputs at 100mA 30V max Dimensions W x H x D 190 mm x 140 mm x 32 mm Shipping Weight 1 Kg ...

Страница 47: ...radio communications However there is no guarantee that interference will not occur in a particular installation If this equipment does cause harmful interference to radio or television reception which can be determined by turning the equipment off and on the user is encouraged to try to correct the interference by one or more of the following measures Reorient or relocate the receiving antenna In...

Страница 48: ...In a web browser on your home network go to http zerowire My User Name is My PIN Code is UltraConnect App Login Download the UltraConnect App on to your smart phone My Serial Number is My Web Access Passcode is My Installer Details ...

Страница 49: ...he ZeroWire which will connect to a specific network which may be different than your phone 2 If a cellular radio module is pre installed skip to Check Signal Level If not remove the cover on the right 3 Locate the 10 pin lead inside the ZeroWire and connect this to the radio module Check Signal Level 4 Turn on power 5 Login to the ZeroWire Web Server 6 Click Settings Connection Status look at Sig...

Страница 50: ...na to another location if the signal is still too low Completing Installation 12 Insert the whole radio module in to the ZeroWire taking care not to crimp any cables 13 Replace the modem cover on the ZeroWire Specifications Power Provided by panel System Current Draw 750 mA max at 9V Operating Temperature Range 0 to 49 C 32 to 120 F Storage Temperature 34 to 60 C 30 to 120 F Maximum Humidity 90 re...

Отзывы: