


2 / 4
TruVision Recorder Operator Guide
Some of the functions can only be accessed after entering a valid user name and
password.
Controlling a PTZ camera
Left-click the mouse on the desired camera image to call-up the Quick Access
toolbar. Click the PTZ control icon in the toolbar to enter the PTZ mode.
If the display is in multiview format, it changes to full screen format for the
selected camera.
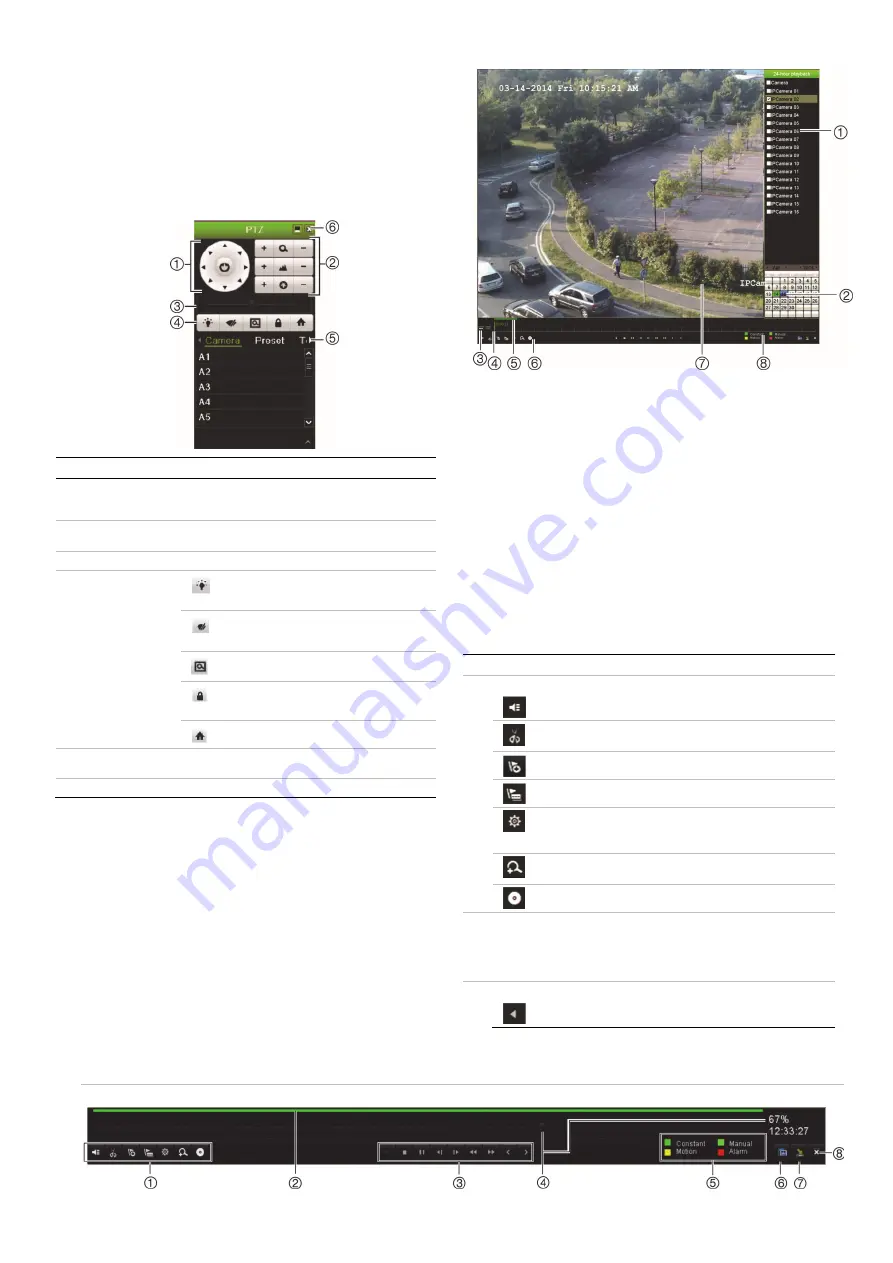
PTZ control panel
Name Description
1.
Directional
pad/auto-scan
buttons
Controls the movements and directions of the PTZ.
Center button is used to start auto-pan by the PTZ
dome camera.
2.
Zoom, focus, and
iris
Adjusts zoom, focus, and iris.
3. PTZ
movement Adjusts
the speed of PTZ movement.
4. Toolbar
Turns on/off camera light. This command is
not supported on all PTZ cameras.
Turns on/off camera wiper. This command is
not supported on all PTZ cameras.
Zoom area
Centers the PTZ dome camera image. This
command is not supported on all PTZ cameras.
Jumps to the home position.
5.
Select PTZ
command
Displays the desired function from the scroll bar:
camera, preset, preset tour or shadow tour.
6.
Exit
Exits the PTZ control panel.
Playback
There are four ways to play back video:
Instant playback of the most recently recorded video
24-hour playback of the day’s recorded video (This function is called “All-
day Playback” on some recorders)
Search the video archives by specific time, date, bookmark, snapshot, or
event
Search the system log
Playback window (24-hour/All-day playback shown)
1.
Camera panel
: Select the cameras for playback. Move the mouse over the
area to display the list of cameras available.
2.
Calendar panel
: Blue: Current date. Green/Yellow/Red: Recordings
available on the recorder.
3.
Zoom control
: Zoom in and out of the timeline to show the progress bar in
greater or lesser detail.
4.
Time line
: Time of actual playback. This is only displayed in 24-hour/All-day
playback.
5.
Playback progress bar
: This bar displays how much of the 24-hour period
has been recorded. Its color depends on the recording type.
6.
Playback control toolbar
(See below for more information).
7. Playback
viewer.
8.
Recording type
: Description of the color coding of the recording types that
appear in the playback progress bar.
Playback control toolbar
See Figure 1 below.
Description
1.
Audio and video toolbar
:
Audio
on/off.
Start/stop a video clip during playback. Sections of a
recording can be saved to an external storage device.
Add default bookmark.
Add customized bookmark.
Bookmark management. Click to see the list of bookmarks
and their times.
Note
: Not available on all recorders.
Digital zoom. Zoom in to a selected part of the video image.
This option may not be available on all recorders.
Archive files.
2.
Timeline
: Allows you to jump forwards or backwards in time. The
timeline moves left (oldest video) to right (newest video). Click a
location on it for where you want playback to start.
In 24-hour/All-day playback the cursor shows the actual time. In
search playback, the cursor is a ball.
3.
Playback control toolbar
.
Reverse play the recording. Click again to pause.
Figure 1: Playback control toolbar


