background image


D-0128073-C  – 2022/05 

AT235 - Instructions  for Use  - US 


Page 54 


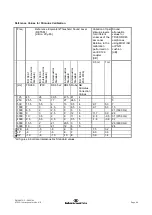
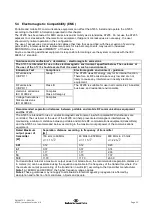
Guidance and Manufacturer’s Declaration - Electromagnetic Immunity 

The  AT235  is intended for use in the electromagnetic environment specified below. The customer or the user 

of the AT235


should assure that it is used in such an environment. 

Immunity Test 

IEC 60601 Test 

Level 

Compliance 

Electromagnetic 

Environment-Guidance 

Electrostatic 

Discharge (ESD) 


IEC 61000-4-2


+6 kV contact 


+8 kV air 


+6 kV contact 


+8 kV air 


Floors should be wood, concrete 

or ceramic tile. If floors are 

covered with synthetic material, 

the relative humidity should be 

greater than 30%. 

Electrical fast 

transient/burst  


IEC61000-4-4


+2 kV for power supply 

lines 


+1 kV for input/output 

lines


+2 kV for power supply 

lines 


+1 kV for input/output 

lines 

Mains power quality should be 

that of a typical commercial or 

residential environment. 

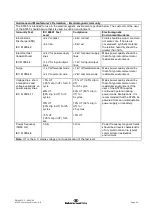
Surge 


IEC 61000-4-5


+1 kV differential mode 


+2 kV common mode 

+1 kV differential mode 


+2 kV common mode 


Mains power quality should be 

that of a typical commercial or 

residential environment.


Voltage dips, short 

interruptions and 

voltage variations on 

power supply lines  


IEC 61000-4-11 


< 5% 

U

T  

(>95% dip in 

U

T)  for 0.5 

cycle 


40% 

U

T  

(60% dip in 

U

T)  for 5 

cycles 


70% 

U

T  

(30% dip in 

U

T)  for 25 

cycles 


<5% 

U

T  

(>95% dip in 

U

T)  for 5 

sec


< 5% 

U

T  (>95% dip in 

U

T) 

for 0.5 cycle 


40% 

U

T  (60% dip in 

U

T) for 

5 cycles 


70% 

U

T  (30% dip in 

U

T) for 

25 cycles 


<5% 

U


Mains power quality should be 

that of a typical commercial or 

residential environment. If the 

user of the AT235


requires 

continued operation during 

power mains interruptions, it is 

recommended that the AT235


be 

powered from an uninterruptable 

power supply or its battery. 


Power frequency 

(50/60 Hz) 


IEC 61000-4-8


3 A/m


3 A/m


Power frequency magnetic fields 

should be at levels characteristic 

of a typical location in a typical 

commercial or residential 

environment.


Note: 

U

T is the A.C. mains voltage prior to application of the test level. 


Содержание AT235

Страница 1: ...Instructions for Use US AT235 Science made smarter D 0128073 C 2022 05 ...

Страница 2: ......

Страница 3: ...16 2 14 Probe Status 17 2 15 Use of standard and clinical probe system 18 2 16 AT235 Stand alone operation 18 2 16 1 AT235 Stand alone operation panel 18 2 16 2 Startup 19 2 16 3 Instrument settings language printer date time etc 20 2 16 4 Test and module selection 21 2 16 5 Tympanometry test screens 21 2 16 5 1 Tymp test screen 22 2 16 5 2 Reflex test screen 24 2 16 6 Audiometry test screen 26 2 ...

Страница 4: ...es 40 4 3 Cleaning the Probe Tip 41 4 4 Concerning Repair 42 4 5 Warranty 42 4 6 Periodic calibration 43 5 Technical Specifications 45 5 1 Calibration Properties 47 5 2 Reference equivalent threshold values for transducers 51 5 3 Pin Assignments 52 5 4 Electromagnetic Compatibility EMC 53 ...

Страница 5: ...nometric results in neonates The AT235 tympanometer is intended to be used by an audiologist hearing healthcare professional or trained technician in a quiet environment 1 3 Contraindications for performing impedance audiometry Recent stapedectomy or other middle ear surgery Discharging ear Acute external auditory canal trauma Discomfort eg severe otitis externa Occlusion of the external auditory ...

Страница 6: ...nstrument Clinical Probe System1 Diagnostic Probe System1 2 Power supply unit UES65 240250SPA3 Contralateral headphone1 Daily check cavity CAT50 option DD65v2 Audiometric headset Patient Response Option Printer kit Option Wall mounting kit Option Cleaning cloth Assortment bag BET55 1 Applied part as according to IEC60601 1 2 One can be selected ...

Страница 7: ...ngs cautions and notices are used WARNING indicates a hazardous situation which if not avoided could result in death or serious injury CAUTION used with the safety alert symbol indicates a hazardous situation which if not avoided could result in minor or moderate injury NOTICE NOTICE is used to address practices not related to personal injury ...

Страница 8: ...D 0128073 C 2022 05 AT235 Instructions for Use US Page 4 ...

Страница 9: ... Reporting Imperfections Inspect before connection Prior to connecting the product it should once more be inspected for damage All of the cabinet and the accessories should be checked visually for scratches and missing parts Report immediately any faults Any missing part or malfunction should be reported immediately to the supplier of the instrument together with the invoice serial number and a de...

Страница 10: ...l indicates that when the end user wishes to discard this product it must be sent to separate collection facilities for recovery and recycling 0123 The CE mark in combination with MD symbol indicates that Interacoustics A S meets the requirements of the Medical Device Regulation EU 2017 745 Approval of the quality system is made by TÜV identification no 0123 Medical Device Year of manufacture Do n...

Страница 11: ...d to supply mains with protective earth 5 Do not use any additional multiple socket outlet or extension cord For safe setup please refer to section 2 3 6 This instrument contains a coin type lithium battery The cell can only be changed by service personnel Batteries may explode or cause burns if disassembled crushed or exposed to fire or high temperatures Do not short circuit 7 No modification of ...

Страница 12: ...lectronic waste may contain hazardous substances and therefore has to be collected separately Such products will be marked with the crossed out wheeled bin shown below The cooperation of the user is important in order to ensure a high level of reuse and recycling of electric and electronic waste Failing to recycle such waste products in an appropriate way may endanger the environment and consequen...

Страница 13: ... Left Audiometry Left output 11 Contra Contra transducer output 2 6 Calibration cavities You can use the 0 2 ml 0 5 ml 2 0ml and 5 ml for validity check of the probe calibration To perform a calibration check select a protocol the measures a tympanogram Do not use an ear tip Place the probe tip completely into the cavity Perform the measurement Check the volume that was measured The allowed tolera...

Страница 14: ...Changing probe system Change between the standard and clinical probe as follows 1 Locate the probe connection on the back of the unit 2 Open the 2 locks by pushing them to the sides 3 Swap to the other probe system 4 Close the 2 locks by pushing them to the center ...

Страница 15: ...to all the following points 1 Use Microsoft supported operating systems 2 Ensure operating systems are security patched 3 Enable database encryption 4 Use individual user accounts and passwords 5 Secure psychical and network access to computers with local data storage 6 Use updated antivirus and firewall and anti malware software 7 Implement appropriate backup policy 8 Implement appropriate log re...

Страница 16: ... a position so that it is difficult to disconnect the device 2 10 License When you receive the AT 235 it already contains the license you have ordered If you would like to add licenses that are available in AT235 please contact your dealer for a license AT235 Medical power supply Mains outlet Medically approved safety transformer PC power supply PC Printer Mains outlet Medical power supply AT235 a...

Страница 17: ...nse keys and check your Suite Firmware and Build Versions Also in this window you will find the Checksum section which is a feature designed to help you identify the integrity of the software It works by checking the file and folder content of your software version This is using a SHA 256 algorithm On opening the checksum you will see a string of characters and numbers you can copy this by double ...

Страница 18: ...D 0128073 C 2022 05 AT235 Instructions for Use US Page 14 ...

Страница 19: ...should not be performed on patients with such symptoms without a medical doctor s approval 11 The presence of tinnitus hyperacusis or other sensitivity to loud sounds may contraindicate testing when high intensity stimuli are used NOTICE 1 Careful handling of the instrument whenever in contact with a patient should be given high priority Calm and stable positioning while testing is preferred for o...

Страница 20: ...brella shaped ear tip Umbrella ear tips seal the ear canal without the probe tip going into the ear canal Press the ear tip firmly into the ear canal in such a way that a seal remains during the complete test For more stable testing we recommend using an extension cord with a mushroom shaped ear tip Make sure that this ear tip inserts completely into the ear canal Mushroom shaped ear tips allow yo...

Страница 21: ... is in the ear and a seal is maintained Yellow Probe is in the ear and is blocked leaking or too noisy White The probe has just been attached Probe status is unknown If the probe light stays white in any other situation the AT235 may need to be switched off and back on again to regain proper probe status Blinking AT235 is pausing and or an interaction is expected The AT235 will for example remain ...

Страница 22: ... 13 Function keys The 10 function keys hold functions of which labels are displayed in the screen 14 Tests Hold down Test and use the wheel 19 to select the desired protocol or audiometry or impedance module Let go of the Test button to make your selection 15 New Session Clears data and starts a new session in the current module 16 Clients Press the Clients button to open a window in which a clien...

Страница 23: ...ter Start stop In audiometry it is the tone switch In tympanometry it interrupts or starts the auto start function and it operates as a stop and start button while the probe is in an ear In menus that require textual input the tone switch is used for making selections 23 Right Selects right ear for testing 24 Left Selects left ear for testing 2 16 2 Startup The AT235 will always load the last used...

Страница 24: ...he system hold the Language button 6 while using the wheel 19 to selecting the language of your choice The AT235 needs to be restarted for the change to be effectuated Use the wheel 19 to preselect Display light A LED light B Date and time C and Printer type D In order to make changes at Display light LED light and the Printer type hold the Change button 7 while rotating the wheel 19 In case the A...

Страница 25: ...time or press the Back button 12 to reject any change made 2 16 4 Test and module selection While holding the Tests button 14 use the wheel 19 for selecting either one of the protocols or a different module Release the wheel 19 for making your selection 2 16 5 Tympanometry test screens After startup the AT235 will have selected the last used impedance protocol and will be ready to start a test The...

Страница 26: ...e target pressure E The name of the current protocol F Protocol list showing which test is currently viewed and in the check boxes which tests will be tested after starting a test G Press Prev Test to select the previous test of the protocol list H Press Next Test to select the next test of the protocol list I Press Include to select or Exclude to deselect the checkbox of the currently viewed test...

Страница 27: ...zed by the capital in the button label N Pressing Child activates a train that will move across on the lower part of the screen to help distract the child while obtaining the measure Pressing 0 daPa results in quickly setting ambient pressure as target pressure and quickly pumping back to 0 daPa The function is only available in manual mode O O Activating manual mode in the tympanogram test allows...

Страница 28: ... manual mode O only The slider is moved by holding the pressure button see T and turning the wheel R The compliance meter shows an indication for the current non compensated compliance value and might be uses as a help to set the pressure at peak pressure or at an offset from peak pressure in manual mode O only S The currently selected reflex measurement is indicated by the rectangle around it Wit...

Страница 29: ...reflex is present while red blue indicates that the reflex is not present X Holding the Enlarge button show the currently selected reflex Q in highest available detail Y Pressing Child activates a train that will move across on the lower part of the screen to help distract the child while obtaining the measure In manual mode O the Add Stimulus button is available and allows adding new reflex rows ...

Страница 30: ...he presentation type tone or pediatric noise and the test frequency is shown D For clarity second channel information is shown although the AT235 cannot contain licenses to use this second channel E The cursor in the audiogram visualized the currently selected stimulus frequency and intensity F Press the 1 2 5 dB button 4 to toggle the dB step size The current step size is indicated on the label o...

Страница 31: ...rease the test frequency 2 16 7 Start and stop of a tympanometric test After startup the AT235 is ready to automatically start a measurement as soon as it detects that the probe is in the ear When the probe is in the ear the test can be manually stopped or paused and again started by pressing the Start stop button 22 or by pressing the probe button When the probe is out of the ear the test can be ...

Страница 32: ... is as follows Use the wheel 19 to scroll and use Enter 22 to select numbers to be inserted for the client ID Press the Next button 13 to proceed Use the wheel 19 to scroll and use Enter 22 to select letter to be inserted for the client s first name A clear backspace shift caps lock and spacebar function are found under the soft key buttons 4 to 8 Press the Next button 13 to proceed Use the wheel ...

Страница 33: ...ect the client by pressing the Select button 13 and a list of available sessions will appear Use again the wheel 19 to highlight the session that needs to be selected Press the View button 13 to show the historic session in a separate window Use the Next button 13 to browse through the tests in within the session Return to the test screen by pressing Back three times ...

Страница 34: ... required fields and click OK 4 Click on the Diagnostic Suite module icon at the top of the screen For further instructions about working with the database please see the operation manual for Noah 4 2 17 4 Crash Report In the event that the Diagnostic Suite crashes and the details can be logged by the system the Crash Report window will appear on the test screen as shown below The crash report pro...

Страница 35: ... Use US Page 31 2 17 5 Instrument setup Select Menu Setup Suite setup to open general suite settings Important Both at the AUD module and the IMP module please be sure to select the AT235 version 3 and not AT235 which refers to the old version ...

Страница 36: ...f language Menu Setup Suite Setup takes you to a window from where you can change the language or Print allows for printing the onscreen results directly to your default printer or to a pdf file You will be prompted to select a print template if the protocol does not have one linked to it refer to the Additional Information document for more details about the print wizard Save New Session saves th...

Страница 37: ...button opens a separate window for adding and saving notes to the current session The hardware indication picture indicates whether the hardware is connected Simulation mode is indicated when operating the software without hardware The protocol listing shows all tests that are part of the used protocol The test that is displayed in the test screen area is highlighted blue or red depending on the c...

Страница 38: ...r Print allows for printing the onscreen results directly to your default printer or to a pdf file You will be prompted to select a print template if the protocol does not have one linked to it refer to the Additional Information document for more details about the print wizard Save New Session saves the current session in Noah or OtoAccess or to a commonly used XML file when running in standalone...

Страница 39: ...ng entering an audiogram by clicking with the mouse Mouse controlled audiometry allowing stimulus presentation and storage by mouse control in the audiogram dB step size allowing to toggle between 1 2 and 5 dB step size Hide unmasked threshold allowing showing or hiding unmasked thresholds for which a masked threshold exists Transfer allowing updating the PC screen with data currently available in...

Страница 40: ...open underneath the AUD and IMP tabs in the upper right corner The SYNC tab provides the following possibilities Client upload is used for uploading clients from the database Noah or OtoAccess to the AT235 The internal AT235 memory can hold up to 500 clients and 50 000 sessions Session download is used to download audiogram and or tympanometry sessions from the AT235 memory to Noah OtoAccess or XM...

Страница 41: ... memory The internal AT235 memory can hold up to 500 clients and 50 000 sessions On the right side the clients currently stored on the internal AT235 memory hardware is down It is possible to remove all clients for individual clients using the Remove all or Remove buttons 2 18 5 Session download The following screen shot shows the session download screen When pressing the Find client button a wind...

Страница 42: ...D 0128073 C 2022 05 AT235 Instructions for Use US Page 38 ...

Страница 43: ...nd examine the audiometer and all accessories 2 Check earphone cushions plugs main leads and accessory leads for signs of wear or damage Damaged or badly worn parts should be replaced 3 Switch on equipment and leave for the recommended warm up time Carry out any set up adjustments as specified On battery powered equipment check battery state using the manufacturer s specified method Switch on equi...

Страница 44: ... always switch off and disconnect from the power supply Follow local best practice and safety guidelines if available Use a soft cloth lightly dampened with cleaning solution to clean all exposed surfaces Do not allow liquid to come in contact with the metal parts inside the earphones headphones Do not autoclave sterilize or immerse the instrument or accessory in any fluid Do not use hard or point...

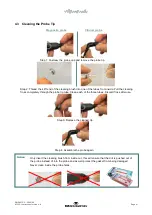
Страница 45: ...nd of the cleaning brush into one of the tubes from inside Pull the cleaning floss completely through the probe tip tube Clean each of the three tubes Discard floss after use Notice Diagnostic probe Clinical probe Only insert the cleaning brush from inside out this will ensure that the dirt is pushed out of the probe instead of into the probe and as well protect the gasket from being damaged Never...

Страница 46: ...ility Repair or replacement will be carried out at Interacoustics expense subject to the terms of this warranty The product requiring service should be returned promptly properly packed and postage prepaid Loss or damage in return shipment to Interacoustics shall be at purchaser s risk In no event shall Interacoustics be liable for any incidental indirect or consequential damages in connection wit...

Страница 47: ...nterval of a 3 or 6 month period based on instrument usage 3 When an audiometer or transducer has had a shock vibration malfunction or a repair or part replacement has been performed which potentially may have put the audiometer out of calibration 4 Whenever user observations or patient results appear to be the result of questionable operation of an audiometer Annual calibration It is recommended ...

Страница 48: ...D 0128073 C 2022 05 AT235 Instructions for Use US Page 44 ...

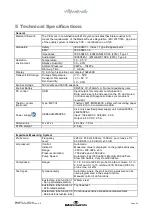
Страница 49: ...c module is required Thermal printer Optional Type MPT III Thermal MPT III HM E300 printer with recording paper in rolls Print on command via USB Power supply UES65 240250SPA3 Use only specified power supply unit model UES65 240250SPA3 Input 100 240VAC 50 60Hz 2 0 A Output 24 0 VDC 2 5A Dimensions H x W x L 29 x 38 x 7 5 cm AT235 Weight 2 5 kg Impedance Measuring System Probe tone Frequency Level ...

Страница 50: ...gle contra insert and or IP30insert for Reflex measurements Ipsi Earphone Probe earphone incorporated in the probe system for Reflex measurements Probe connection Connection of the electrical and air system to the probe Test types Manual Reflex Manual control of all functions Automated Reflex Single intensities Reflex growth Reflex Decay Automatic 10 dB above threshold and manually controlled with...

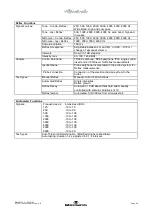
Страница 51: ...Fall time 20 ms A weighted SPL in Off 31 dB Impedance Calibration Properties Probe tone Frequencies 226 Hz 1 678 Hz 1 800 Hz 1 1000 Hz 1 Level 85 dB SPL 1 5 dB measured in an IEC 60318 5 acoustic coupler The level is constant for all volumes in the measurement range Distortion Max 1 THD Compliance Range 0 1 to 8 0 ml Temperature dependence 0 003 ml C Pressure dependence 0 00020 ml daPa Reflex sens...

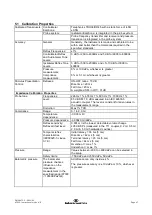
Страница 52: ... Calibration Standards and Spectral Properties General Specifications for stimulus and audiometer signals are made to follow IEC 60645 5 Contralateral Earphone Pure tone ISO 389 1 for TDH39 and ISO 389 9 for IP30 Wide Band noise WB Spectral properties Interacoustics Standard As Broad band noise specified in IEC 60645 5 but with 500 Hz as lower cut off frequency Low Pass noise LP Spectral propertie...

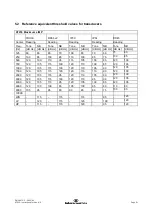
Страница 53: ...nteracoustics Standard Interacoustics Standard Interacoustics Standard Interacoustics Standard ISO 389 4 ISO 8798 0 5 ml 1 ml Hz TDH39 IP30 DD65 v2 DD45 Probe NB Stimulus Correction Values RETSPL 125 45 26 30 5 47 5 41 4 3 250 25 5 14 17 27 24 5 4 5 500 11 5 5 5 8 13 9 5 4 9 7 5 3 7 1000 7 0 4 5 6 6 5 6 9 7 5 3 15 1500 6 5 2 2 5 8 5 6 21 1600 Hz 2000 9 3 2 5 8 12 6 11 7 3 9 26 3000 10 3 5 2 8 11 6...

Страница 54: ... their performance Therefore the specifications can be subject to change without notice The performance and specifications of the instrument can only be guaranteed if it is subject to technical maintenance at least once per year This should be carried out by a workshop authorized by Interacoustics Interacoustics puts diagrams and service manuals at the disposal of authorized service companies Enqu...

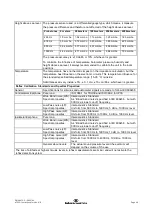
Страница 55: ... 80 65 85 70 100 85 70 60 75 60 250 100 85 100 85 110 100 85 75 100 85 500 120 100 110 95 115 105 100 85 120 100 750 120 105 115 100 120 110 100 85 120 105 1000 120 105 115 100 120 110 105 90 120 105 1500 120 105 115 100 120 110 110 90 120 100 2000 120 105 115 95 120 110 105 90 120 100 3000 120 105 115 100 120 110 95 90 120 105 4000 120 105 110 95 120 105 100 85 120 105 6000 120 100 100 85 105 100...

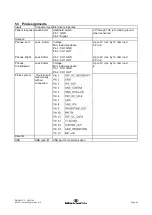
Страница 56: ...d Outputs Phones Left Phones Right Jack 6 3mm Jack 6 3mm Voltage Min load impedance Pin 1 CH1 GND Pin 2 CH1 OUT Pin 1 CH1 GND Pin 2 CH1 OUT Up to 3V rms by 10 ohm load 8 Pin 2 Up to 3V rms by 10 ohm load 8 Pin 2 Phones Contralateral Jack 6 3mm Voltage Min load impedance Pin 1 CH1 GND Pin 2 CH1 OUT Up to 3V rms by 10 ohm load 8 Probe system 15 pin D sub high density with air connection Data I O USB...

Страница 57: ...nt RF emissions CISPR 11 Class B The AT235 is suitable for use in all commercial industrial business and residential environments Harmonic emissions IEC 61000 3 2 Complies Class A Category Voltage fluctuations flicker emissions IEC 61000 3 3 Complies Recommended separation distances between portable and mobile RF communications equipment and the AT235 The AT235 is intended for use in an electromag...

Страница 58: ...nment Surge IEC 61000 4 5 1 kV differential mode 2 kV common mode 1 kV differential mode 2 kV common mode Mains power quality should be that of a typical commercial or residential environment Voltage dips short interruptions and voltage variations on power supply lines IEC 61000 4 11 5 UT 95 dip in UT for 0 5 cycle 40 UT 60 dip in UT for 5 cycles 70 UT 30 dip in UT for 25 cycles 5 UT 95 dip in UT ...

Страница 59: ... Field strengths from fixed RF transmitters as determined by an electromagnetic site survey a should be less than the compliance level in each frequency range b Interference may occur in the vicinity of equipment marked with the following symbol NOTE1 At 80 MHz and 800 MHz the higher frequency range applies NOTE 2 These guidelines may not apply in all situations Electromagnetic propagation is affe...

Страница 60: ...et Interacoustics DD65 v2 IP30 Insert Phone 10ohm single Interacoustics IP30C DD45 Audiometric Headset P3045 Interacoustics DD45 IP30 Insert Phone 10ohm set Interacoustics IP30 Conformance to the EMC requirements as specified in IEC 60601 1 2 is ensured if the cable types and cable lengths are as specified below Description Length Screened Mains Cable 2 0m Unscreened USB Cable 2 0m Screened Clinic...

Отзывы: