Disassembly
Removing and Installing the Keyboard 2 - 9
2.Disassembly
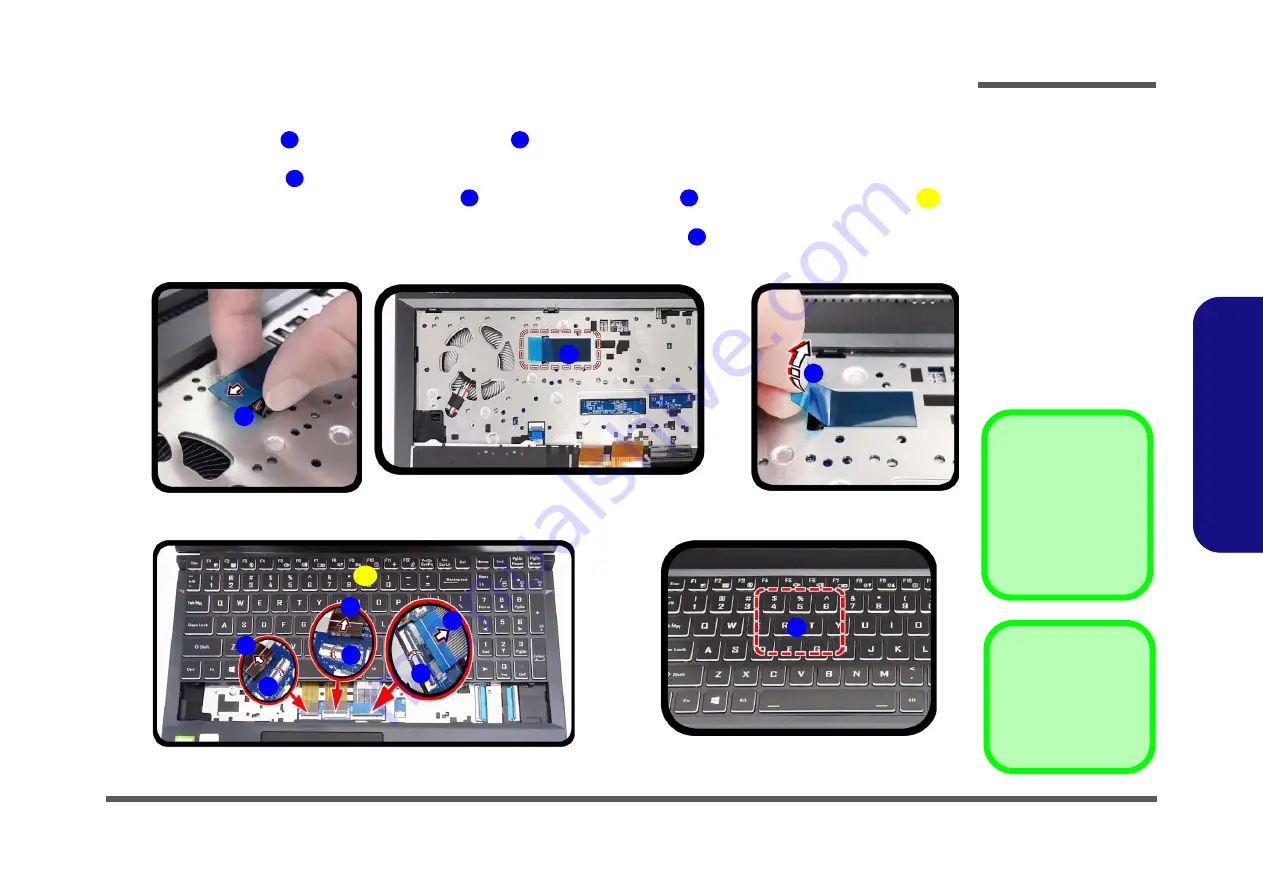
Keyboard Installation Procedure
1. Make sure to insert
a part of the adhesive mylar
and then install it properly in the location as shown (
a
).
2. Pull the mylar cover
to reveal the adhesive side of the mylar (
b
).
3. Carefully connect the keyboard ribbon cable
to the locking collar socket
and then insert the keyboard
in
place (
).
4. Make sure to press the keyboard downward in the indicated area as shown
to ensure that it sticks to the adhe-
sive mylar (
). Apply pressure atleast 2kg for 10 seconds.
1
2
3
4
5
6
7
a.
3
1
5
6
b.
2
c.
4
4
4
5
5
d.
7
6. Keyboard
Figure 5
Keyboard
Installation
a. Install the adhesive my-
lar.
b. Remove the mylar cov-
er.
c. Connect the keyboard
ribbon cable to the lock-
ing collar socket and in-
sert the keyboard in
place.
d. Make sure to press the
keyboard toward the
computer.
Re-inserting the Key-
board
When re-inserting the
keyboard firstly, align the
keyboard tabs at the bot-
tom of the keyboard with
the slots in the case.
Содержание PC50HP
Страница 1: ...PC50HS G PC50HR G PC50HP G PC51HS G PC51HR G PC51HP G...
Страница 2: ......
Страница 24: ...Introduction 1 12 1 Introduction...
Страница 42: ...Disassembly 2 18 2 Disassembly...
Страница 45: ...Top A 3 A Part Lists Top Figure A 1 Top...
Страница 46: ...A 4 Bottom A Part Lists Bottom Figure A 2 Bottom...
Страница 47: ...Main Board A 5 A Part Lists Main Board Figure A 3 Main Board...


