4
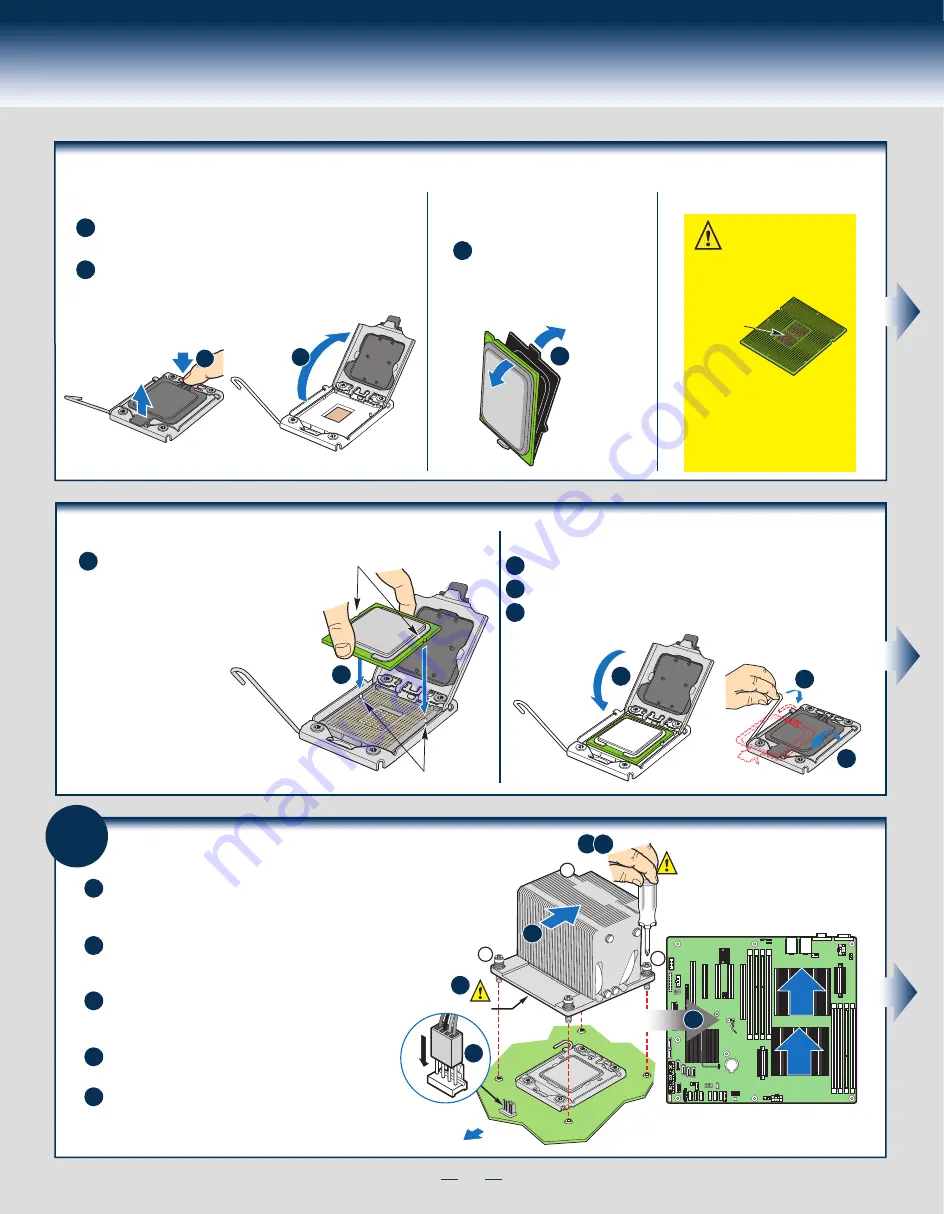
General Installation Process
6
Install Heat Sink(s)
A
B
C
D
E
Server
Board
CPU 2 Heat Sink
CPU 1 Heat Sink
A
I
R
F
L
O
W
A
I
R
F
L
O
W
Air Flow
CAUTION:
Do not
over-tighten
fasteners.
NOTE: Heatsink
styles may vary
2
3
1
TIM
Chassis Front
E
A
B
B
C D
If a protective film covers the thermal interface material
(TIM) on the underside of the heatsink, remove the
protective film.
Align the heat sink fins to the front and back of the
chassis for correct airflow. Airflow goes from
front-to-back of chassis.
Using a #2 Phillips* screwdriver, finger-tighten
each fastener diagonally, according to the
white-circled numbers.
Securely re-tighten each fastener again in
the same order as performed in Step C.
(Optional:Please check your chassis
User
Guide
)Attach active heatsink fan power cable to
server board as shown.
Install the Processor(s) ...
continued
B. Open the Load Plate
Open the load plate as shown.
A
B
A
B
Push the rear tab with your finger tip to bring the
front end of the load plate up slightly.
C. Remove the Processor
Protective Cover
A
A
Take the processor out of the
box and remove the protective
shipping cover.
D. Install the Processor
CAUTION: The underside
of the processor has
components that may damage
the socket wires if installed
improperly.
DO NOT DROP processor
into the socket!
Components
Processor must align correctly
with the socket opening before
installation.
Install the Processor(s) ...
continued
Orient the processor with the socket
so that the orientation notches on
the processor align with the two
orientation posts on the socket.
A
Install the processor as shown.
Orientation Posts
Orientation Notches
A
E. Close Load Plate and Socket Lever
A
Close the socket lever.
C
B
A
B
C
Close the load plate all the way as shown.
Remove the protective cover after it been automatically disengaged from
the load plate.
Содержание P4304SC2SFEN
Страница 2: ...This page is intentionally left blank...
Страница 18: ...G63272 001...


