background image

Intel NUC Kit NUC8i7HNK & NUC8i7HVK User Guide 


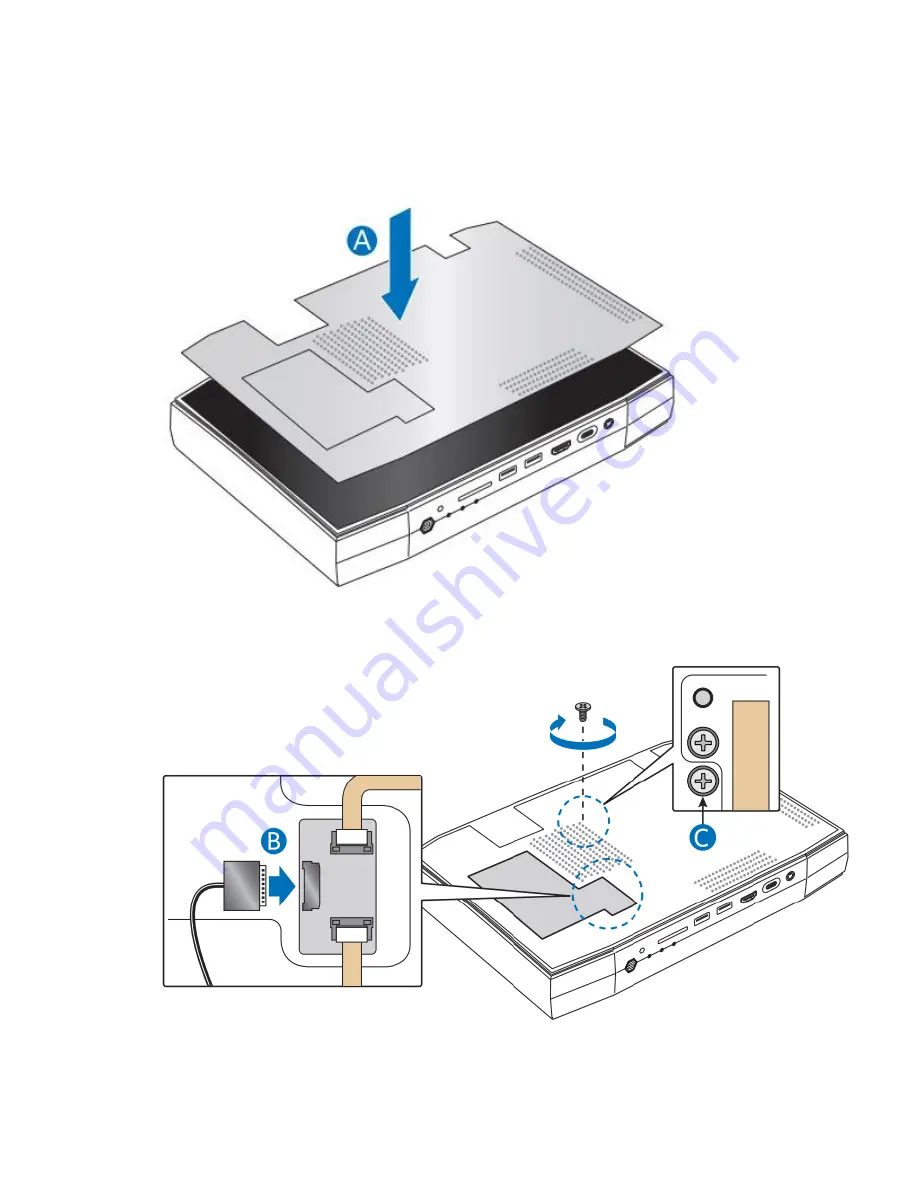
Closing the Chassis 


After all the components have been installed, close the Intel NUC chassis. Intel recommends this be done 
by hand with a screwdriver to avoid over-tightening and possibly damaging the screws. 


1.


Place the top plate on the NUC chassis. 


2.


Reattach the cable and secure the screw with a screwdriver. 


3.


Place the top lid on the NUC and use the hex tool to tighten all the screws. 


Содержание NUC8i7HNK

Страница 1: ...Intel NUC Kit NUC8i7HNK NUC8i7HVK User Guide 1 Intel NUC Kit NUC8i7HNK Intel NUC Kit NUC8i7HVK User Guide ...

Страница 2: ...odel serial numbers installed options and configuration information Electrostatic discharge ESD can damage components Perform the procedures described in this chapter only at an ESD workstation using an antistatic wrist strap and a conductive foam pad If such a station is not available you can provide some ESD protection by wearing an antistatic wrist strap and attaching it to a metal part of the ...

Страница 3: ...Install a VESA mount bracket Connect power Install an operating system Install the latest drivers Open the Intel NUC Chassis To open the Intel NUC chassis follow these steps 1 Using the included hex wrench unscrew the six screws on the top cover of the chassis and lift the cover 2 Detach the cable from the top of the NUC ...

Страница 4: ...Intel NUC Kit NUC8i7HNK NUC8i7HVK User Guide 4 3 Unscrew the single screw to release the top plate ...

Страница 5: ...e of the SO DIMM with the key in the socket 4 Insert the bottom edge of the SO DIMM into the socket 5 When the SO DIMM is inserted push down on the outer edge of the SO DIMM until the retaining clips snap into place Make sure the clips are firmly in place To remove memory follow these steps 1 Observe the precautions in Before You Begin on page 2 2 Turn off all peripheral devices connected to the c...

Страница 6: ...l notch at the bottom edge of the M 2 card with the key in the connector 3 Insert the bottom edge of the M 2 card into the connector B 4 Secure the card to the standoff with the small silver screw C To install a 42mm M 2 SSD 1 Remove the small silver screw from the metal standoff on the motherboard A 2 Move the standoff B from the 80mm position to the 42mm position C 3 Align the small notch at the...

Страница 7: ...e the Intel NUC chassis Intel recommends this be done by hand with a screwdriver to avoid over tightening and possibly damaging the screws 1 Place the top plate on the NUC chassis 2 Reattach the cable and secure the screw with a screwdriver 3 Place the top lid on the NUC and use the hex tool to tighten all the screws ...

Страница 8: ...uide 8 Attaching and Using the VESA Bracket Optional Follow these instructions to attach and use the VESA mount bracket 1 Using the four small black screws that were included in the box attach the VESA bracket to the back of the monitor or TV ...

Страница 9: ...Intel NUC Kit NUC8i7HNK NUC8i7HVK User Guide 9 2 Attach the two slightly larger black screws to the bottom chassis cover of the Intel NUC 3 Slide the Intel NUC onto the VESA mount bracket ...

Страница 10: ... to be purchased separately Power cords are available at many Internet sites for use in multiple countries The connector on the power adapter is a C13 type connector BOXNUC8i7H x K1 US power cord included BOXNUC8i7H x K2 EU power cord included BOXNUC8i7H x K3 UK power cord included BOXNUC8i7H x K4 Australia New Zealand power cord included Connect the power cord to the adapter A Plug the power adap...

Страница 11: ... Refer to Operating System Installation for system requirements and installation steps Installing Drivers To download the latest Microsoft Windows drivers and BIOS updates go to Download Center Links Intel NUC Kit NUC8i7HNK Intel NUC Kit NUC8i7HVK Drivers are available for the following features Audio Bluetooth Chipset Consumer Infrared Graphics Intel ME Intel Rapid Storage Technology Intel Ready ...

Отзывы: