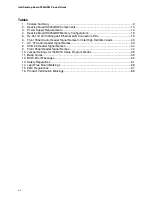
Contents
vii
Figures
1. Desktop Board D945GRW Components .......................................................................12
2. LAN
Connector LEDs....................................................................................................18
3. Location of Standby Power Indicator.............................................................................22
4. Installing the I/O Shield .................................................................................................28
5. Desktop Board D945GRW Mounting Screw Hole Locations .........................................29
6. Lift
Socket
Lever ...........................................................................................................30
7. Lift the Load Plate and Don’t Touch the Socket Contacts .............................................30
8. Remove
the
Protective Socket Cover ...........................................................................31
9. Remove the Processor from the Protective Processor Cover/Do Not Touch.................31
10. Install Processor ...........................................................................................................32
11. Close the Load Plate ....................................................................................................32
12. Position the Thermal Module Over the Mounting Holes ................................................33
13. Use Care Routing the Thermal Module Fan Cable........................................................34
14. Secure the Thermal Module..........................................................................................34
15. Connect the Thermal Module Fan Cable ......................................................................35
16. Dual Channel Memory Configuration Example 1...........................................................36
17. Dual Configuration Example 2 ......................................................................................37
18. Dual Configuration Example 3 ......................................................................................37
19. Installing a DIMM ..........................................................................................................38
20. Connecting the IDE Cable ............................................................................................40
21. Connecting the Serial ATA Cable .................................................................................41
22. Internal Headers ...........................................................................................................42
23. Back Panel Audio Connectors ......................................................................................45
24. Location of Fan Headers...............................................................................................46
25. Connecting Power Supply Cables.................................................................................47
26. Location of the BIOS Configuration Jumper Block ........................................................48
27. Removing the Battery ...................................................................................................54
28. F2 Key ..........................................................................................................................55


