background image

Intel Desktop Board D975XBX Product Guide 

36   


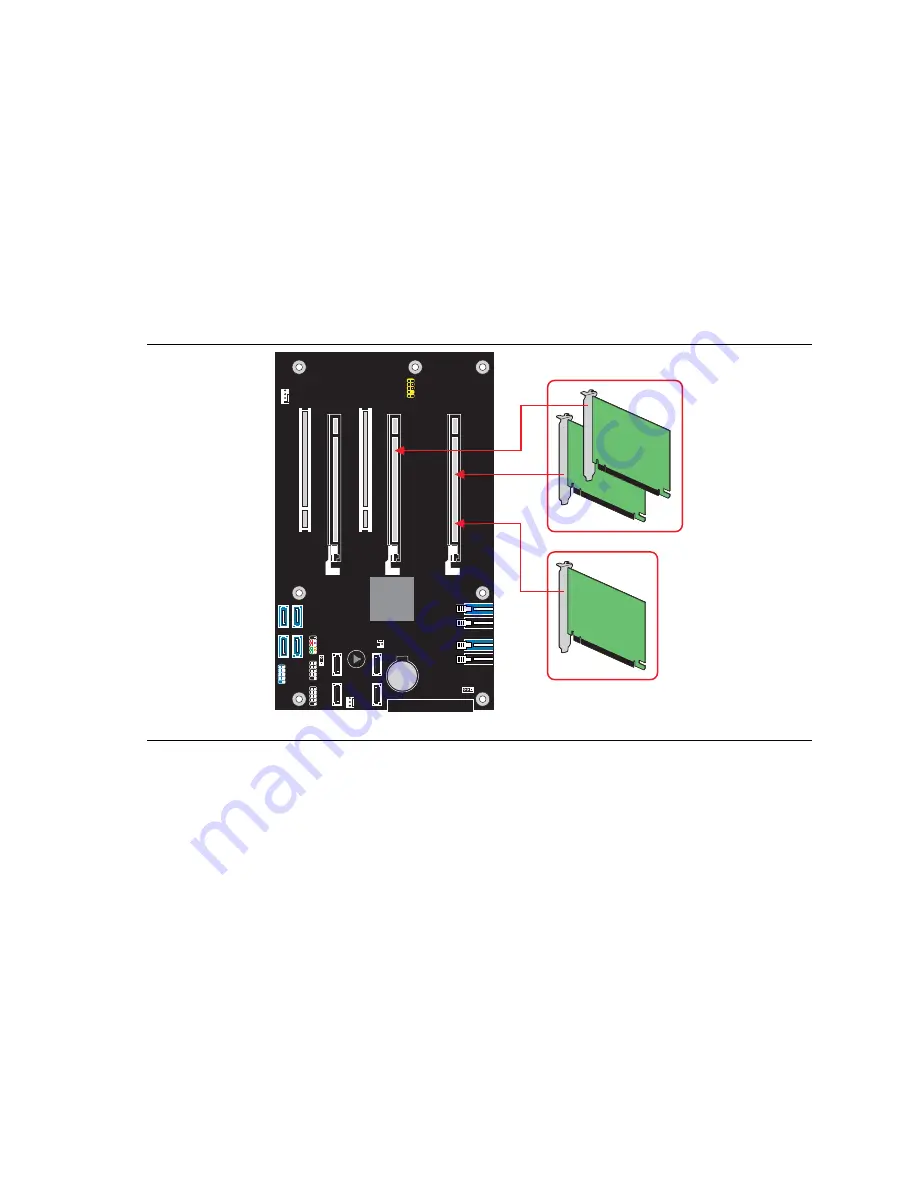
Installing a PCI Express x16 Card 

If you are installing a single PCI Express Graphics card, install it in PCI Express connector 1 (see 
Figure 18, A) for optimum performance.  However, if you are installing two PCI Express Graphics 
cards, install them in PCI Express connectors 1 and 2 (see Figure 18, B).   
Follow these instructions to install any PCI Express x16 card: 
1.


Observe the precautions in "Before You Begin" on page 23. 

2.


Place the card in the PCI Express x16 connector. 

3.


Press down on the card until it is completely seated in the PCI Express x16 connector and the 
card retention notch snaps into place around the RM pin. 

4.


Secure the card’s metal bracket to the chassis back panel with a screw. 

OM18187

B

A


Figure 18.  Installing PCI Express Graphics Cards 

Содержание BLKD975XBXLKR

Страница 1: ...Intel Desktop Board D975XBX Product Guide Order Number D31531 003...

Страница 2: ...y to operate the equipment Tested to comply with FCC standards for home or office use Canadian Department of Communications Compliance Statement This digital apparatus does not exceed the Class B limi...

Страница 3: ...oduct Guide are arranged as follows 1 Desktop Board Features a summary of product features 2 Installing and Replacing Desktop Board Components instructions on how to install the desktop board and othe...

Страница 4: ...ktop Board I O shield One ATA 66 100 cable One diskette drive cable Four Serial ATA cables One rear panel USB 2 0 adapter One front panel USB 2 0 IEEE 1394 audio adapter One 2x2 to 2x4 power supply ca...

Страница 5: ...Features 18 ACPI 19 Fan Connectors 19 Fan Speed Control Intel Precision Cooling Technology 19 Suspend to RAM Instantly Available PC Technology 19 Resume on Ring 20 Wake from USB 20 Wake from PS 2 Keyb...

Страница 6: ...er Supply Cables 46 Connecting 2x12 Power Supply Cables 47 Other Connectors 48 Setting the BIOS Configuration Jumper 49 Clearing Passwords 50 Back Panel Connectors 51 Replacing the Battery 52 3 BIOS A...

Страница 7: ...Install the Processor 29 11 Close the Load Plate 29 12 Connecting the Processor Fan Heat Sink Cable to the Processor Fan Header 30 13 Dual Channel Memory Configuration Example 1 31 14 Dual Channel Me...

Страница 8: ...AN Connector LEDs 16 5 Front Panel Audio Header Signal Names 41 6 IEEE 1394a Header Signal Names 41 7 USB 2 0 Header Signal Names 41 8 Front Panel Header Signal Names 42 9 Jumper Settings for the BIOS...

Страница 9: ...H with Direct Media Interface Intel 82801GH I O Controller Hub ICH7DH supporting Intel Matrix Storage Technology Audio Intel 975X Express Chipset Intel High Definition Audio codec Up to 8 channel audi...

Страница 10: ...oard and mouse ports Power Management Support for Advanced Configuration and Power Interface ACPI Suspend to RAM STR Wake on USB PCI PCI Express PS 2 LAN and front panel Hardware Management Hardware m...

Страница 11: ...on of the major components on Desktop Board D975XBX OM18176 Channel A Channel B Y X AA Z K L M DIMM 0 DIMM 1 DIMM 0 DIMM 1 J A B D C E G H I F W U T R S V BB Q P O N Coaxial Digital Line Out Optical D...

Страница 12: ...nnector 2x12 P Diskette drive connector Q BIOS configuration jumper R IDE connector right angle connector S Chassis intrusion header T Battery U 3 Gigabit s Serial ATA connectors 0 1 2 and 3 black V F...

Страница 13: ...ted Links Go to the following links or pages for more information about Instructions on installing or upgrading the processor page 27 in Chapter 2 The location of the power connectors page 46 in Chapt...

Страница 14: ...products desktop chipsets Audio Subsystem The desktop board D975XBX includes a flexible 8 channel audio subsystem based on an Intel High Definition Audio codec The audio subsystem features Impedance s...

Страница 15: ...stems PS 2 style mouse and keyboard interfaces Interface for one 1 2 MB 1 44 MB or 2 88 MB diskette drive Intelligent power management including a programmable wake up event interface PCI power manage...

Страница 16: ...peed USB 2 0 Support NOTE Computer systems that have an unshielded cable attached to a USB port might not meet FCC Class B requirements even if no device or a low speed USB device is attached to the c...

Страница 17: ...wo PCI bus add in cards Related Links For information about installing a PCI Express x16 card see page 35 in Chapter 2 BIOS The BIOS provides the Power On Self Test POST the BIOS Setup program the PCI...

Страница 18: ...ervisor password or the user password to access Setup Setup options are then available for viewing and changing depending on whether the supervisor or user password was entered Setting a user password...

Страница 19: ...e disabled if a self controlled chassis fan is attached to any controlled chassis fan header The overall system noise reduction will vary based on system configuration and environment Suspend to RAM I...

Страница 20: ...mes operation from either ACPI S1 or ACPI S3 state Requires only one call to access the computer Detects incoming call similarly for external and internal modems Requires modem interrupt be unmasked f...

Страница 21: ...Battery A battery on the desktop board keeps the values in CMOS RAM and the clock current when the computer is turned off See Chapter 2 starting on page 23 for instructions on how to replace the batt...

Страница 22: ...Intel Desktop Board D975XBX Product Guide 22...

Страница 23: ...mputer from its power source and from any telecommunications links networks or modems before performing any of the procedures described in this chapter Failure to disconnect power telecommunications l...

Страница 24: ...re that the calculated total current loads of all the modules within the computer is less than the output current rating of each of the power supplies output circuits Observe Safety and Regulatory Req...

Страница 25: ...nal components from dust and foreign objects and promotes correct airflow within the chassis Install the I O shield before installing the desktop board in the chassis Place the shield inside the chass...

Страница 26: ...the procedures described here Failure to disconnect the power before you open the computer can result in personal injury or equipment damage NOTE Refer to Appendix B for regulatory requirements Refer...

Страница 27: ...er cord from the computer the standby power LED should not be lit see Figure 3 on page 20 Failure to do so could damage the processor and the board To install a processor follow these instructions 1 O...

Страница 28: ...see Figure 8 E OM19019 E Figure 8 Remove the Protective Socket Cover 5 Remove the processor from its protective cover Hold the processor only at the edges being careful not to touch the bottom of the...

Страница 29: ...he socket cutouts see Figure 10 F Align notches see Figure 10 G with the socket see Figure 10 H Lower the processor straight down without tilting or sliding it in the socket OM19017 G F F H H G Figure...

Страница 30: ...le Connect the processor fan heat sink cable to the 4 pin processor fan header see Figure 12 A fan with a 4 pin connector as shown in Figure 12 A is recommended however a fan with a 3 pin connector Fi...

Страница 31: ...o or Four DIMMs Install a matched pair of DIMMs equal in speed and size see Figure 13 in DIMM 0 blue of both channels A and B OM18182 Channel B Channel A 1 GB 533 MHz 1 GB 533 MHz DIMM 0 DIMM 1 DIMM 0...

Страница 32: ...A 512 MB 533 MHz 256 MB 533 MHz 256 MB 533 MHz DIMM 0 DIMM 1 DIMM 0 DIMM 1 Figure 15 Dual Channel Memory Configuration Example 3 NOTE All other memory configurations will result in single channel mem...

Страница 33: ...Installing and Replacing Desktop Board Components 33 DDR DDR2 OM18185 Figure 16 Use DDR2 DIMMs...

Страница 34: ...g a DIMM 5 Make sure the clips at either end of the DIMM socket s are pushed outward to the open position 6 Holding the DIMM by the edges remove it from its anti static package 7 Position the DIMM abo...

Страница 35: ...t away from the socket and store it in an anti static package 8 Reinstall and reconnect any parts you removed or disconnected to reach the DIMM sockets 9 Replace the computer s cover and reconnect the...

Страница 36: ...xpress connectors 1 and 2 see Figure 18 B Follow these instructions to install any PCI Express x16 card 1 Observe the precautions in Before You Begin on page 23 2 Place the card in the PCI Express x16...

Страница 37: ...RM 1 Observe the precautions in Before You Begin on page 23 2 Remove the screw that secures the card s metal bracket to the chassis back panel Figure 19 A 3 Push down on the RM lever until the retenti...

Страница 38: ...transfer protocols If an ATA 66 100 disk drive and a disk drive using any other IDE transfer protocol are attached to the same cable the maximum transfer rate between the drives may be reduced to tha...

Страница 39: ...e desktop board Either end of the cable can be connected to the SATA drive or the connector on the board For correct cable function 1 Observe the precaution in Before You Begin on page 23 2 Attach the...

Страница 40: ...ound D Power 5 V D B 10 9 7 6 5 4 2 1 3 Sense2_Ret Key no pin Sense1_Ret Presence GND Port2L Sense_Send Port2R Port1R Port1L 5 V Reset HD LED On Off Power LED 1 2 3 4 5 6 7 9 8 E A 3 1 D Alternate Fro...

Страница 41: ...EEE 1394a Header See Figure 22 C for the location of the blue IEEE 1394a header Table 6 shows the pin assignments for the header Table 6 IEEE 1394a Header Signal Names Pin Signal Name Pin Signal Name...

Страница 42: ...Power LED Green 1 HD_PWR Out Hard disk LED pull up 330 to 5 V 2 HDR_BLNK_GRN Out Front panel green LED 3 HDA Out Hard disk active LED 4 HDR_BLNK_YEL Out Front panel yellow LED Reset Switch Purple On...

Страница 43: ...stall the rear panel USB 2 0 adapter see Figure 23 1 Observe the precautions in Before You Begin on page 23 2 Attach the cable end with the connector to the USB 2 0 header on the desktop board 3 Secur...

Страница 44: ...audio header yellow USB 2 0 header black and IEEE 1394a header blue on the desktop board 5 Install a correctly keyed and shielded cable 6 Connect the cables to their respective headers on the desktop...

Страница 45: ...sktop Board Components 45 Connecting Chassis Fan Cables Connect the chassis fan cables to the desktop board fan headers shown in Figure 25 OM18194 2 1 3 2 1 3 2 1 3 3 1 4 2 2 1 3 3 1 4 2 1 4 2 Figure...

Страница 46: ...supply requirements Connecting 2x10 Power Supply Cables The 2x12 main power connector on the desktop board is backwards compatible with ATX12V power supplies with 2x10 power connectors Use of the 1x4...

Страница 47: ...processor that is not running at its default settings Doing so may result in damage to the desktop board 3 Connect the 1x4 power supply cable to the 1x4 connector 4 Connect the main 2x10 power supply...

Страница 48: ...processor that is not running at its default settings Doing so may result in damage to the desktop board 3 Connect the main 2x12 power supply cable to the 2x12 connector see Figure 27 Other Connector...

Страница 49: ...nfiguration Jumper Block The three pin BIOS configuration jumper block enables all board configurations to be done in the BIOS Setup program Table 9 shows the jumper settings for the Setup program mod...

Страница 50: ...per on pins 2 3 as shown below 3 1 6 Replace the cover plug in the computer turn on the computer and allow it to boot 7 The computer starts the Setup program Setup displays the Maintenance menu 8 Use...

Страница 51: ...nel is designed to power either headphones or amplified speakers only Poor audio quality may occur if passive non amplified speakers are connected to this output Figure 30 shows the back panel connect...

Страница 52: ...incorrect Les piles usag es doivent tre recycl es dans la mesure du possible La mise au rebut des piles usag es doit respecter les r glementations locales en vigueur en mati re de protection de l envi...

Страница 53: ...en door een onjuist type batterij Batterijen moeten zoveel mogelijk worden gerecycled Houd u bij het weggooien van gebruikte batterijen aan de plaatselijke milieuwetgeving ATEN O Haver risco de explos...

Страница 54: ...AU IE Risc de explozie dac bateria este nlocuit cu un tip de baterie necorespunz tor Bateriile trebuie reciclate dac este posibil Depozitarea bateriilor uzate trebuie s respecte reglement rile locale...

Страница 55: ...page 23 2 Turn off all peripheral devices connected to the computer Disconnect the computer s power cord from the AC power source wall outlet or power adapter 3 Remove the computer cover 4 Locate the...

Страница 56: ...Intel Desktop Board D975XBX Product Guide 56...

Страница 57: ...luded in an automated update utility that combines the functionality of the Intel Flash Memory Update Utility and the ease of use of Windows based installation wizards To update the BIOS with the Inte...

Страница 58: ...Wide Web site at http support intel com support motherboards desktop Navigate to the D975XBX page click view Latest BIOS updates and select the Iflash BIOS Update utility file NOTE Review the instruc...

Страница 59: ...into diskette drive A 5 Replace the computer cover connect the power cord turn on the computer and allow it to boot The recovery process will take a few minutes 6 Listen to the speaker Upon applying p...

Страница 60: ...Intel Desktop Board D975XBX Product Guide 60...

Страница 61: ...drives are installed respectively Press Enter once you have selected the RAID LEVEL 4 Select the drives to be used in the RAID array only if there are more than two drives available and press Enter 5...

Страница 62: ...g the operating system when a second SATA hard drive is added to the system Follow the steps described in the headings from this section Configuring the BIOS for Intel Matrix Storage Technology and Lo...

Страница 63: ...e allows tasks that do not require user input to continue in the background Works with the Microsoft Away mode to offer a complete power management offering for ACPI and system standby and hibernate T...

Страница 64: ...ng When I press the sleep button on my computer Do nothing NOTE When using the Microsoft Windows XP Media Center Edition remote control the power button on the remote is controlled by the sleep button...

Страница 65: ...yboard remote and mouse will not turn the system on NOTE It is recommended to set the System standby and hibernate options to a specified amount of time This is recommended because the Intel Quick Res...

Страница 66: ...Intel Desktop Board D975XBX Product Guide 66...

Страница 67: ...vent overheating MULTI_BIT_ECC_ERROR The firmware has detected that a Multi Bit ECC Error occurred SINGLE_BIT_ECC_ERROR The firmware has detected that a Single Bit ECC Error occurred CMOS_BATTERY_ERRO...

Страница 68: ...Intel Desktop Board D975XBX Product Guide 68...

Страница 69: ...N 60950 1 2002 Information Technology Equipment Safety Part 1 General Requirements European Union IEC 60950 1 2001 First Edition Information Technology Equipment Safety Part 1 General Requirements Int...

Страница 70: ...EEC kehtestatud n uetele Suomi T m tuote noudattaa EU direktiivin 89 336 EEC 73 23 EEC m r yksi Fran ais Ce produit est conforme aux exigences de la Directive Europ enne 89 336 EEC 73 23 EEC Deutsch...

Страница 71: ...erms and conditions etc Intel Product Recycling Program http www intel com intel other ehs product_ecology Recycling_Program htm Deutsch Als Teil von Intels Engagement f r den Umweltschutz hat das Unt...

Страница 72: ...enarkan pengguna pengguna runcit produk jenama Intel memulangkan produk terguna ke lokasi lokasi terpilih untuk dikitarkan semula dengan betul Sila rujuk http www intel com intel other ehs product_eco...

Страница 73: ...oard contain a small amount of lead which is necessary for component performance and or reliability This desktop board is referred to as Lead free second level interconnect The board substrate and the...

Страница 74: ...nterference Characteristics of Information Technology Equipment European Union EN55024 1998 Information Technology Equipment Immunity Characteristics Limits and methods of measurement European Union A...

Страница 75: ...nvironments Ensure Electromagnetic Compatibility EMC Compliance Before computer integration make sure that the power supply and other modules or peripherals as applicable have passed Class B EMC testi...

Страница 76: ...U EMC directive 89 336 EEC and Low Voltage directive 73 23 EEC Australian Communications Authority ACA C tick mark Includes adjacent Intel supplier code number N 232 Japan VCCI Voluntary Control Counc...

Страница 77: ...tive as applicable should be obtained Additionally other directives such as the Radio and Telecommunications Terminal Equipment R TTE directive may also apply depending on product features In the Unit...

Страница 78: ...Intel Desktop Board D975XBX Product Guide 78...

Отзывы: