Integra DTM-40.7 Скачать руководство пользователя страница 7

7

It

De

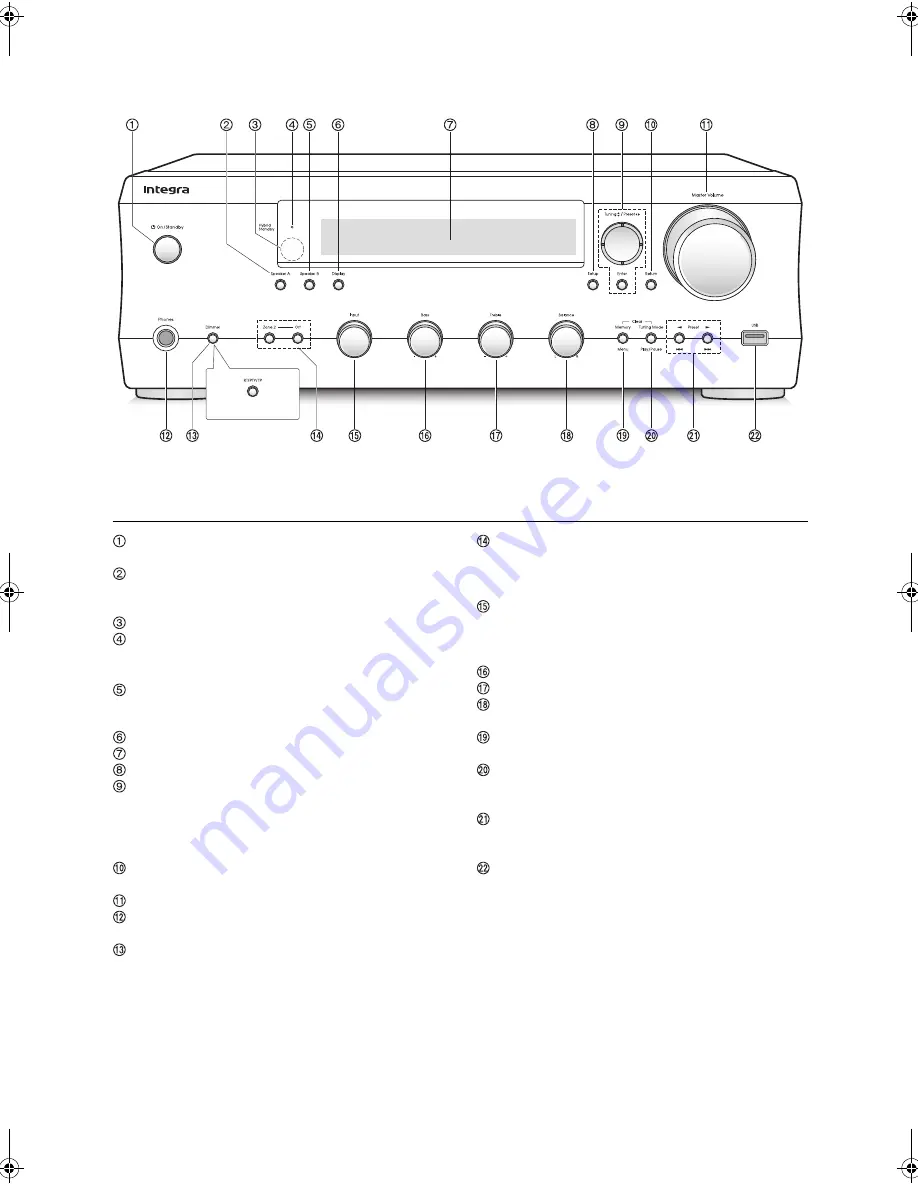
Names and functions of parts

Front

Í

 On/Standby button:

 Press this button to turn the 

unit on or put it in standby mode.

Speaker A button:

 Used to switch between outputting 

and turning off output from speakers connected to the 
SPEAKERS A terminal.

Remote control signal receiver
Hybrid Standby LED:

 Lights when any of Network 

Standby, Bluetooth Wakeup, or Opt1 In Wakeup are 
on.

Speaker B button:

 Used to switch between outputting 

and turning off output from speakers connected to the 
SPEAKERS B terminal.

Display button:

 Change the information shown.

Display (

>

8)

Setup button:

 Used to display the setup menu.

Direction/Tuning 

34

/Preset 

21

/Enter buttons:


Move the cursor and confirms the selection. When 
listening to AM/FM broadcasting, tune in to the station 
with Tuning 

34 

or select the registered station with 

Preset 

21

.

Return button:

 Returns the display to the previous 

state during setting or operation.

Master Volume control: 

Used to adjust the volume.

Phones terminal:

 Connect headphones with a 

standard plug.

Dimmer button (North American model):

 Use this 

button to switch the display’s brightness between 
normal, moderately dark and dark.

RT/PTY/TP button (Australian model):

 Use when 

receiving stations transmitting text information.

Zone 2/Off buttons:

 For use when the unit is 

connected with a pre-main amplifier, a power amplifier 
or a subwoofer with built-in amplifier in a separate 
room and sound is played there.

Input control:

 Selects the source to playback.Turn the 

control to switch the source in the following order; BD/
DVD

#

CBL/SAT

#

PC

#

GAME

#

CD

#

PHONO

#

TV/TAPE

#

AM

#

FM

#

NET

#

BLUETOOTH

Bass control

Adjusts the bass level.

Treble control:

 Adjusts the treble level.

Balance control:

 Adjusts the audio output balance 

between the left and right speakers.

Memory/Menu button:

 Press this button to register a 

AM/FM station or display the menu.

Tuning Mode/Play/Pause button:

 Press this button to 

switch the AM/FM tuning mode, or playback (*) or 
pause (*) of a track.

Preset 

21

/Skip (

:

/

9

) buttons:

 Press this 

button to select the registered AM/FM station, or skip 
(*) to tracks before or after the current track.

USB port:

 A USB storage device is connected so that 

music files stored in it can be played.

*

Operate with USB storage device play or the home network 
feature (DLNA, Home Media).

(Australian model)

DTM40.7_mst.book  7 ページ  2015年7月24日 金曜日 午後12時58分

Содержание DTM-40.7

Страница 1: ...Network Stereo Receiver DTM 40 7 Instruction Manual...

Страница 2: ...0 Playing music stored on DLNA compatible devices 26 0 Music streaming from a shared folder Home Media 27 Listening to the sound from a connected player 29 Listening to AM FM radio 30 Multi zone playb...

Страница 3: ...paratus does not operate normally by following the operating instructions Adjust only those controls that are covered by the operating instructions as an improper adjustment of other controls may resu...

Страница 4: ...work properly the next time you turn it on so be sure to use it occasionally For U S models FEDERAL COMMUNICATIONS COMMISSION DECLARATION OF CONFORMITY This device complies with part 15 of the FCC Rul...

Страница 5: ...einschl gigen Bestimmungen der Richtlinie 1999 5 EG befindet K esolevaga kinnitab Onkyo Corporation seadme DTM 40 7 vastavust direktiivi 1999 5 E p hin uetele ja nimetatud direktiivist tulenevatele te...

Страница 6: ...details High quality fully fledged audio design 0 High powered discrete amplifier that can drive even a large speaker system 0 WRAT Wide Range Amplifier Technology 0 High power transformer with silic...

Страница 7: ...ican model Use this button to switch the display s brightness between normal moderately dark and dark RT PTY TP button Australian model Use when receiving stations transmitting text information Zone 2...

Страница 8: ...s when the unit is tuned into a radio station Headphone indicator Stays lit when headphones are connected NET Lights when NET is selected as the input source It will flash if the connection is not cor...

Страница 9: ...Remote Mode Zone2 button For use when the unit is connected with a pre main amplifier a power amplifier or a subwoofer with built in amplifier in a separate room and sound is played there Pause butto...

Страница 10: ...void electrical shock always disconnect the power cord from the AC outlet before disconnecting the other end Turning on the unit may cause a momentary power surge that might interfere with other elect...

Страница 11: ...ls After inserting the cables tighten the terminals firmly by turning to the right North American model Note that when using commercially available banana plugs first tighten the speaker terminals and...

Страница 12: ...cable or digital coaxial cable to one of the DIGITAL IN terminals To play select the terminal name with the Input Selector Note that this unit is equipped with an Opt1 In Wakeup feature so that when p...

Страница 13: ...at if the connected record player has a built in audio equalizer connect it to a LINE IN terminal other than PHONO AM FM antenna connections Connect the antennas to listen to AM FM broadcast 0 You may...

Страница 14: ...less LAN router for example Set with the remote control while watching the display on the main unit 1 Turn on the unit 2 Press the Setup button The setup menu appears on the display 3 Use the directio...

Страница 15: ...display and press the Enter button PIN code Select this method when the automatic setting button of the access point is beyond the reach The 8 digit PIN code is displayed Register the displayed PIN c...

Страница 16: ...d the on demand programs registered TuneIn Radio is a service where you can enjoy music sports and news from all over the world Playing back 1 Press the NET button 2 Use the direction buttons to selec...

Страница 17: ...ist and then press the Enter button Playback starts TuneIn Radio Menu If you press the Menu button or Enter button while playing TuneIn Radio the following TuneIn Radio menu items appear To use each f...

Страница 18: ...t for the selected category appears on the display 5 Use the direction buttons to select the desired channel and then press the Enter button The playback starts and you can listen to SiriusXM Internet...

Страница 19: ...ple user accounts which means you can freely switch between several logins After registering user accounts login is performed from the Users display Press the Menu button while Users is displayed Add...

Страница 20: ...f the IP address 4 Turn the PC on and open Internet Explorer or another Internet browser 5 Input this unit s IP address into the Internet browser URL field If the IP address displayed on the unit is 1...

Страница 21: ...s the Enter button 3 Use the direction buttons to select a radio station and press the Enter button Playback starts To remove a radio station that has been added 1 Select the radio station in the My F...

Страница 22: ...is requested enter 0000 0 You can pair with another Bluetooth enabled device by pressing and holding the Enter button of the unit until Now Pairing is on the display This unit can store the data of up...

Страница 23: ...iPod touch or iPad If the volume setting on the AirPlay enabled device is low the sound will not be output from this unit so adjust the volume to an appropriate level Playback music files from a comp...

Страница 24: ...s streaming will start If the volume setting on the Spotify enabled device is low the sound will not be output from this unit so adjust the volume to an appropriate level If 3 Hardware Network Standby...

Страница 25: ...the USB storage device reading data from it may take some time 0 If the media you connect is not supported or cannot be connected properly the message No storage will be displayed 4 Press the Enter b...

Страница 26: ...a dialog box 0 If media streaming is already turned on select More streaming options in the Stream menu to list players in the network and then go to step 4 3 Click Turn on media streaming to list pl...

Страница 27: ...at appeared on the display of the unit 0 When the volume is adjusted from the unit the value is not reflected in the Play To dialog box 0 Depending on the version of Windows Media Player the names of...

Страница 28: ...uttons to select Home Media on the display and press the Enter button 3 Use the direction buttons to select the server that you want to use and press the Enter button 0 You can check the server name o...

Страница 29: ...2 is on 0 While playing an analog source if a digital signal is input to the input source with the same name play switches to the digital signal Input Selector By connecting an Onkyo component with R...

Страница 30: ...monaural sound 1 Turn the Input control on the main unit to select AM or FM on the display 2 Press the Tuning Mode button so that the AUTO indicator on the display goes off 3 Press the Tuning 34 butt...

Страница 31: ...y to select either AM or FM on the display 2 Press CH i j buttons to select a preset number 0 You can also select by directly entering the preset number with the number buttons Alternatively you can p...

Страница 32: ...the RT PTY TP button of the unit twice The current program type appears on the display 2 Press the Preset 21 buttons to select the type of program to search for The following RDS station types are dis...

Страница 33: ...separate room with an RCA cable You can also connect a subwoofer with built in amplifier to the ZONE 2 PRE OUT SUBWOOFER jack Performing multi zone playback 1 Press the Remote Mode Zone2 button of th...

Страница 34: ...is switched to playback in a separate room only Performing steps 1 and 2 while the unit is in standby also switches the playback mode to playback in a separate room only Turning off the function After...

Страница 35: ...dB in 2 dB increments default setting 0 dB Balance Adjusts the audio output balance between the left and right speakers Select between Li10 and Ri10 in 2 steps increments default setting 0 Sleep time...

Страница 36: ...rience Set using the following procedure 1 Press the Setup button 2 Use the direction buttons to select the setting you want to change and press the Enter button 0 To cancel the operation press the Se...

Страница 37: ...one 2 output is on 0 When a cable is connected to the OPTICAL1 terminal and this setting is enabled power consumption increases even when the unit is on standby however the increase in power consumpti...

Страница 38: ...rom a Bluetooth enabled device to the unit On default setting Off 0 If the input is not switched automatically set to Off and change the input manually Auto Reconnect This function automatically recon...

Страница 39: ...to the unit s operation As some devices cause a large current when they turn on delay the output if such devices are connected 0sec to 3sec default setting 1sec BD DVD CBL SAT PC GAME TV TAPE CD PHONO...

Страница 40: ...router are connected to the network Try to disconnect and then connect again the power to the unit and router This may solve the problem If you are still unable to connect to the Internet the DNS serv...

Страница 41: ...e update is complete 11 Disconnect the USB storage from the unit 12 Press the On Standby button on the front panel to put the unit into standby 0 Do not use the button on the remote control for this o...

Страница 42: ...ay be set to Zone 2 Be sure to press the Remote Mode Main button first before operating the unit with the remote control 0 Make sure that the batteries are installed with the correct polarity 0 If the...

Страница 43: ...t Send mode 0 Depending on the characteristics or specifications of your Bluetooth enabled device playback on the unit is not guaranteed USB storage device is not displayed 0 Check whether the USB sto...

Страница 44: ...nit complies with version 1 5 of the DLNA guidelines 0 Depending on the type of media server this unit might not recognize it or be able to play audio files saved on it File format This unit can play...

Страница 45: ...Tuning Frequency Range 87 5 MHz 107 9 MHz North American 87 5 MHz 108 0 MHz RDS Others AM Tuning Frequency Range 530 kHz 1710 kHz North American 522 530 kHz 1611 1710 kHz Others Preset Channel 40 Ethe...

Страница 46: ...device you are able to link to other services or websites which are not under the control of any company which has designed manufactured or distributed have distributed this device and its affiliates...

Страница 47: ...used for software interchange If distribution of object code is made by offering access to copy from a designated place then offering equivalent access to copy the source code from the same place sati...

Страница 48: ...distribute the Program except as expressly provided under this License Any attempt otherwise to copy modify sublicense or distribute the Program is void and will automatically terminate your rights u...

Страница 49: ...ht c 2004 2006 2007 Glenn Randers Pehrson and are distributed according to the same disclaimer and license as libpng 1 2 5 with the following individual added to the list of Contributing Authors Cosmi...

Страница 50: ...SCLAIMED IN NO EVENT SHALL THE AUTHOR OR CONTRIBUTORS BE LIABLE FOR ANY DIRECT INDIRECT INCIDENTAL SPECIAL EXEMPLARY OR CONSEQUENTIAL DAMAGES INCLUDING BUT NOT LIMITED TO PROCUREMENT OF SUBSTITUTE GOO...

Страница 51: ...ree to defend indemnify and hold harmless the Author and the Publisher from and against any claims suits losses damages liabilities costs and expenses including reasonable legal or attorneys fees resu...

Страница 52: ...818 9200 Fax 201 785 2650 http www integrahometheater com Gutenbergstrasse 3 82178 Puchheim GERMANY Tel 49 8142 4401 0 Fax 49 8142 4208 213 http www integra eu 302 Building 1 20 North Chaling Rd Xuhui...

Отзывы: