background image

33

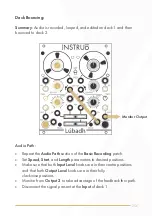
Control Path:


• 

Set the 

Time

 knob of deck 1 fully anticlockwise to generate one 

trigger signal per loop.

• 

Connect the 

Clock Output

 of deck 1 to the 

Record Gate Input 

of 

deck 2. Recording on deck 2 will start at the beginning of the loop 
on deck 1 and end at the beginning of the next loop on deck 1.

Содержание Dual Looper

Страница 1: ...Lúbadh Dual Looper User Manual ...

Страница 2: ...pansion Parameters 16 Normalisation Path 17 Record Overdub Erase 18 Latching Momentary Recording 19 Input Monitoring Modes 21 Looping One Shot Record Modes 23 Looping One Shot Playback Modes 25 Time Modes 27 Save Load 29 Patch Examples Basic Recording Equal Division Trigger Deck Bouncing Auxiliary Feedback Delay Dry Wet Feedback Delay Pitch Shifting Delay ...

Страница 3: ...saturation On the first recording the sound may appear slightly fuller and warmer re recording audio back and forth will compound this effect over time allowing you to create dense tape like textures Features 9 minutes of recording time per loop Dual recording looping and overdubbing capabilities One shot play and one shot record modes Delay and reverb diffusion networks Tape decay mode Feedback f...

Страница 4: ... power cable to the 2x8 pin header on your Eurorack power supply confirming that the red stripe on the power cable is connected to 12V 6 Optional To install the CV Expander module connect the included 12 pin IDC cable to both modules Ensure that the red strip of the IDC cable matches the white stripe on each module 7 Mount the Instruō Lúbadh in your Eurorack synthesizer case 8 Power your Eurorack ...

Страница 5: ...utput 5 Output Level 6 Pre Post Output Level Switch 7 Record Button 8 Record Gate Input 9 Erase Button 10 Position Record Indicator 1 1 Speed 12 Speed CV Input 13 Speed Indicator 14 Length 15 Start 16 Retrigger Shift Button 17 Retrigger Input 18 Clock Output 19 Time Indicator 20 Time 21 Link Toggle 22 Auxiliary Input 23 Auxiliary Input Crossfade 24 Auxiliary Input Crossfade CV Input 25 Auxiliary O...

Страница 6: ...ngth CV Input Left Deck 2 Start CV Input Left Deck 3 Time CV Input Left Deck 4 Erase Trigger Input Left Deck 5 Length CV Input Right Deck 6 Start CV Input Right Deck 7 Time CV Input Right Deck 8 Erase Trigger Input Right Deck 1 2 3 4 5 6 7 8 ...

Страница 7: ...al is present at the Input Output AC coupled audio output The Output of deck 1 is normalled to the Input of deck 2 and the Output deck 2 is normalled to the Input of deck 1 creating a feedback path This allows for the transfer of loops from one deck to the other as well as feedback delay and diffusion effects See the Delay Mode section for more information Output Level The Output Level knob sets t...

Страница 8: ...ithin the loop is shown by the Position Record Indicator Speed The Speed knob sets the playback rate of the loop When the knob is fully clockwise the rate of playback will be set to 4x the original speed When the knob is fully anticlockwise the rate of playback will be set to 4x the original speed but playback will be reversed When the knob is set to its centre position playback will be stalled Be...

Страница 9: ...gth The Length knob controls how much of the loop is played before resetting to the loop s start position set by the Start knob Lúbadh can record up to 9 minutes of audio per deck When the knob is fully clockwise the entire loop will play When the knob is fully anticlockwise the loop will be as small as possible creating a wavetable esque sound source scrub through the sample via the Start knob fo...

Страница 10: ...et to the start position set by the Start parameter when a trigger or gate signal is present at the Retrigger Input Clock Output The Clock Output generates a trigger signal based on the size of the loop and the value set by the Time knob Time Indicator The Time Indicator illuminates white when a trigger signal is generated at the Clock Output It will also illuminate amber when Time Modes are enabl...

Страница 11: ...te 64 triggers per loop Visual indication is shown via the Position Indicator upon selection of the multiplication factor The available multiplication factors are 1 2 3 4 5 6 7 8 9 10 11 12 16 24 32 and 64 The Time knob also sets the delay time when Delay Mode is enabled and tape decay time when Tape Decay Mode is enabled See the Time Modes section for more information ...

Страница 12: ... to the Input of each deck As the fader moves from fully left to fully right audio crossfades between the Inputs of both decks LINK LINK Left Deck Right Deck Lúbadh REC IN OUT CV CV OUT CLK DIV CLK DIV SPEED LINK LENGTH START CLK OUT RETRIG AUX I O IN ERASE ERASE REC LENGTH START Lúbadh REC IN OUT CV CV OUT CLK DIV CLK DIV SPEED LINK LENGTH START CLK OUT RETRIG AUX I O IN ERASE ERASE REC LENGTH ST...

Страница 13: ... moves from fully left to fully right audio from both decks crossfades at the Auxiliary Output Auxiliary Output Crossfade CV Input The Auxiliary Output Crossfade CV Input is a bipolar control voltage input for the Auxiliary Output Crossfade Control voltage is summed with the fader position Input range 5V Lúbadh REC IN OUT CV CV OUT CLK DIV CLK DIV SPEED LINK LENGTH START CLK OUT RETRIG AUX A I O I...

Страница 14: ... The Capacitive Tape Reel Trimmer is accessed via the front panel and is used to calibrate the sensitivity of the Capacitive Tape Reel Capacitive Tape Reel Switch The Capacitive Tape Reel Switch is located on the bottom of the second circuit board and is used for turning the Capacitive Tape Reel on and off By default the Capacitive Tape Reel Switch will be in the on position OFF ON Capacitive Tape...

Страница 15: ...CV Input is a bipolar control voltage input for the Start parameter Control voltage is summed with the knob position Input range 5V Time CV Input The Time CV Input is a bipolar control voltage input for the Time parameter Control voltage is summed with the knob position Input range 5V Erase Trigger Input A trigger or gate signal present at the Erase Trigger Input will erase the buffer of the corre...

Страница 16: ...o the Input of deck 2 which then passes to the Output of deck 2 The Output of deck 2 is normalled back to the Input of deck 1 This feedback path becomes very useful when bouncing audio from deck to deck or utilising the Tape Decay and Delay modes See the Time Modes section for more information Normalised Signal Path TIME TIME ...

Страница 17: ...g Press the Record Button again to stop recording Playback of the recorded audio will immediately start and will be indicated by a cycling Position Record Indicator Repeat this process to overdub new audio on the existing recording The existing recording being overdubbed upon is always rerecorded with an amplitude setting of 0 9 to allow older overdubs to decay over time Press the Erase Button to ...

Страница 18: ...y trigger or gate signal present at the Record Gate Input When set to Momentary the recording will be enabled for as long as a gate signal is held high This can be configured by pressing both Retrigger Shift Buttons 1 and 2 and then pressing the Erase Button 3 of the deck you wish to alter By default the Record Gate Input is set to Latching TIME TIME 1 2 3 ...

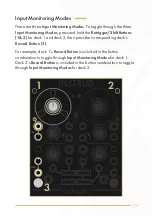
Страница 19: ...Shift Buttons 1 2 for deck 1 and deck 2 then press the corresponding deck s Record Button 3 For example deck 1 s Record Button is included in the button combination to toggle through Input Monitoring Modes for deck 1 Deck 2 s Record Button is included in the button combination to toggle through Input Monitoring Modes for deck 2 1 2 1 TIME TIME 3 ...

Страница 20: ...armed or when audio is being recorded Pressing the Record Button once arms the deck and the Record Button pulses amber enabling input monitoring Pressing the Record Button a second time starts recording and keeps input monitoring enabled Pressing the Record Button a third time stops recording disables input monitoring and starts playing the recorded loop When armed the Erase Button will disarm the...

Страница 21: ...ton of the opposite deck For example to toggle between Looping Record Mode and One Shot Record Mode on deck 1 press and hold the Retrigger Shift Button 1 of deck 1 then press the Record Button 2 of deck 2 To toggle between Looping Record Mode and One Shot Record Mode on deck 2 press and hold the Retrigger Shift Button of deck 2 then press the Record Button of deck 1 1 1 TIME TIME 2 ...

Страница 22: ...y the first loop along with the Start and Length parameters Once the determined duration of time is met recording will automatically stop One Shot Record Mode is indicated by an illuminated mixed amber and white Record Button when Input Monitoring Enabled Mode is active a pulsing mixed amber and white Record Button when Armed Input Monitoring Mode is active and an unilluminated Record Button when ...

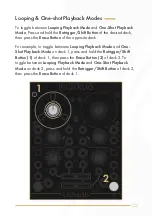
Страница 23: ...ton of the opposite deck For example to toggle between Looping Playback Mode and One Shot Playback Mode on deck 1 press and hold the Retrigger Shift Button 1 of deck 1 then press the Erase Button 2 of deck 2 To toggle between Looping Playback Mode and One Shot Playback Mode on deck 2 press and hold the Retrigger Shift Button of deck 2 then press the Erase Button of deck 1 1 1 TIME TIME 2 ...

Страница 24: ...a gate or trigger signal to the Retrigger Input will start playback of a full loop determined by the Start and Length parameters Playback will automatically stop after each loop When toggling between these modes Looping Playback Mode is indicated by one white blink of the Record Button One Shot Playback Mode is indicated by one mixed amber and white blink of the Record Button ...

Страница 25: ... hold the Retrigger Shift Button and then press the Record Button of deck 2 Clock Divisions Mode This is the default mode In this mode the Time knob sets the number of clock divisions per loop Clock trigger signals can be set between 1 trigger per loop to 64 triggers per loop This number of triggers per loop is indicated on the Speed Indicator Clock trigger signals are indicated by white illuminat...

Страница 26: ...clockwise a complex diffusion network is enabled The complex diffusion network is post record head Moving the knob clockwise will increase delay time from multi taps to 500ms at the centre position to mono taps to 3 seconds of delay time The delay line is pre record head This mode is indicated by an illuminated amber Time Indicator 12 16 24 32 64 Shortest Decay Time Old Tape Infinite Decay Time Ne...

Страница 27: ...le to save a recording from deck 1 press and hold the Retrigger Shift Button 1 and the Erase Button 2 of deck 1 then press the Record Button 3 of deck 1 To save a recording from deck 2 press and hold the Retrigger Shift Button and the Erase Button of deck 2 then press the Record Button of deck 2 Hold this button combination for 2 seconds to export to the USB flash drive 1 1 TIME TIME 2 3 ...

Страница 28: ...ck 1 press and hold the Retrigger Shift Button 1 and then press the Erase Button 2 of deck 1 To load a saved recording to deck 2 press and hold the Retrigger Shift Button and then press the Erase Button of deck 2 Hold this button combination for 2 seconds to import from the USB flash drive Note Any audio content settings auto saved from previous sessions will be automatically loaded when powered o...

Страница 29: ...tored Audio Path Connect any audio signal to the Input Set the Input Level to its centre position and set the Output Level fully clockwise Monitor Output 1 Press the Record Button or connect a gate signal to the Record Gate Input to start recording audio Monitor Output Audio Signal ...

Страница 30: ...n has been met if the Record Button is pressed while recording is activated or if a gate or trigger signal is present at the Record Gate Input The loop will play once recording has stopped Control Path Apply control voltage to any of the CV inputs of Lúbadh ...

Страница 31: ...rmined by the Start parameter This creates equal divisions of the loop without having to use the Length parameter Audio Path Repeat the Audio Path section of the Basic Recording patch Set the Start knob to a desired position Control Path Set the Time knob to a loop division and connect the Clock Output to the Retrigger Input Monitor Output Audio Signal ...

Страница 32: ...ic Recording patch Set Speed Start and Length parameters to desired positions Make sure that both Input Level knobs are in their centre positions and that both Output Level knobs are in their fully clockwise positions Monitor from Output 2 to take advantage of the feedback thru path Disconnect the signal present at the Input of deck 1 Monitor Output ...

Страница 33: ...ly anticlockwise to generate one trigger signal per loop Connect the Clock Output of deck 1 to the Record Gate Input of deck 2 Recording on deck 2 will start at the beginning of the loop on deck 1 and end at the beginning of the next loop on deck 1 ...

Страница 34: ...ary Input Set the Output Level of deck 1 fully clockwise Monitor from the Output of deck 1 Set the Input Level of deck 1 to a desired position Connect the Auxiliary Output to the Input of deck 1 Use the Auxiliary Output Crossfade to set the amount of feedback Set the Time parameter of deck 1 to a desired position Monitor Output Audio Signal Control Voltage ...

Страница 35: ...35 Control Path Apply control voltage to the Time Input of deck 1 and Auxiliary Output Crossfade CV Input for delay time and feedback modulation ...

Страница 36: ...eck 2 Monitor from the Auxiliary Output Set the Output Level of deck 1 fully clockwise Set the Output Level of deck 2 fully clockwise Set the Input Levels of deck 1 and deck 2 to desired positions Connect the Output of deck 1 to the Auxiliary Input Set the Auxiliary Input Crossfade to a desired position This fader acts as a feedback control Monitor Output Audio Signal Control Voltage ...

Страница 37: ...d position Set the Auxiliary Output Crossfade to a desired position This fader acts as a dry wet mix control for the dry signal deck 2 and the wet signal deck 1 Control Path Apply control voltage to the Time Input of deck 1 for delay time modulation ...

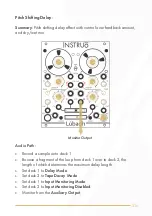
Страница 38: ... Record a sample onto deck 1 Bounce a fragment of the loop from deck 1 over to deck 2 the length of which determines the maximum delay length Set deck 1 to Delay Mode Set deck 2 to Tape Decay Mode Set deck 1 to Input Monitoring Mode Set deck 2 to Input Monitoring Disabled Monitor from the Auxiliary Output Monitor Output ...

Страница 39: ...the Input Level of deck 2 to fully clockwise Set Speed knob of deck 1 to Orginal Playback Speed Set Speed knob of deck 2 to 2x Playback Speed Set the Auxiliary Output Crossfade to a desired position This mixes between the orginal audio and the pitch shifted version Set the Input Level of deck 1 to desired position This knob acts as a feedback control which introduces barber tones Control Path Use ...

Отзывы: