background image

14

Chapter 2 System BIOS 

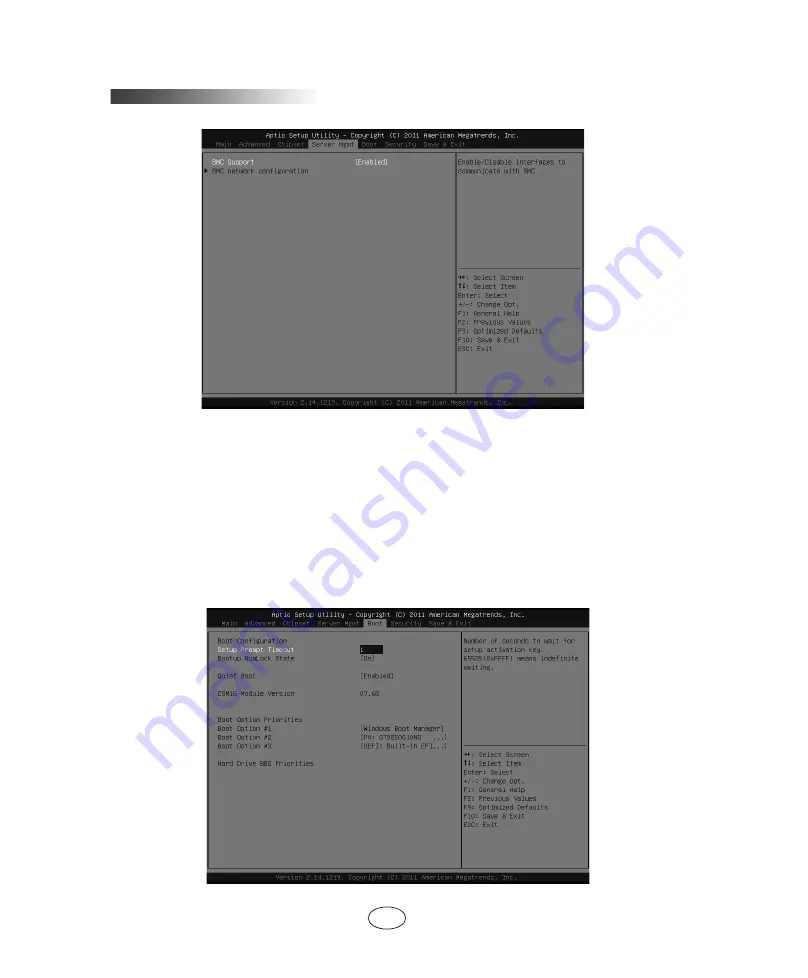
2.2.4 Server Mgmt Menu


Figure 2-7

 BMC Support

There are two options, [Enable] and [Disable]. It is used to control whether BIOS 

has mutual information with BMC.

 BMC network Configuration

This menu displays information configuration of BMC network port. 

2.2.5 Boot Menu

Boot menu is mainly used to the configuration of system boot devices priority.


Figure 2-8

Содержание Yingxin NX 5440

Страница 1: ...humankind s benefit This manual is the property of the Inspur Group Co Ltd This User Manual is not to be copied by any group or person in any manner with out the consent of Inspur Group Co Ltd The Inspur Group Co Ltd reserves the right of revising this manual momentarily Any alteration about the content of this manual will not be informed Please contact Inspur Group Co Ltd if you have any question...

Страница 2: ...he MEMORY CPU CPU Fan Fan and so on are all in given standard Please don t use them together with the corresponding components of any other computers 4 When you have any software problems during the application of this server we hope that you firstly contact the corresponding software supplier and then he will contact us in favor of communication so as to solve your problem together especially for...

Страница 3: ...rding to the following steps Switch off the power supplies of the system and the equipment disconnect them with the power socket wait for 10 to 20 minutes and then open the cover of the host Move the equipment to the ventilation place to dry the system at least for 24 hours and make sure that the system is fully dried Close the cover of the host re connect the system to the power socket and then s...

Страница 4: ...ic electricity on the body by contacting the metal earthing objects such as the unpainted metal surface on the chassis to prevent the static electricity on the body from conduct ing itself to the sensitive components For electrostatic sensitive components not ready to be installed for application please do not take them out from the antistatic package materials During the work please touch the ear...

Страница 5: ...e and stabilization When pressing down the release latch of the sliding rail of components and slid ing in or out please be careful as the sliding rail may hurt your figures Never make the AC power branch circuit in the cabinet overload The sum of cabinet load shall not exceed 80 of the ratings of branch circuits Ensure that components in the cabinet have good ventilation When repairing components...

Страница 6: ...rthing pin of power lines and do not use the patch plug or the earthing pin unplugged with cables In case of the earthing conductors not installed and it is uncertain whether there are appropriate earth ing protections please do not operate or use the equipment Contact and consult with the electrician please Warning 6 To avoid short circuit of internal components and fire or electric shock hazards...

Страница 7: ...foot first If you fail to install cor respondingly the supporting foot before installing equipment in the chassis it may cause the cabinet to turn over in some cases and thus may cause personal injury Therefore it is necessary to install supporting feet before installing equipment in the chassis After installing the equipment and other components in the chassis it can only pull out one component f...

Страница 8: ...tem Common Problems and Trouble shooting We suggest you read this manual seriously before you use this server for sake of the unnecessary faults in your operation Technical Service Hot line 86 531 88546554 Address NO 1036 Inspur Road Jinan China Inspur Group Zip code 250101 ...

Страница 9: ...r the BIOS Setup 2 2 BIOS System Menu Introduction Chapter 3 Operating System Installation 3 1 Manually Install Windows Server 2008 R2 Enterprise Edition 3 2 Manually Install Red Hat Enterprise Linux 6 1 Chapter 4 Integrated RAID System 4 1 How to Enter the Configuration Interface of SATA RAID 4 2 Control Key Application 4 3 SATA RAID Configuration Chapter 5 Common Problems and Trouble shooting 5 ...

Страница 10: ... Type Romley EP 2S Socket R Memory Type DDR3 1600 1333 1066 800 ECC Registered Memory Slots 8 Total Capacity Up to 256GB Monitor Controller Type Integrated graphics HDD Controller SATA Controller Support 2 pieces of 2 5 hot swapping SATA SSD hard disks 1 2 NX5440 Computing Blade View The following 1 1 picture shows the view of NX5440 Computing Blade Figure 1 1 Computing Blade ...

Страница 11: ...boot Button Fault Indi cator It lights when the blade fails or is reboot ed red D USB Interface For connecting USB devices 1 4 NX5440 Computing Blade Application NX 5440 Computing Blade should accompany Inspur I8000 server namely the user should install the computing blade into the I8000 server system for proper applica tion Please refer to the relevant parts in the I8000 server user manual or the...

Страница 12: ...open the upper panel of the chassis with the authorization of Inspur Group 1 Close the system extract the blade unit and press the unlocking springs 2 Pull outward to the direction as the arrow in the picture shows remove the up per panel Figure 1 4 Pin Short cut 1 2 pins Setting Jumper Cap 1 Press the notches of unlocking springs 2 Pull the upper panel backwards to open it ...

Страница 13: ...umper NO Description Function J12 CMOS clear jumpers Short cut pin 1 2 normal status short cut pin 2 3 clear CMOS Notes When you short cut Pin 2 3 to clear CMOS please remain the shortcut for 5 seconds then re short cut Pin 1 and Pin 2 default status of CLR CMOS jumper with jumper caps to recover the previous status ...

Страница 14: ...m is selected and Enter is pressed the screen will display its submenu 2 2 BIOS System Menu Introduction Next the following main function menus of BIOS are introduced Function Menu Menu name Menu Function Main Configuring the basic system settings such as system time system date super user and user password setup displaying version of BIOS CPU and memory information etc Advanced Configuring advanc...

Страница 15: ... next item value The key only displays the item values relevant to the item itself rather than all the item values F1 The help key for displaying the relevant introduction of current menu F2 For restoring the value saved last time F9 For back to the system default configuration with the best performance F10 For saving CMOS settings and exiting Enter For executing current command or entering the su...

Страница 16: ...nd modification time Memory Information Display the memory total capacity installed in system System Date Set the system date in format of week month date year System Time Set the system time adopting 24 hour system in format of hour minute second 2 2 2 Advanced menu Figure 2 2 ...

Страница 17: ...etailed information about CPU0 1 including CPU main frequency maximum frequency minimum frequency CPU cores whether support hyper threading and VT X first lever cache second cache and third cache Hyper threading CPU hyper treading function setup includes Enabled defaulted and Disabled two items Active Processor Cores Activated all the cores in the CPU It includes All 1 2 4 6 the items may vary acc...

Страница 18: ...AHCI Mode and RAID Mode Serial ATA Controller 0 This item only appears when SATA Mode is set to be IDE Mode There are three options Disabled Enhanced and Compatible SAS Configuration Enter this item to view the status of SAS devices connected to every SAS ports When Chipset South Bridge Scu devices is set to be Disable this item will disappear Serial Port Console Redirection The item can be used t...

Страница 19: ...rth Bridge South Bridge ME Subsystem Following are the introductions about the main and common items 2 2 3 1 North Bridge Figure 2 4 IOH Configuration The menu is used to open or close VT d or set the rate of PCIE port Figure 2 5 ...

Страница 20: ...ize Lock Step function the user has to set the same memory of DIMM 0 1 and 2 3 under every CPU Enabling this function can enhance the correction ability of the memory To realize Sparing function two pieces of 2 Rank memory or above should be installed After the enabling the function the system will select a rank for spare when the faults in the other ranks on this memory reach a certain threshold ...

Страница 21: ...ction for memory overheat Two available options CLTT the memory temperature is read by the in built sensor TSOD when the temperature reaches a certain threshold value the bandwidth will be automatically re duced OLTT for memory without in built sensor TSOD the bandwidth will be lim ited in the value of OLTT Peak BW Altitude Thermal Throttling function calculating index the altitude of the machine ...

Страница 22: ... controller there are Enabled and Dis abled two options If SAS HDD connection is required set this item as Enabled Onboard SATA RAID Oprom This item is used to open or close onboard SATA RAID controller rom here are Enabled and Disabled two options If SATA mode is selected as raid mode this item must be set as Enabled USB Configuration Open or close USB 2 2 3 3 ME Subsystem This menu displays the ...

Страница 23: ...ptions Enable and Disable It is used to control whether BIOS has mutual information with BMC BMC network Configuration This menu displays information configuration of BMC network port 2 2 5 Boot Menu Boot menu is mainly used to the configuration of system boot devices priority Figure 2 8 ...

Страница 24: ... finish the boot settings Hard Drive BBS Priority Press Enter to enter the submenu Then set the boot order for the device 2 2 6 Security Menu Figure 2 9 Administrator Password The menu is used to set system administrator password After the settings the user has to input the password of common user or level above to enter the BIOS Setup User Password The menu is used to set user password After the ...

Страница 25: ...d press Enter Then select Yes in the pop up and discard the amendments you made in the BIOS Setup Then exit BIOS Setup Save Changes and Reset Select this item and press Enter Then select Yes in the pop up and save the amendments you made in the BIOS Setup Then exit BIOS Setup and the computer will be rebooted Discard Changes and Reset Select this item and press Enter Then select Yes in the pop up ...

Страница 26: ...op up and the system will load the default optimized settings You will not exit the BIOS Setup Also you can realize this function by F9 Save as User Defaults Select this item and press Enter Then select Yes in the pop up and all BIOS settings will be saved as the default configurations Restore User Defaults Select this item and press Enter Then select Yes in the pop up and the system will load the...

Страница 27: ... introduction illustrates how to install OS under external Intel RSTe 3 0 RAID configurations If your server is configured with other external RAID cards please refer to the User Manual in the disk attached for how to add hard disk controller drivers For network card driver graphics driver and system patches please still refer to this Chapter Please first confirm that the configurations of your se...

Страница 28: ...ation do you want select the installa tion type and here the default set by us is the first installation Select Custom model to continue 8 The system enters the interface of Where do you want to install Windows If it prompts no driver is detected it means your configurations require Inspur Driver U Disk to load the driver of disk controller Please follow the steps below If Inspur driver U disk is ...

Страница 29: ...rmation page click Yes to continue After formatting the partition click Next to continue 10 The system starts to install Windows and it will complete operations of Copying files Expanding files Installing functions Installing updates and Completing installation etc In this course the system may automatically reboot for several times 11 After the installation the system would boot to the interface ...

Страница 30: ...e installation Enter the interface of Readme File Information and click Next to con tinue the installation The installation program begins to install and click Next according to the prompts Complete the installation click Finish 2 Install Network card driver Please do not withdraw the driver CD after the installation of chipset patches the system will enter the network card driver installation In ...

Страница 31: ...ers the interface of Welcome to Red Hat Enterprise Linux 6 1 which includes the following items Install or upgrade an existing system Install system with basic video driver Rescue installed system Boot from local driver Memory test You can use up and down arrow key to select items Here we default that this is the first installation Select Install or upgrade an existing system and press Enter to co...

Страница 32: ...ompt Weak Password please select according to your actual needs and then continue 11 The installation program enters Which type of installation would you like Here we illustrate the installation by the example of customer manually partition select Create Custom Layout and click Next to continue 12 The installation program enters the interface of Select the hard disk to in stall In the Data Storage...

Страница 33: ...ding to the actual demand After confirming the selected software package to install and click Next to continue the installation Here we select the Desktop and X Windows System in Desktops and Devel opment tools software package in Development 18 The installation program begins to build file system and copy files 19 Entering Congratulations your Red Hat Enterprise Linux installation is com plete in...

Страница 34: ...rt Starting MST Mellanox Software Tools driver set Loading MST PCI module Success Loading MST PCI configuration module Success Create devices MST modules MST PCI module loaded MST PCI configuration module loaded If the information above is displayed it means the load runs normally 2 Input mst status MST devices dev mst mt4099_pciconf0 PCI configuration cycles access bus dev fn 02 00 0 addr reg 88 ...

Страница 35: ...e 4 2 Control Key Application Key Description For moving cursor and modifying menu option value in differ ent menus TAB For selecting the next menu configuration item Enter For selecting menu Esc For exiting menu or back to the previous menu from submenu 4 3 SATA RAID Configuration After entering the SATA RAID configuration interface these information will pops out including the menu list informat...

Страница 36: ...th up and down arrow keys and then press Enter to create RAID volume menu Or simply input the digital key before the menu to Create RAID menu The system will display the following menu options Name Please input the volume name which contains less than 16 characters without special characters RAID Level Please select RAID volume level if it has not created volume at present there are four volume le...

Страница 37: ...med please enter Y the volume will then be created and at the same time all the data on the selected hard disk will be lost If not to create RAID volume please enter N and exit the creation of volume Here we enter Y and create RAID volume after the creation return to the main configuration interface of SATA RAID and the created RAID volume will be displayed in the RAID volume Ⅱ Delete RAID Volume ...

Страница 38: ...g to the prompt It should be noted that when resetting hard disks all data on hard disks will be lost And at the same time the hard disk will never again belong to the RAID volume Ⅳ Exit Menu After entering the configuration interface of SATA RAID you can select the menu by the up and down arrows and then press Enter to enter the menu System prompts Are you sure you want to exit Y N input Y and th...

Страница 39: ...r up system memory and restart the oper ating system Ctrl Alt Del Clear system memory re self test the POST and reboot the opera tion system Reset button Cold boot again switch off and restart the system power so that to clear up the system memory to self check the POST again to re start the operating system and to power up all peripherals again Power button 5 2 Problems When Starting the Machine ...

Страница 40: ...e 6 If the machine is installed with components other than Inspur ones please re move them first 7 With the permission of Inspur technical support personnel you may pull and plug RAM and clear CMOS for test 5 2 3 Installation System Can t Find Hard Disk 1 When installing the system directly booted with the system CD if it prompts that no hard disk can be found please check the normality of the dis...

Страница 41: ...zation of the system you may refer to the following measures 1 If other external non Inspur components or some application program software are installed before the fault it is suggested removing it and going on to test your serv er 2 Use the latest antivirus software for antivirus test 3 It is suggested that you record the displayed information code for blue screen such as stop c000000218 stop 0x...

Страница 42: ...ID card or hard disk back plane If it is also accompanied by no display on the monitor or power on faults there is high possibility of something wrong with motherboard You can try to pull or plug RAM or clear CMOS If the starting self check is normal and the alarm starts when the RAID card is under test and there is abnormal array information then it is likely that the RAID card has set off the al...

Страница 43: ...es 1 If you have doubt in product configuration and specification details please con tact your supplier 2 If there is system problem in using the machine please contact the customer service center of Inspur server directly please record the product serial number on your host chassis After receiving your service request our technical support personnel will provide you with solution or field mainten...

Отзывы: