Содержание OS
Страница 1: ...Inspur Server OS Installation Guide Document Version V2 3 Release Date January 19 2022 ...
Страница 16: ...7 Figure 4 1 Server Mgmt ...
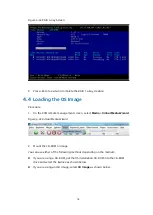
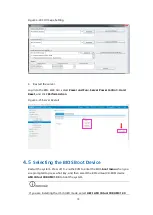
Страница 17: ...8 Figure 4 2 Configuration Address Source Figure 4 3 BMC IP Setting ...
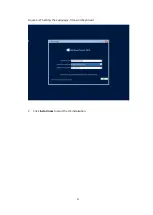
Страница 30: ...21 Figure 4 27 Setting the Language Time and Keyboard 2 Click Install now to start the OS installation ...
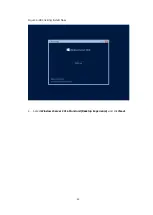
Страница 31: ...22 Figure 4 28 Clicking Install Now 3 Select Windows Server 2016 Standard Desktop Experience and click Next ...
Страница 32: ...23 Figure 4 29 Selecting the OS 4 Check I accept the license terms and click Next ...
Страница 37: ...28 Figure 4 35 User Login Screen 10 Enter the desktop and the installation is completed ...
Страница 43: ...34 Figure 4 41 Selecting a Drive 6 Press or to select a keyboard layout and press Enter to continue ...
Страница 44: ...35 Figure 4 42 Selecting a Keyboard Layout 7 Set the root password and press Enter to continue ...
Страница 46: ...37 Figure 4 44 Confirming the Installation 9 Wait for the installation to complete ...
Страница 47: ...38 Figure 4 45 Installing ESXi 7 0 1 10 When the installation is completed press Enter to reboot ...
Страница 49: ...40 Figure 4 47 System UI Management Screen Figure 4 48 Authentication Required Screen ...
Страница 54: ...45 Figure 4 53 Selecting Restart Management Network Figure 4 54 Confirming the Management Network Restart ...
Страница 57: ...48 Figure 4 57 Selecting Restart Management Agents Figure 4 58 Confirming the Restart ...
Страница 68: ...59 Figure 5 12 Selecting INSPUR 8204 4 GB Figure 5 13 INSPUR 8204 4 GB Configuration Screen ...
Страница 71: ...62 4 Select Proceed to next Form Figure 5 17 Selecting Proceed to Next Form 5 Set RAID Level to RAID 5 ...
Страница 75: ...66 Figure 5 21 Setting System Date Figure 5 22 Setting System Time ...
Страница 85: ...76 Figure 5 36 Language Selection Screen 5 The INSTALLATION SUMMARY screen appears ...
Страница 90: ...81 Figure 5 41 Installation Progress Screen 10 After the installation is completed click Reboot System ...
Страница 102: ...93 Figure 5 58 Authentication Required Screen Figure 5 59 System Customization Screen ...
Страница 106: ...97 Figure 5 63 Selecting Restart Management Network Figure 5 64 Confirming the Management Network Restart ...
Страница 109: ...100 Figure 5 67 Selecting Restart Management Agents Figure 5 68 Confirming the Restart ...
Страница 121: ...112 Figure 6 16 Setup Wizard Screen 3 Select the language you like to use and click Continue ...
Страница 122: ...113 Figure 6 17 Selecting the Language 4 Set DATE TIME KEYBOARD and LANGUAGE SUPPORT ...
Страница 124: ...115 Figure 6 19 Software Selection 6 Select the destination drive to install the OS to and configure the partitions ...
Страница 126: ...117 Figure 6 21 Network Configuration 9 Check all the information and then start the installation process ...
Страница 127: ...118 Figure 6 22 Checking Information and Beginning Installation 10 Set the root password in USER SETTINGS ...
Страница 128: ...119 Figure 6 23 User Settings Figure 6 24 Setting the Root Password ...
Страница 130: ...121 Figure 6 26 Reboot Figure 6 27 Reboot Screen ...
Страница 136: ...127 Figure 6 32 Selecting a Drive 6 Press or to select a keyboard layout and press Enter to continue ...
Страница 137: ...128 Figure 6 33 Selecting a Keyboard Layout 7 Set the root password and press Enter to continue ...
Страница 139: ...130 Figure 6 35 Confirming the Installation 9 Wait for the installation to complete ...
Страница 140: ...131 Figure 6 36 Installing ESXi 7 0 1 10 When the installation is completed press Enter to reboot ...
Страница 142: ...133 Figure 6 38 System UI Management Screen Figure 6 39 Authentication Required Screen ...
Страница 147: ...138 Figure 6 44 Selecting Restart Management Network Figure 6 45 Confirming the Management Network Restart ...
Страница 150: ...141 Figure 6 48 Selecting Restart Management Agents Figure 6 49 Confirming the Restart ...
Страница 165: ...156 Figure 7 18 Setting System Date Figure 7 19 Setting System Time ...
Страница 174: ...165 Figure 7 31 User Login Screen Figure 7 32 Desktop ...
Страница 177: ...168 Figure 7 34 Language Keyboard and Product Selection 3 Check I Agree to the License Terms and click Next ...
Страница 181: ...172 Figure 7 38 Skipping Registration Dialog Box 7 Select the extensions and modules to be installed and click Next ...
Страница 182: ...173 Figure 7 39 Extension and Module Selection Figure 7 39 Add On Product Installation ...
Страница 185: ...176 Figure 7 42 Creating Mount Points 11 Set the time zone and click Next Figure 7 43 Setting the Time Zone ...
Страница 188: ...179 Figure 7 46 Installation Settings Figure 7 47 Performing Installation ...
Страница 196: ...187 Figure 7 56 Confirming the Installation ...
Страница 199: ...190 Figure 7 59 System UI Management Screen Figure 7 60 Authentication Required Screen ...
Страница 204: ...195 Figure 7 65 Selecting Restart Management Network Figure 7 66 Confirming the Management Network Restart ...
Страница 207: ...198 Figure 7 69 Selecting Restart Management Agents Figure 7 70 Confirming the Restart ...
Страница 214: ...205 Figure 8 8 Installation Step 1 Figure 8 9 Installation Step 2 ...
Страница 244: ...235 Figure 10 29 Modifying the Kdump Configuration 2 Figure 10 30 Modifying the Kdump Configuration 3 ...
Страница 247: ...238 Figure 10 35 Advanced System Settings 3 In the Startup and Recovery area select Settings ...
Страница 248: ...239 Figure 10 36 Startup and Recovery 4 Configure the Windows kernel crash in the Startup and Recovery dialog box ...
Страница 258: ...249 Figure 10 52 BIOS Serial Port Setting 1 Figure 10 53 BIOS Serial Port Setting 2 ...

