background image

10

Item

Description 

Status & Interpretation

1

Power button and LED

Steady green in power-on status

Steady orange in standby status

Long press to force a system shutdown

2

UID LED and button

Turn on/off UID, blue on

3

System reset button

Short press to force a system reset

4

System status LED

Off in normal status

Steady red in case of power failure

Flashing red in case of abnormal power status

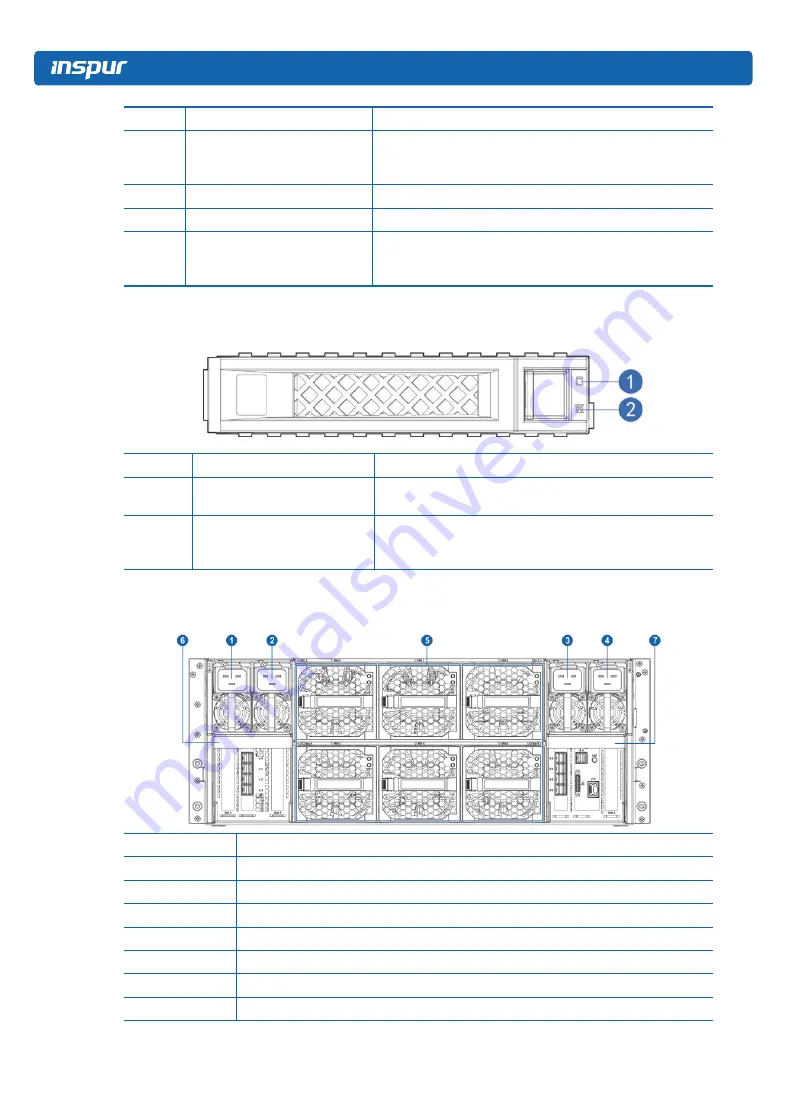
3.3 Drive Tray LEDs

Item

Description 

Status & Interpretation

1

Activity status LED

teady green: Normal

Flashing green: Read and write activity

2

Fault alarm LED

Steady red: A failure occurs

Steady blue: Drive positioning

Steady pink: RAID Rebuilding

3.4 Rear Panel Components

Item

Description 

1

PSU0

2

PSU1

3

PSU2

4

PSU3

5

FAN 0-5

6

I/O Box A

7

I/O Box B

Содержание NF5488A5

Страница 1: ...Inspur Server User Manual NF5488A5 ...

Страница 2: ...t prior written consent of Inspur The information in this manual is subject to change without notice Inspur is the registered trademark of Inspur All the other trademarks or registered trademarks mentioned in this manual are the property of their respective holders Edition 1 3 June 2021 Edition statement Product Specifications updated ...

Страница 3: ...y If needed please contact Inspur for our support and guidance 2 Before disassembling the server s components please be sure to disconnect all the power cords connected to the server 3 BIOS and BMC setup is a significant factor in correctly configuring your server If there are no special requirements it is suggested to use the Default Values and not alter the parameter settings arbitrarily After t...

Страница 4: ... 4 2 Power down the Server 18 4 3 Extend the Server from the Rack 18 4 4 Remove the Access Panel 19 4 5 Install the Access Panel 20 4 6 Install the Server 20 4 7 Remove the GPU BOX 20 4 8 Remove the IO BOX 21 5 Setup 22 5 1 Optimum Environment 22 5 2 Rack Warnings 24 5 3 Identifying the Contents of the Server Shipping Carton 25 5 4 Installing Hardware Options 25 5 5 Installing the Server into the ...

Страница 5: ...cation Numbers 40 10 2 Federal Communications Commission Notice 40 10 3 European Union Regulatory Notice 41 10 4 Disposal of Waste Equipment by Users in the European Union 41 10 5 Korean Notice 42 10 6 Chinese Notice 42 10 7 Battery Replacement Notice 42 11 Electrostatic Discharge 44 11 1 Preventing Electrostatic Discharge 44 11 2 Grounding Methods to Prevent Electrostatic Discharge 44 12 Warranty...

Страница 6: ...able with properly grounded plugs Observe extension cable ratings Ensure that the total rating of all equipment plugged into the extension cable does not exceed 80 percent of the ratings limit for the extension cable 4 Please be sure to use the power supply components that come with the server such as power cable power socket if provided with the server etc For your safety please do not replace po...

Страница 7: ...stabilizers before installing equipment into the rack Failure to install the corresponding stabilizers before installing equipment into the rack may cause the cabinet to tip over possibly resulting in severe injury After installing the equipment and other components into the rack only one component can be pulled out from the rack through its sliding part at one time Pulling out several components ...

Страница 8: ... cables avoid placing wires in high foot traffic locations Please do not place objects on the cables 4 Before removing the host cover and or touching the internal components please allow for the equipment to cool first To avoid damaging the motherboard please power off the system and wait for five seconds and then remove the components from the motherboard and or disconnect the peripheral device f...

Страница 9: ...connections of the system When disconnecting the cables please hold the connector of the cables and slowly pull the plugs out Never pull on the cables 2 The products need to completely cool down before dismounting the host cover or touching the internal components 3 Before disassembling assembling or touching any electronic components in the equipment you should first remove static electricity on ...

Страница 10: ...ircuits in the rack The total load of the rack should not exceed 80 of the ratings of the branch circuits 6 Ensure that components in the rack have good ventilation conditions 7 When repairing components in the rack never step on any other components 9 After receiving the server please refer to the label on the top cover to remove the screws on both sides of the chassis and then install it on the ...

Страница 11: ...GB GPUs interconnected at high speed in 4U space The direct P2P data interaction between any two GPUs can achieve 2 petaflops of AI computing performance NF5488A5 adopts the most advanced high speed NVIDIA NVSwitch which enables P2P connection between any two of the 8 NVIDIA SXM4 A100 Tensor Core 40 80 G GPUs at a total bandwidth of up to 600 GB s in a 4U space With 2 AMD EPYC 7002 7003 series PCI...

Страница 12: ...B 80GB GPU up to 400W Supports NVSwitch fully connected topology I O USB 2 front USB3 0 port Network port 2 10G optical port VGA 1 front VGA port Mgmt 1 front RJ45 IPMI port and 1 rear RJ45 Switch BMC port PCIe Supports 4 PCIe Gen4 x16 25W low profile PCIe card Display Controller type Integrated in Aspeed 2500 chip supporting up to 1900 1200 resolution Drive Drive type Up to 4 hot swap NVMe SSDs 4...

Страница 13: ...imensions 722mm W x 368 mm H x 1168mm D Host machine dimensions 448mm W x 175 5mm H x 850mm D Weight Full configuration NW 62kg GW 95kg Gross weight including host packing box rails accessory box Environmental Operating temperature 5 35 Storage transportation temperature 40 60 Operating humidity 20 90 relative humidity Storage transportation humidity 20 93 40 relative humidity ...

Страница 14: ...onents Item Description 1 Power button LED 2 UID button LED 3 System reset button 4 System failure LED 5 12 HDD 0 7 13 USB3 0 port x2 14 BMC management port 15 Ethernet port x2 16 VGA port 17 BMC debug port 18 UID button LED 19 GPU BOX 3 2 Front Control Panel Buttons and LEDs ...

Страница 15: ... 4 System status LED Off in normal status Steady red in case of power failure Flashing red in case of abnormal power status 3 3 Drive Tray LEDs Item Description Status Interpretation 1 Activity status LED teady green Normal Flashing green Read and write activity 2 Fault alarm LED Steady red A failure occurs Steady blue Drive positioning Steady pink RAID Rebuilding 3 4 Rear Panel Components Item De...

Страница 16: ...SASHD connector 1 3 SASHD connector 0 4 Slimline connector x11 5 CPU1 6 Motherboard handle 7 TPM connector 8 CPU0 9 DIMM slots CPU0 10 TF slot 11 Left ear front panel connector 12 Slimline_PCIe_Raid 13 Raid card connector 14 HDD_BP signal connector 1 15 HDD_BP signal connector 0 16 BMC_TF slot ...

Страница 17: ... port 18 UID button 19 BMC USB3 0 port x2 20 10G Ethernet port x2 21 VGA port 22 Slimline_PCIe_MB1 23 M 2 Riser slot 24 Motherboard handle 25 HDD_BP signal connectors 26 P12V_INPUT connector 27 PWR_PDB0 connector 28 PWR_PDB1 connector ...

Страница 18: ...sary to power down the server 1 Back up the server data 2 Shut down the operating system 3 Disconnect the power cords The system is now without power 4 3 Extend the Server from the Rack 1 Follow the installation guide and loosen the four captive screws within the ears on both sides by using a screwdriver 2 Pull out the server slowly out of the rack Install the lifting handles on both sides Move th...

Страница 19: ...thout the access panel air baffle or fan installed If the server supports hot plug components minimize the amount of time the access panel is open To remove the component 1 Power down the server if performing a non hot plug installation or maintenance procedure 2 Extend the server from the rack 3 Use the screwdriver to loosen the security screw on the hood latch 4 Lift up on the hood latch handle ...

Страница 20: ...he rack 2 Use a screwdriver to fix the captive screws within the ears on both sides to secure the chassis onto the rack WARNING A single server weighs above 60kg and should be lifted by at least four people or by using auxiliary equipment 4 7 Remove the GPU BOX 1 OpenthehandlesonbothsidesoftheGPUBOXchassis asshownby inthefollowingfigure Note Before opening the handles check whether the screws on b...

Страница 21: ...16 heavy and requires two people to lift 4 8 Remove the IO BOX 1 Use a screwdriver to loosen the screw on the handle of the IO BOX 2 Open the handle outwards and pull the IO BOX out of the chassis ...

Страница 22: ... cabinet and the rear door must be adequately ventilated to allow the warm air to escape from the cabinet CAUTION To prevent improper cooling and damage to the equipment do not block the ventilation openings When vertical space in the rack is not filled by a server or rack component the gaps between the components cause changes in airflow through the rack and across the servers Cover all gaps with...

Страница 23: ...irements Installation of this equipment must comply with local and regional electrical regulations governing the installation of information technology equipment by licensed electricians This equipment is designed to operate in installations covered by NFPA 70 1999 Edition National Electric Code and NFPA 75 1992 code for Protection of Electronic Computer Data Processing Equipment For electrical po...

Страница 24: ...ust install the equipment in accordance with any regional or national electrical wiring codes such as the International Electrotechnical Commission IEC Code 364 parts 1 through 7 Furthermore you must be sure that all power distribution devices used in the installation such as branch wiring and receptacles are listed or certified grounding type devices Because of the high ground leakage currents as...

Страница 25: ... server shipping carton and locate the materials and documentation necessary for installing the server All the rack mounting hardware necessary for installing the server into the rack is included with the rack or the server The contents of the server shipping carton include Server Power cord Rack mounting hardware In addition to the supplied items you may need Operating system or application softw...

Страница 26: ...ounding plug is an important safety feature Plug the power cord into a grounded earthed electrical outlet that is easily accessible at all times Unplug the power cord from the power supply to disconnect power to the equipment Do not route the power cord where it can be walked on or pinched by items placed against it Pay particular attention to the plug electrical outlet and the point where the cor...

Страница 27: ...cessor Option The server supports single and dual processor operation CAUTION To avoid damage to the processor and motherboard only authorized personnel should attempt to replace or install the processor in this server To help avoid damage to the processor and motherboard do not install the processor without using the processor installation tool CAUTION To prevent possible server malfunction and d...

Страница 28: ...stallation 6 Install the processor Step 1 Follow the sequence in the figure to loosen the screws of the CPU fixing cover Step 2 Open the fixing cover Step 3 Open the tabs on both sides at the same time to open the CPU holder ...

Страница 29: ...24 Step 4 Insert the CPU into the CPU holder Avoid the CPU golden finger side touching the holder Make sure the CPU is inserted into the bottom of the holder 步骤 4 中两幅图增加箭头 ...

Страница 30: ...25 Hardware Options Installation Step 5 Lower the CPU holder onto the socket slowly and press the two tabs to secure it 步骤 5 中图片增加箭头 ...

Страница 31: ...26 Step 6 Close the fixing cover and follow the sequence to tighten the screws Step 7 Install the heatsink and tighten the screws ...

Страница 32: ...atsink it is required to tighten screws according to the sequence Note The pins of the processor socket are easily damaged If any pins are damaged you may need to replace the motherboard 6 3 Memory Option Note This server does not support mixing DIMMs All DIMMs installed in the server must be the same type DIMM slot layout is as shown in the following figure ...

Страница 33: ...V V V V V V V V V V V 24 V V V V V V V V V V V V V V V V V V V V V V V V 32 V V V V V V V V V V V V V V V V V V V V V V V V V V V V V V V V CA CE CF CG CH CG CH CD CC CPU1 CPU0 CB CA CE CF CD CC CB Step 1 Open the lock tabs on both ends of the DIMM slot Step 2 Align the bottom key with the receptive point on the slot press both ends of the DIMM with your thumbs Insert the DIMM into the slot comple...

Страница 34: ...t plug components minimize the amount of time the access panel is open 1 Check the status of the hard drive from the hot plug hard drive LED 2 Back up all server data on the hard drive 3 Remove the hard drive Step 1 Press the drive panel button Step 2 The lever on the drive tray pops out automatically Remove the drive tray outward in horizontal direction Step 3 Use four screws to fix the drive int...

Страница 35: ...oute the power cord through the power cord anchor or cable management arm 5 Reposition the cable management arm into the operating position 6 Connect the power cord to the power source 7 Verify that the corresponding power supply LED is green 6 6 Air Baffle Option CAUTION For proper cooling do not operate the server without the access panel baffles expansion slot covers or blanks installed If the ...

Страница 36: ...31 Hardware Options Installation 4 Hold the two sides of the air baffle by using both hands and lift the air baffle upward to remove it ...

Страница 37: ...d Route the SlimSAS cables according to the yellow lines 2 When the drive backplane is directly connected with the motherboard route the SAS cables according to the blue lines to connect the drive backplane and the SAS RAID card Route the power cables according to the red lines to connect the drive backplane and the motherboard Route the SlimSAS cables according to the yellow lines 3 Signal line c...

Страница 38: ...33 Cabling 4 Power cable connection between the motherboard and the switch board Note Please route the cables according to your purchased machine configuration ...

Страница 39: ...there is a machine and a power module of the same type you could change the power module to test whether there is a power module fault d If the instructions above do not resolve the problem please contact Inspur customer service 2 No display after power on Description After pressing the power button the power LED on server s front control panel is on the chassis fans rotate normally but there s no...

Страница 40: ...C logs to check whether there are errors reported e If above operations could not resolve the problem please contact Inspur customer service 4 Power module LED is off or red Description The server is under normal operation but a certain power module LED is off or red Suggestions a Firstly check whether all power cables are normal and plug in the power cables again b If the fault still exists inser...

Страница 41: ... check whether the chassis fans operate at a high speed caused by the over temperature chassis b If the chassis has a high temperature check the temperature of server room if it is excessively high open the air conditioner to cool the room c If the server room s temperature is normal check whether the front panel or chassis interior is jammed with dust or the air inlet is blocked It needs to impro...

Страница 42: ...line can be called for support 9 USB interface problem Description Unable to use devices with a USB interface Suggestions a Make sure the operating system on server supports USB devices b Make sure the system has been installed with correct USB device driver c Power off the server and then power on again to test d Check whether the USB device is normal when connected to other hosts e If the USB de...

Страница 43: ...OS Enter BIOS Setup to view the memory capacity if the memory is identified completely the operating system may have limits to the memory capacity e g Windows server 2008 x86 supports 4G memory at most b If the memory is not identified completely in BIOS Setup confirm that the corresponding slots have been installed with memories of correct type c If above operations could not resolve the problem ...

Страница 44: ... risk of fire and burns exists if the battery pack is not properly handled To reduce the risk of personal injury Do not attempt to recharge the battery Do not expose the battery to temperatures higher than 60 C 140 F Do not disassemble crush puncture short external contacts or dispose of in fire or water Replace only with the spare designated for this product To remove the component 1 Power down t...

Страница 45: ...on their intended installation Class A devices are those that may reasonably be expected to be installed in a business or commercial environment Class B devices are those that may reasonably be expected to be installed in a residential environment for example personal computers The FCC requires devices in both classes to bear a label indicating the interference potential of the device as well as a...

Страница 46: ...oduct documentation The compliance is indicated by one of the following conformity markings placed on the product Please refer to the regulatory label provided on the product 10 4 Disposal of Waste Equipment by Users in the European Union This symbol on the product or on its packaging indicates that this product must not be disposed of with other household waste Instead it is your responsibility t...

Страница 47: ...um manganese dioxide a vanadium pentoxide or an alkaline battery pack A risk of fire and burns exists if the battery pack is not properly handled To reduce the risk of personal injury Do not attempt to recharge the battery Do not expose the battery to temperatures higher than 60 C 140 F Do not disassemble crush puncture short external contacts or dispose of in fire or water ...

Страница 48: ...ttery packs and accumulators should not be disposed of together with the general household waste To forward them to recycling or proper disposal use the public collection system or return them to Inspur an authorized Inspur Partner or their agents ...

Страница 49: ...ve component or assembly 11 2 Grounding Methods to Prevent Electrostatic Discharge Several methods are used for grounding Use one or more of the following methods when handling or installing electrostatic sensitive parts Use a wrist strap connected by a ground cord to a grounded workstation or computer chassis Wrist straps are flexible straps with a minimum of 1 megohm 10 percent resistance in the...

Страница 50: ... Conditions i Remote Services Inspur provides 24x7 remote service through Hotline E mail and Website Through Hotline and E mail Services Inspur engineer helps customers determine the cause of the malfunction and provide solution Website service provides a number of resources to help customers resolve problems and learn about our products such as product manuals drivers and Firmware Below is how to...

Страница 51: ...arts as well as any products the serial number of which falls off is damaged or obscure for the following reasons l Accident misuse abuse defiling improper maintenance or calibration or other external causes l Operating beyond the parameters as stipulated in the user documentation l Use of the software interface parts or supplies not provided by Inspur l Improper preparation place or maintenance l...

Отзывы: