1
USER MANUAL – EN
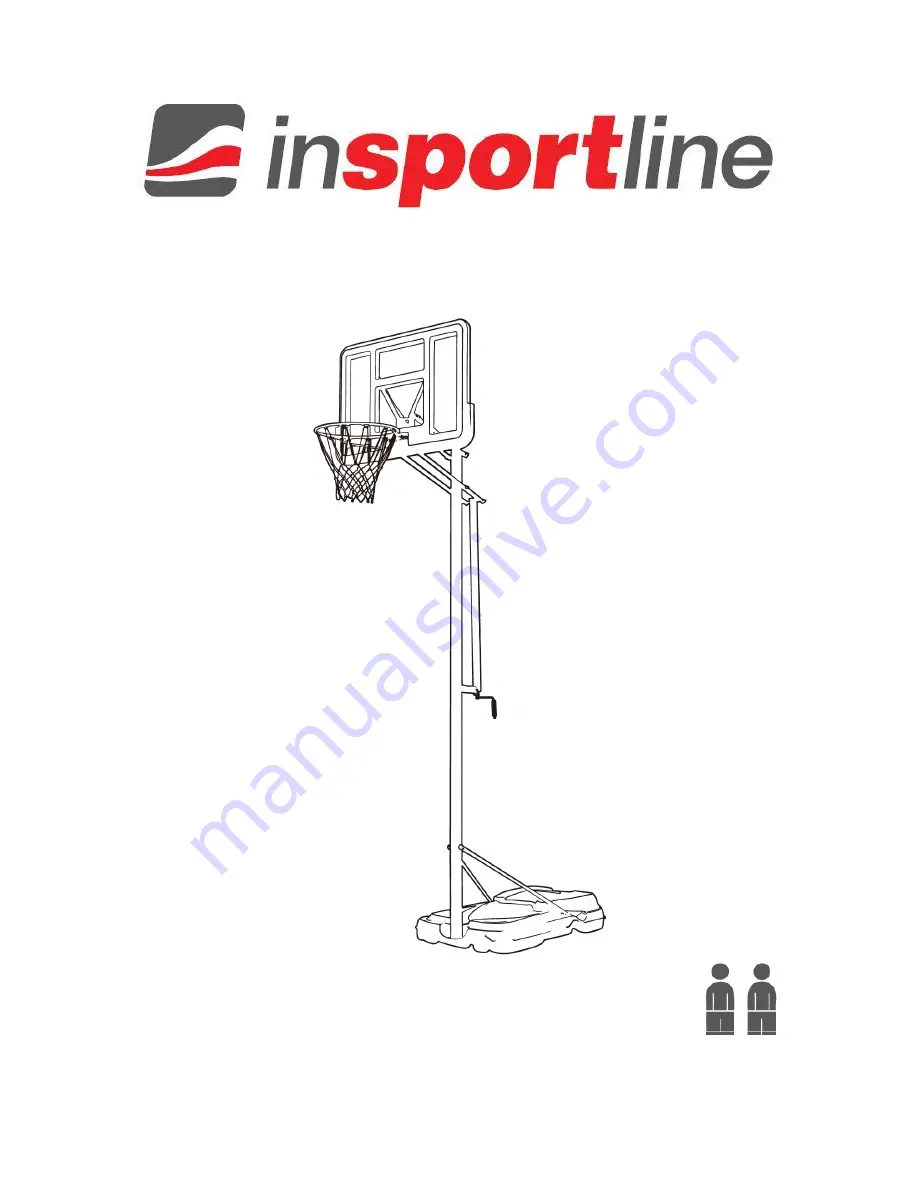
IN 10664 Portable Basketball L System inSPORTline Orlando
TWO ADULTS
Страница 1: ...1 USER MANUAL EN IN 10664 Portable Basketball L System inSPORTline Orlando TWO ADULTS...
Страница 2: ...2 CONTENTS SAFETY INSTRUCTIONS 3 PARTS LIST 4 HARDWARE 5 REQUIRED TOOLS 7 PRECAUTIONS 7 ASSEMBLY 8 TRANSPORT 14 TERMS AND CONDITIONS OF WARRANTY WARRANTY CLAIMS 15...
Страница 3: ...roperly If using a ladder during assembly use extreme caution Check base regularly for leakage Slow leaks could cause the system to tip over unexpectedly Seat the pole sections properly if applicable...
Страница 4: ...4 PARTS LIST A Backboard 1x B Rim Net 1x C Base 1x D Bottom Pole 1x E Middle Pole 1x F Top Pole 1x G Support arm 2x H Wheels 2x I Wheels Axle 1x J V Bracket 1x...
Страница 5: ...ms Short 2x L Height Adjuster Cap 1x N Spring 2x Q Height Adjuster 1x R Plastic Mat short 8x S Height Adjuster Handle 1x T Plastic Mat long 2x U Bracket Tube 2x HARDWARE V Lock Nut 17x W Washer 35x X...
Страница 6: ...6 V 4 M12 5x W 3 M10 4x W 4 M12 10x 1 M10x90mm 2x 2 M8x16mm 4x 4 M8x100mm 2x 6 M12x180mm 5x 3 M8x20mm 2x 5 M8x40mm 2x 7 M8x65mm 1x 8 Cross head screw 1x 9 M8x90mm 2x...
Страница 7: ...en any loose fittings Keep water and organic material away from the pole The pole could rust and fall Once a month check the pole and all metal parts for rust Do not hang from the rim Do not wear jewe...
Страница 8: ...eels H into the groves of the base C Using the axle I through them to secure 2 Secure the support arms to the base and bottom pole by using two bolts 2 two bolts 3 through six washers W 2 and two nuts...
Страница 9: ...9 STEP 2 1 Attached the middle pole E to bottom pole D straightly 2 Secure the U Bracket K on the middle pole E at the joint by two bolts 9 through four washers W 2 and two nuts V 2...
Страница 10: ...ening it with backboard 1 Attach the rim B and V Bracket J on the backboard A by using two spring sets X N and four bolts 4 5 through six washers W 2 and four nuts V 2 2 Open the V Bracket to align at...
Страница 11: ...hin rim hook Repeat for remaining net loops 1 Attach the upper arms P on the V Bracket using a bolt 6 through two washers W 4 two plastic mats R one bracket tube U and one nut V 4 2 Attach the lower a...
Страница 12: ...plastic mats R and two nuts V 4 2 Attach the height adjuster Q on the lower arms O by using a bolt 6 through two washers W 4 two plastic mats T and a nut V 4 3 Cap the M and L onto the top pole and he...
Страница 13: ...Bracket K by using a bolt 7 through two washers W 2 and a nut V 2 2 Attach the height adjuster handle S into height adjuster by using a cross head screw 8 through a washer W 1 and a nut V 1 3 Attach...
Страница 14: ...d adult Carefully pour sand into base 4 Allow sand to slide into lower and of base near the wheels Gradually lower base as sand is poured to ensure sand fills entire base Once full replace cap 5 If fi...
Страница 15: ...ied in the Certificate of Warranty Invoice Bill of Delivery or other documents related to the Goods The legal warranty period provided to the Consumer is not affected By the Warranty for Goods Quality...
Страница 16: ...ds unless a longer period has been agreed upon The day when the repaired or exchanged Goods is handed over to the Buyer is considered to be the day of the Warranty Claim settlement When the Seller is...