


20
user manual
InspIred Instruments Inc.
21
•
Sn
-
single note (monophonic) mode
this is an on/off function that limits the yrG to playing a single voice
(monophonic). this is useful for soloing and sweep picking and is simi-
lar to playing a synthesizer that is set to 1 voice only. single note
mode can alleviate spurious notes and false triggers when soloing
rapidly.
•
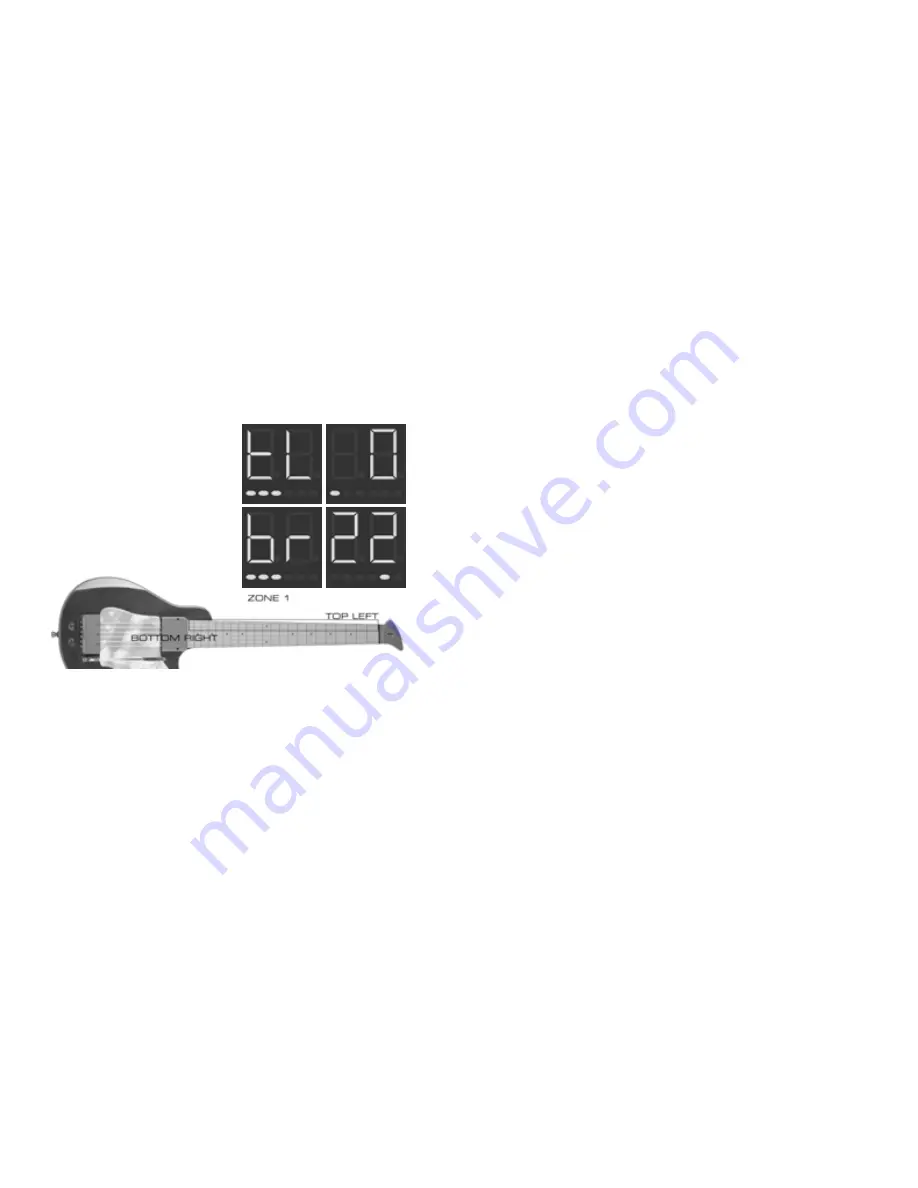
tL
and
br
-
top left and bottom right zone selection
these two parameters allow a zone to be setup for the GuItar or
synth layers. the zone is specified by a rectangle created by the
top left and bottom rIGht corners. you assign the parameters
by simply pressing the string/fret that defines the corners of the
rectangle.
for example, the zones can be de-
fined anywhere on the neck. first
set the top left (tl) corner of the
GuItar layer by striking an open
note on the lo e string. the dis-
play will show the lo e string and
fret 0.
next set the Zone for synth layer by plucking the d string open for
tl then pressing the hi e string fret 22 for br.
note:
If only one layer is enabled, it will cover the full neck and ignore
the zone settings.
sUbMenU 4: preset options
here you can customize the performance of many aspects of the
yrG presets. note that alterations made here will affect only your
currently selected preset. Within this submenu, use the up/doWn
buttons to scroll to your desired parameter. these are as follows:
•
od
-
open damping adjust
this is an enhanced version of our open damping algorithm, It allows
the user to adjust the damping from 0 ~ 10. recommended settings
are in the 4 or 5 range. open damping reduces the likelihood that
open notes will ring out when playing other notes on the fingerboard.
then use up arrow to go to bot-
tom right (br) and press the a
string 22 fret. now GuItar layer
will only sound in the zone that has
been defined.
•
Sr
-
slide range
here you can set the number of half steps (1-12) you can slide up or
down. note that the yrG uses pitch bend for slide, and that if you
slide outside of the acceptable range, you will trigger a new note.
With this option displayed, press down on a fret to set your desired
slide range. pressing the first fret will allow you to slide up or down a
single half step, while pressing the twelfth will allow you to slide up or
down a full octave.
•
br
-
whammy bar range
here you can set the number of half steps (1-12) by which the fully en-
gaged whammy bar will alter the pitch of any notes being played. With
this option displayed, press down on a fret to select your desired
whammy range. pressing the first fret will allow you to bend down or
up a single half step, while pressing the twelfth fret will allow you to
bend up or down a full octave. note that this setting is limited to be-
ing no higher than the current slide range setting (if ‘sr’ is set to 5,
for instance, ‘br’ can be set anywhere from 1-5, but not to 6).
•
PC
-
Midi patch change
here you can set the mIdI patch assigned to the current preset.
With this option displayed, press down on the fret corresponding to
your desired setting (1-128). fret 1 on the low e string corresponds
with setting 1, fret 1 on the a to 23, and so on, up to fret 18 on
the high e, which corresponds with setting 128.
•
Pd
-
Modulation pitch depth
here you can adjust the depth of the modulation joystick. With this
option displayed, press down on the fret corresponding to your de-
sired setting (0-127). fret 1 on the low e string corresponds with
setting 0, fret 1 on the a to 22, and so on, up to fret 18 on the
high e, which corresponds with setting 127.
•
PS
-
Modulation pitch speed
here you can adjust the frequency of the modulation joystick. With
this option displayed, press down on the fret corresponding to your
desired setting (0-127). fret 1 on the low e string corresponds with
setting 0, fret 1 on the a to 22, and so on, up to fret 18 on the
high e, which corresponds with setting 127.
•
(
C1
) and
(
C2
)
-
assignable Midi continuous controllers
the joystick has both an x and a y direction, c1 corresponds to the
x and c2 corresponds to the y. the x and y directions can be as-
signed to any mIdI continuous controller number between 1 and 127.
If x and y are assigned to the same controller, only a single value is
transmitted that represents the distance from the center of the joy-
stick.
•
(
S1
) and (
S2
) -
assignable Midi switches
the two switches behind the bridge can be assigned to mIdI control-
lers. the switches only send out two values 00 or 64 that can be
used to turn on/off external mIdI devices. When a switch is assigned
a mIdI controller number, the display will read on or of indicating the
current state of the mIdI switch for a few seconds – then return to
the preset value.
note:
to save changes made to your current preset, hold down the
musIc button and press the record button. switching between
presets without doing so will cause you to lose any unsaved changes.


