background image

10

NS-WC14SS9

www.insigniaproducts.com

Providing the correct power source

Check your power outlet. Your refrigerator requires a AC115V (±10%), 60Hz power supply.
Make sure that the power outlet supplies 10 amps or higher.

WARNINGS:

Make sure that:
• The power outlet accepts a 3-prong grounding plug. The third prong on the power 

cord plug grounds your refrigerator to minimize the possibility of electric shock. Do 
not modify the power plug.

• You Do NOT plug anything else into the same power outlet as your refrigerator. You 

may overload the circuit which can cause a fire.

• You DO NOT use an extension cord. If your refrigerator is too far from the power 

outlet, move your refrigerator or have an electrician install an outlet closer to your 
refrigerator.

• The power outlet cannot be turned off with a switch or pull string.

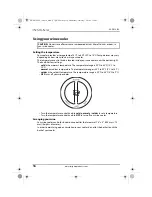
3-prong outlet

Outlet cover

3-prong plug

Grounding lead

Grounding adapter

Outlet cover

Screw

Outlet

Using a 3-prong plug and outlet

Using a grounding adapter

NS-WC14SS9_18-0059_MAN_V3_ENG.fm  Page 10  Wednesday, February 7, 2018  9:12 AM

Содержание NS-WC14SS9

Страница 1: ...ne Cooler NS WC14SS9 Before using your new product please read these instructions to prevent any damage NS WC14SS9_18 0059_MAN_V3_ENG fm Page 1 Wednesday February 7 2018 9 12 AM Final Trim Size 5 827...

Страница 2: ...g the correct power source 10 Leveling your wine cooler 11 Reversing the door 11 Using your wine cooler 16 Setting the temperature 16 Arranging your wine 16 Serving and storage tips 17 Maintaining you...

Страница 3: ...use this appliance near water 6 Clean only with a damp cloth 7 Do not block any ventilation openings Install in accordance with the manufacturer s instructions 8 Do not install near any heat sources...

Страница 4: ...hen the appliance has been damaged in any way such as the power supply cord or plug is damaged liquid has been spilled or objects have fallen into the appliance the appliance has been exposed to rain...

Страница 5: ...posing of this product 10 This cooler is intended to be used in household and similar environments 11 Do not store or use gasoline or any flammable liquids inside or in the vicinity of this cooler 12...

Страница 6: ...29 cm W D The top shelf is 4 10 2 cm from the inside top of your wine cooler The bottom shelf is 3 7 9 5 cm from the top shelf The storage below the bottom shelf is 7 2 18 4 cm 18 9 48cm 17 2 43 7cm 1...

Страница 7: ...right for approximately 30 minutes before connecting it to power This reduces the possibility of a malfunction in the cooling system from incorrect handling during transportation Let your cooler run t...

Страница 8: ...on Adjust the leveling feet to keep your cooler level Locate your cooler away from direct sunlight and sources of heat stove heater radiator and so on Direct sunlight may affect the acrylic coating an...

Страница 9: ...ooler www insigniaproducts com Providing ventilation Your wine cooler needs at least 1 6 4 cm between it and the surrounding walls and ceiling 1 6 4 cm 1 6 4 cm NS WC14SS9_18 0059_MAN_V3_ENG fm Page 9...

Страница 10: ...ower plug You Do NOT plug anything else into the same power outlet as your refrigerator You may overload the circuit which can cause a fire You DO NOT use an extension cord If your refrigerator is too...

Страница 11: ...e and a Phillips screwdriver Have someone available to assist you in the process Keep all of the parts you remove to reuse them later Removing the door requires that the cooler be tilted backwards Not...

Страница 12: ...covers on the left side of your cooler 4 Pry up and remove the hinge cover on the right side of your cooler 5 Remove the three bolts that secure the hinge then remove the hinge 6 Use a cutting blade t...

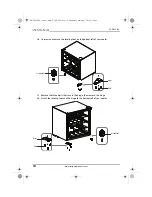
Страница 13: ...r 8 Use a cutting blade to remove the bearing bushing on the bottom right of the door 9 Remove the stop block screw and stop block of the bottom right of the door and attach them on the bottom left of...

Страница 14: ...left of your cooler 11 Remove the three bolts that secure the hinge then remove the hinge 12 Attach the leveling foot and the hinge to the bottom left of your cooler Leveling foot Bolts Hinge Leveling...

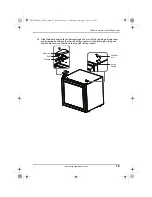
Страница 15: ...nstall the top hinge hinge cover and a bearing bushing to the top left of your cooler Install a bearing bushing and plastic hole covers to the top to the top right of your cooler Bearing bushing Plast...

Страница 16: ...F 9 C to 15 C colder is the coldest temperature The temperature range is 39 F to 48 F 4 C to 9 C OFF turns off your wine cooler Turn the temperature control knob to cold normal or colder to set a temp...

Страница 17: ...our cooler and taken out immediately before drinking Maintaining your wine cooler Cleaning your wine cooler 1 Turn off your wine cooler and unplug it from the wall outlet 2 Remove all wines 3 Wash the...

Страница 18: ...e new location 5 If necessary level your cooler See Leveling your wine cooler on page 11 Tips on saving energy Locate your cooler in the coolest area of the room away from heat producing appliances or...

Страница 19: ...You can use an electric hair dryer to heat the seal Make sure that your wine cooler is level See Leveling your wine cooler on page 11 The temperature is too hot You may have left the door open too lo...

Страница 20: ...veling your wine cooler on page 11 Make sure that your wine cooler is not touching any walls Make sure that the shelves are installed correctly The outside of my wine cooler is hot Heat dissipation fr...

Страница 21: ...verage terminates if you sell or otherwise transfer the Product How to obtain warranty service If you purchased the Product at a Best Buy retail store location please take your original receipt and th...

Страница 22: ...OT BE LIABLE FOR ANY INCIDENTAL OR CONSEQUENTIAL DAMAGES FOR THE BREACH OF ANY EXPRESS OR IMPLIED WARRANTY ON THIS PRODUCT INCLUDING BUT NOT LIMITED TO LOST DATA LOSS OF USE OF YOUR PRODUCT LOST BUSIN...

Страница 23: ...23 14 Bottle Stainless Steel Wine Cooler www insigniaproducts com NS WC14SS9_18 0059_MAN_V3_ENG fm Page 23 Wednesday February 7 2018 9 12 AM...

Страница 24: ...NIA is a trademark of Best Buy and its affiliated companies Distributed by Best Buy Purchasing LLC 7601 Penn Ave South Richfield MN 55423 U S A 2018 Best Buy All rights reserved Made in China V3 ENGLI...

Отзывы: