background image

6

IS-TVCA206 20-inch Color TV

www.insignia-products.com

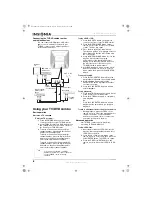
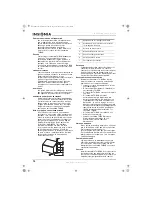
Connecting the TV/DVD combo to other 
audio/video devices

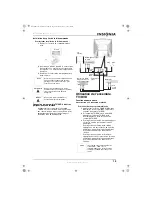
You can connect a DVD player, VCR, video 
game console, and stereo system to your 
TV/DVD combo to enjoy a higher quality of 
picture and sound effect.

Using your TV/DVD combo

Basic operation

W

ATCHING


A

 TV 

PROGRAM

To watch a TV program:

1

Press the POWER button on the remote 
control or the front of your TV/DVD combo.

2

If your TV/DVD combo is in DVD mode, press 
the TV/DVD button on the remote control or 
the front of your TV/DVD combo.

3

To watch a channel that has a one-digit 
channel number, press 0 and the channel 
number on the number pad.
To watch a channel that has a two-digit 
channel number, press the Digital Selector 
button once, then use the number pad to 
enter the two-digit channel number.
To watch a channel that has a three-digit 
channel number, press the Digital Selector 
button twice, then use the number pad to 
enter the three-digit channel number.

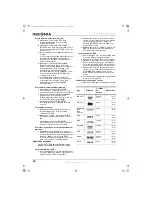
To play a DVD or CD:

1

Press the DVD/TV button on the remote 
control or the front of your TV/DVD combo.

2

Press the OPEN/CLOSE button on the 
remote control or the front of your TV/DVD 
combo. The disc tray opens.

3

Place the disc in the tray, label side up.
The tray has “guides” for playing two sizes of 
discs. Make sure that the disc is lined up in 
the correct guide.

4

Press the OPEN/CLOSE button to close the 
tray. The disc should start playing 
automatically. If the disc does not start 
playing, press the PLAY/ENTER button on 
the remote control or the front of your 
TV/DVD combo to start playback.

5

If the DVD displays a menu, use the arrow 
buttons on the remote control to select a 
menu option, then press the PLAY/ENTER 
button.

To pause playback:

1

Press the PAUSE/STEP button. While the 
disc playback is paused, the sound is muted.

2

While playback is paused, press the 
PAUSE/STEP button to playback the video 
one frame at a time.

3

Press the PLAY/ENTER button to resume 
normal playback.

To stop playback:

1

Press the STOP button on the remote control 
or the front of your TV/DVD combo.

2

Press the STOP button again to completely 
stop playback.
Or
Press the PLAY/ENTER button to resume 
playback at the point where you stopped 
playback.

To skip to a different track or chapter on the disc:

During playback, press the PREV on the 
remote control to skip to the previous track or 
chapter on the disc, or press the NEXT 
button on the remote control to skip to the 
next track or chapter on the disc.

Advanced operation

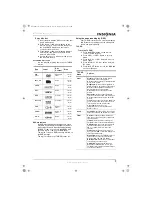
Your TV/DVD combo can also play discs 
containing JPEG and MP3 files.

To view JPEG files:

1

Insert the disc with the JPEG files into the 
disc tray. A menu opens that shows a list of 
JPEG files on the disc.

2

Press the up or down arrow button on the 
remote control to select a file, then press the 
PLAY/ENTER button. The JPEG file opens.

3

Press the PREV or NEXT button on the 
remote control to move from JPEG to JPEG 
file.

Tip

You can also use the CH – and CH + 
buttons on the remote control or the front 
of your TV/DVD combo to change 
channels.

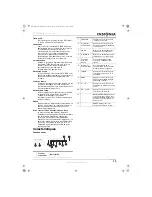
External 
TV

DVD, VCR, or 
other device

Video 
output

Audio 
output

VHF

UHF

Receiver, DVD, 
VCD, or other 
device

To video input

To audio input

Laser DVD 

To audio 
output

IS-TVDVD20 20-inch TV-DVD Combo.fm  Page 6  Wednesday, July 27, 2005  7:28 PM

Содержание IS-TVDVD20

Страница 1: ...20 TV DVD combo Moniteur couleur Monitor a color IS TVDVD20 User Guide Guide de l utilisateur Guía del Usuario ...

Страница 2: ......

Страница 3: ...rface Do not place your TV DVD combo near or over a radiator or heat source Do not place your TV DVD combo in a built in installation such as a bookcase or rack unless you provide correct ventilation or follow the manufacturer s instructions POWER SOURCE Operate your TV DVD combo only from the type of power source indicated on the rating plate If you are not sure of the type of power supply to you...

Страница 4: ... TV DVD combo does not operate normally by following the operating instructions Adjust only those controls that are covered by the operating instructions because an incorrect adjustment of other controls may result in damage and will often require extensive work by a qualified technician to restore your TV DVD combo to its normal operation If your TV DVD combo has been dropped or the cabinet has b...

Страница 5: ...ctor Description 1 PLAY Press to start disc playback 2 Power switch Press to turn your TV DVD combo on and off 3 VIDEO Plug your external video device into this connector 4 L AUDIO R Plug your external audio system into these connectors 5 Power indicator This indicator lights when your TV DVD combo is turned on 6 Remote control sensor Receives signals from the remote control Do not block 7 TV DVD ...

Страница 6: ... go forward on the DVD 11 NEXT Press to go to the next scene on the DVD 12 PREV Press to go to the previous scene on the DVD 13 PAUSE STEP Press to pause playback Press again to advance the program one frame at a time Press PLAY ENTER to return to normal playback 14 STOP Press to stop playback on the DVD 15 10 Press this button in combination with number pad buttons to select a two digit channel n...

Страница 7: ...disc playback or resume normal playback When the OSD is opened press to confirm selections 34 D MENU Press to open the DVD menu if the DVD you are playing has a menu 35 SUBTITLE Press to select subtitles for a DVD if the DVD has subtitles 36 SLOW Press to playback in slow motion Each time you press SLOW the speed changes Press PLAY ENTER to resume normal playback 37 PROGRAM Press to enter Program ...

Страница 8: ...front of your TV DVD combo to start playback 5 If the DVD displays a menu use the arrow buttons on the remote control to select a menu option then press the PLAY ENTER button To pause playback 1 Press the PAUSE STEP button While the disc playback is paused the sound is muted 2 While playback is paused press the PAUSE STEP button to playback the video one frame at a time 3 Press the PLAY ENTER butt...

Страница 9: ...s 12 cm 8 cm Kodak CD Pictures 12 cm 8 cm CD R Audio or video 12 cm 8 cm CD RW Audio or video 12 cm 8 cm CD G Audio 12 cm 8 cm TV OSD Menu Options Video Picture Increases the picture level to adjust white areas of the picture Decreases the picture level to adjust black areas of the picture Brightness Increases the brightness to add more light to dark areas of the picture Decreases the brightness t...

Страница 10: ... translation of the primary language such as English in your area Select CC2 for secondary language translation such as French or any other language that may be broadcast in your area Demo mode Displays the main functions for your TV DVD combo TV OSD Menu Options Channel Channel System Selects the channel system You can select AUTO NTSC and NTSC443 For best results select AUTO Antenna Sets the sig...

Страница 11: ...e the Parental Lock password 1 Open the OSD then select the Parental Lock menu 2 Press the CH or CH button to select Change Password 3 Use the number pad to enter a new four digit password 4 Use the number pad to re enter your new password DVD OSD Menu Options General Setup Page TV Display Sets the aspect ratio Note This option is only used when you have an external TV connected to your TV DVD com...

Страница 12: ...os and variety programming C Children Children under the age of 7 These programs do not contain realistic violence crude or indecent language sex or nudity and realistic aggressive behavior Programs may contain infrequent imaginary and unrealistic aggressive behavior or some comedic or unrealistic violence C8 Children 8 years and older Programs may contain mild physical violence comedic violence c...

Страница 13: ...Try plugging your TV DVD combo into a different electrical outlet preferably an outlet on a different circuit No sound Make sure that the volume is turned up and the mute control is turned off No picture and no sound Make sure that the power cord is plugged into a working outlet Make sure that the brightness and contrast level are not set too low Picture has no color Adjust the color controls Pict...

Страница 14: ... nearest retail store location of the store or online web site from which you purchased the Product This warranty does not cover cosmetic damage or damage due to acts of God lightning strikes accident misuse abuse negligence commercial use or modification of or to any part of the Product including the antenna This warranty does not cover damage due to improper operation or maintenance connection t...

Страница 15: ...rtures au dos et au bas du boîtier sont prévues pour la ventilation pour assurer un fonctionnement fiable de l ensemble TV DVD et le protéger contre toute surchauffe Ces ouvertures ne doivent être ni bloquées ni obstruées Ne pas placer l ensemble TV DVD sur un lit un sofa une moquette ou toute autre surface semblable Ne pas placer l ensemble TV DVD à proximité ou au dessus d un radiateur ou d une ...

Страница 16: ...urs de mise à la terre l emplacement de l unité de décharge de l antenne la connexion aux conducteurs de terre ENTRETIEN L utilisateur ne doit pas essayer de réparer cet ensemble TV DVD lui même en effet son ouverture ou le démontage des couvercles peut l exposer à des tensions dangereuses et à d autres dangers Toutes les réparations doivent être réalisées par du personnel qualifié DÉGÂTS NÉCESSIT...

Страница 17: ...ager l appareil AVIS À L INSTALLATEUR DE TÉLÉVISION PAR CÂBLE Le présent avis a pour objet de rappeler à l installateur de systèmes de télévision par câble que l article 820 40 du Code national de l électricité contient des recommandations relatives à la mise à la masse de l appareil et en particulier stipule que la terre du câble doit être connectée au système de mise à la terre de l immeuble aus...

Страница 18: ...ur cette touche pour mettre le téléviseur sous ou hors tension 2 TV DVD Appuyer sur cette touche pour sélectionner le mode TV ou le mode DVD 3 Pavé numérique Appuyer sur zéro 0 puis appuyer sur une touche numérique pour sélectionner un canal TV à 1 chiffre Appuyer une fois sur la touche de réglage numérique puis appuyer successivement sur deux touches numériques pour sélectionner un canal TV à deu...

Страница 19: ...ption 16 A B Appuyer sur A B au début de la section à lire en boucle Appuyer de nouveau sur A B à la fin de la section à lire en boucle La section est lue en boucle de façon répétée Appuyer de nouveau sur la touche pour revenir au mode de lecture normal 17 REPEAT Appuyer une fois sur la touche REPEAT Répéter pour lire le chapitre en cours une nouvelle fois Appuyer deux fois sur la touche REPEAT po...

Страница 20: ...ouvrir le menu du DVD si le disque de DVD en cours de lecture comporte un menu 35 SUBTITLE Appuyer sur la touche Sous titres pour sélectionner les sous titres d un DVD si celui ci comporte des sous titres 36 SLOW Appuyer sur la touche SLOW Ralenti pour la lecture d une DVD au ralenti La vitesse de lecture change à chaque pression sur la touche SLOW Appuyer sur la touche PLAY ENTER Lecture Entrée p...

Страница 21: ...mble TV DVD 3 Pour regarder un canal à un chiffre appuyer sur 0 et le numéro du canal sur le pavé numérique Pour regarder un canal à deux chiffres appuyer une fois sur la touche de sélection numérique puis utiliser le pavé numérique pour entrer le numéro de canal à deux chiffres Pour regarder un canal à trois chiffres appuyer deux fois sur la touche de sélection numérique puis utiliser le pavé num...

Страница 22: ...êtée Pour aller à une piste ou un chapitre différent sur le disque Pendant la lecture appuyer sur la touche PREV Précédent de la télécommande pour revenir à la piste ou au chapitre précédent du disque ou appuyer sur la touche NEXT Suivant de la télécommande pour aller à la piste ou au chapitre suivant du disque Opérations avancées L ensemble TV DVD peut également lire des disques contenant des fic...

Страница 23: ...r la richesse de la couleur de l image Netteté Augmente la netteté pour afficher une image plus nette et plus claire Diminue la netteté pour afficher une image plus fine Teinte Augmente le niveau de la couleur pour ajouter plus de vert aux tons chair Diminue le niveau de la couleur pour ajouter plus de rouge aux tons chair Température de couleur Pour sélectionner la température de couleur Il est p...

Страница 24: ...enu OSD TV Options Canal Standard TV Pour sélectionner le standard TV Il est possible de sélectionner AUTO NTSC et NTSC443 Pour obtenir les meilleurs résultats sélectionner AUTO Antenne Règle la source du signal sur antenne TV ou signal de la câblodistribution Saut Ajoute ou supprime un numéro de canal mémorisé Canal actuel Affiche le canal en cours de diffusion En fonction du type d antenne signa...

Страница 25: ...ontrôle parental 2 Appuyer sur la touche CH ou CH pour sélectionner la classification TV 3 Appuyer sur la touche Vol ou Vol pour afficher l écran de la classification TV Menu OSD du lecteur de DVD Options Page principale de configuration Affichage TV Pour régler le format d image Remarque Cette option n est utilisée qu avec un téléviseur externe connecté à l ensemble TV DVD Sélections possibles 4 ...

Страница 26: ...de la violence intense V de la sexualité explicite intense S un langage très grossier L ou des dialogues très suggestifs D TV MA Adultes Enfants de 17 ans ou plus Les émissions peuvent contenir de la violence extrême V une activité sexuelle explicite S ou des vulgarités L Classification canadienne Description E Exempt les émissions de nouvelles les émissions de sports et les documentaires ainsi qu...

Страница 27: ...mble TV DVD à une antenne externe S assurer d utiliser des câbles et des connecteurs de bonne qualité Repositionner l antenne extérieure L images forme des lignes vagues et le son est déformé Une interférence électrique peut être provoquée par des voitures ou des motos Une interférence électrique peut être provoquée par des lampes au néon et des appareils électroménagers Essayer de brancher l ense...

Страница 28: ...u delà de la période de garantie l utilisateur sera redevable de tous les frais afférents à la main d œuvre 2 PIÈCES DÉTACHÉES En outre Insignia fournira gratuitement les pièces détachées neuves ou remises à neuf en échange des pièces défectueuses pendant la durée de la garantie À l expiration de la période de garantie le coût de toute pièce détachée sera à votre charge Pour obtenir le service de ...

Страница 29: ...ÉE À LA PÉRIODE DE GARANTIE APPLICABLE TELLE QUE DÉCRITE CI DESSUS Certains états ou provinces ne permettent ni l exclusion ou la limitation des dommages accessoires ou consécutifs ni les limitations implicites de durée d une garantie de sorte que les limitations ou exclusions énoncées ci dessus peuvent être nulles dans votre cas Cette garantie vous donne des droits spécifiques et vous pouvez auss...

Страница 30: ...el combo TV DVD en una cama un sofá una alfombra u otra superficie similar No coloque su combo TV DVD cerca ni sobre un radiador o fuente de calor No coloque su combo TV DVD en una instalación integrada tal como un librero o estantería a menos que se proporcione ventilación apropiada o se hayan seguido las instrucciones del fabricante FUENTE DE ALIMENTACIÓN Opere su combo TV DVD únicamente con el ...

Страница 31: ...N REPARACIÓN Desconecte su combo TV DVD del tomacorriente y solicite la reparación a personal calificado bajo las siguientes condiciones Cundo el cable de corriente o el enchufe se dañen Si líquido ha sido derramado u objetos han caído dentro del combo TV DVD Si el combo TV DVD ha sido expuesto a la lluvia o al agua Si el combo TV DVD no funciona normalmente aún siguiendo las instrucciones de oper...

Страница 32: ...sea práctico Características Panel frontal Panel Posterior Botón conector Descripción 1 PLAY reproducir Presione para comenzar la reproducción del disco 2 Interruptor de alimentación Presione para encender o apagar el combo TV DVD 3 VIDEO Conecte su dispositivo de video externo en este conector 4 IZQ AUDIO DER Conecte su sistema de audio externo en estos conectores 3 4 5 6 7 8 9 10 11 12 1 2 5 Ind...

Страница 33: ...pantalla Cuando se hace zoom el centro de la imagen se aumenta Esto recorta las otras orillas de la imagen Presiónelo una o más veces para retornar ala vista normal 10 REV y FWD Presione el botón REV para retroceder el DVD Presione el botón FWD para adelantar el DVD 11 NEXT siguiente Presione para ir a la siguiente escena en el DVD 12 PREV Presione para ir a la escena anterior en el DVD 13 PAUSA S...

Страница 34: ...tico Presione para configurar el temporizador del apagado automático del TV 32 Flechas Presione para hacer selecciones en el OSD del DVD o en los menús del DVD 33 PLAY ENTER reproducir ingresar Cuando no se muestra el OSD presione para comenzar la reproducción del disco o para reanudar la reproducción normal Cuando se muestra el OSD presione este botón para confirmar las opciones 34 D MENU Presion...

Страница 35: ...un digito como número presione 0 y el número del canal con los botones numéricos Para ver un canal que tiene un número de dos dígitos presione el botón Digital Selector una vez y luego use los botones numéricos para ingresar el número de dos dígitos del canal Para ver un canal que tiene un número de tres dígitos presione el botón Digital Selector dos veces y luego use los botones numéricos para in...

Страница 36: ...ducir discos que contengan archivos JPEG y MP3 Para reproducir archivos JPEG 1 Inserte el disco con los archivos JPEG en la bandeja del disco Un menú se abrirá y mostrará una lista de los archivos JPEG en el disco 2 Presione el botón arriba o abajo en el control remoto para seleccionar un archivo luego presione el botón PLAY ENTER El archivo JPEG se abrirá 3 Presione el botón PREV o NEXT en el con...

Страница 37: ...egar más rojo a los tonos de piel Color Temp temperatura de color Seleccione una temperatura de color Puede seleccionar Neutral Warm caliente o Cool frío Audio Volume volumen Ajusta el volumen También puede ajustar el volumen con el control remoto Timer temporizador Clock reloj Ajusta la hora y los minutos La hora se usa para configurar otras opciones como el temporizador del apagado automático Ti...

Страница 38: ... System Sistema de canales Selecciona el sistema de canales Puede seleccionar AUTO NTSC y NTSC443 Para mejores resultados seleccione AUTO Antenna antena Establece la señal origen como señal de antena de TV o de CATV Skip saltar Agrega o borra el número de un canal de la memoria almacenada Current Ch canal actual Muestra el canal que esta sintonizado actualmente Dependiendo del tipo de antena señal...

Страница 39: ...asificación de TV 3 Presione el botón Vol o Vol para abrir la pantalla de clasificación de TV Menú del OSD del DVD Opciones Página de Configuració n General TV Display visualización de pantalla Establece la relación de aspecto Nota Esta opción se usa solamente cuando tiene un TV externo conectado a su combo TV DVD Se puede seleccionar 4 3 PS Pan and Scan Llena la pantalla pero corta los lados izqu...

Страница 40: ...ia V situaciones sexuales intensas S lenguaje fuerte L o diálogo intensamente sugestivo D TV MA Maduro Niños de 17 años o más Los programas pueden contener violencia V actividad sexual explicita S o profanidad L Clasificación canadiense Descripción E Exento Programas como noticias deportes documentales programas de opinión videos de música y programación de variedades C Niños Niños menores de 7 Es...

Страница 41: ...ta calidad Reubique la antena exterior La imagen tiene líneas ondas y el sonido esta distorsionado Interferencia eléctrica puede ser causada por autos y motocicletas La interferencia eléctrica se puede causar también por lámparas fluorescentes y otros aparatos Pruebe conectar su combo TV DVD en otro tomacorriente preferiblemente un tomacorriente en otro circuito No hay sonido Asegúrese de que el c...

Страница 42: ...omo reemplazo de los componentes que se encuentren defectuosos durante el Período de Garantía Después del período de garantía usted deberá cubrir todos los gastos ocasionados por los repuestos Para obtener servicio de garantía usted deberá llevar el Producto con su recibo original u otra prueba de compra ya sea en su empaque original o en un empaque que proporcione el mismo grado de protección al ...

Страница 43: ...ue en este caso los limites o exclusiones anteriores no son aplicables al cliente Esta garantía le da derechos legales específicos y usted puede poseer otros derechos que varían de estado a estado o provincia a provincia Para servicio al cliente favor llamar al 1 877 467 4289 www insignia products com Insignia Products Richfield Minnesota U S A IS TVDVD20 20 inch TV DVD Combo fm Page 41 Wednesday ...

Страница 44: ...42 IS TVCA206 20 inch Color TV www insignia products com IS TVDVD20 20 inch TV DVD Combo fm Page 42 Wednesday July 27 2005 7 28 PM ...

Страница 45: ......

Страница 46: ...All rights reserved All other products and brand names aretrademarks of their respective owners 2005 produits Insignia Tous droits réservés Tous les autres produits ou noms de marques sont des marques de commerce qui appartiennent à leurs propriétaires respectifs 2005 productos Insignia Todos los derechos reservados Todos los demás productos y marcas son marcas comerciales de sus respectivos dueño...

Отзывы: