


Table 1.
ADDING A ZSENS930 TO A THERMOSTAT RUNNING
v
5.3
TZON1050, AZON1050, TCONT824, ACONT824, TCONT850, ACONT850
FIRST, FOLLOW STEPS ONE THROUGH THREE IN THE INSTALLATION TABLE.
Software
v
5.3
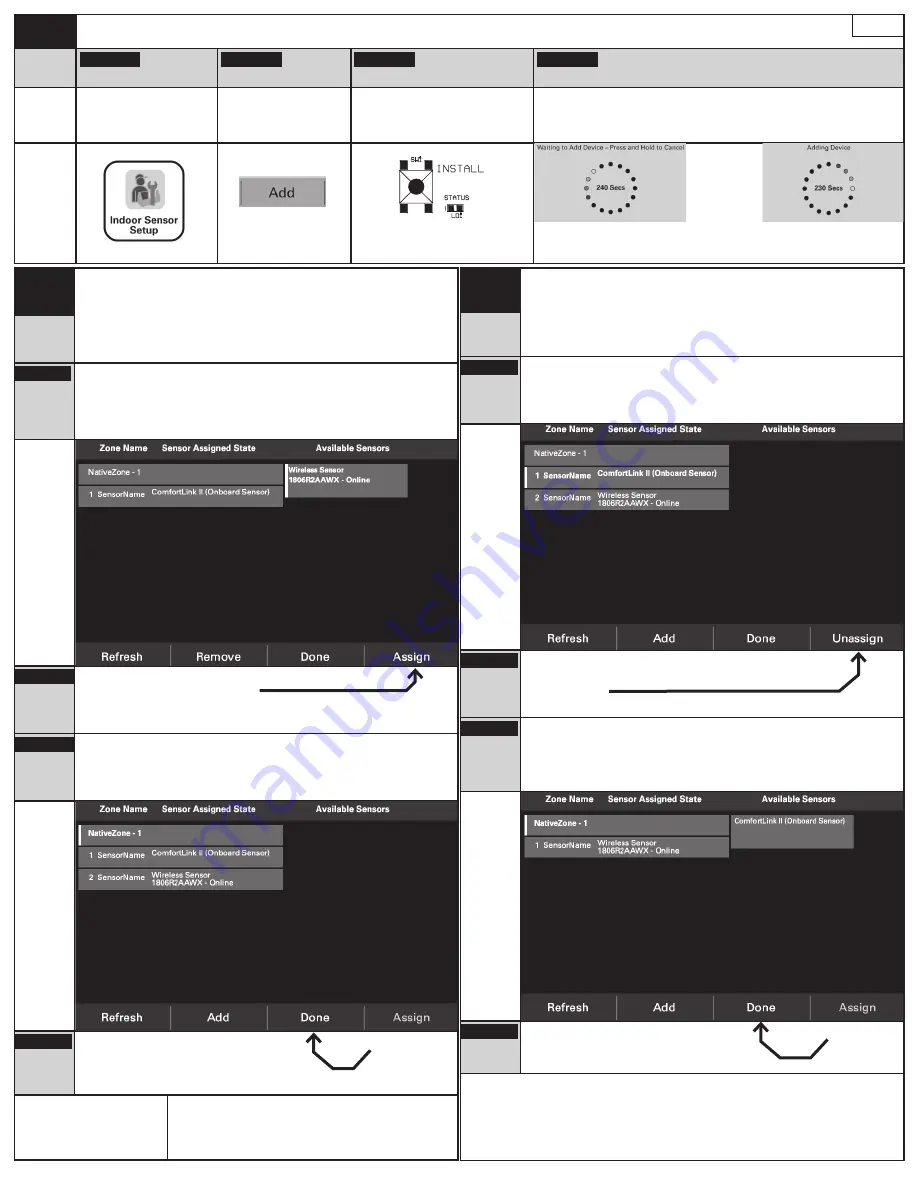
STEP 4.1
Access the “
Service Menu
”
STEP 4.2
Put the stat in “Add” mode
STEP 4.3
Add the Z-Wave sensor
STEP 4.4
On screen response
Action
Press
“
Indoor Sensor Setup”
Press
“
Add”
Stand where the sensor is to be
installed and press and release the
button labeled “
INSTALL
” on the
interior of the sensor.
Text at top of the screen should change:
From: “
Waiting to Add Device – Press and Hold to Cancel
“
To: “
Adding Device”
Button
To
The STATUS LED will blink rapidly
for 3 seconds
After the sensor is added, “
Temperature Sensor added as Node [X]: Sensor
added successfully.
” should appear.
Page - 2
Table 2.
ASSIGNING A ZSENS930 TO A THERMOSTAT
RUNNING SOFTWARE
v
5.3
TZON1050, AZON1050, TCONT824, ACONT824, TCONT850, ACONT850
FIRST, FOLLOW STEPS
1
THROUGH
3
IN THE
INSTALLATION TABLE
ON PAGE 1 AND ALL THE STEPS IN
TABLE 1
.
Software
v
5.3
STEP 5.1
Select an
available
sensor
Tap the newly added sensor on the right side of the Sensor Assignment screen
under the label “
Available Sensors
”.
NOTE: The selection indicator on the left of the button turns green.
Screen 1
STEP 5.2
Assign the
sensor
Once the sensor is selected “
Assign
” will illuminate
on the Navigation Bar. Tap “
Assign
”.
Repeat until all needed sensors are assigned.
STEP 5.3
The sensor
is now
assigned.
The list of assigned and averaged sensors on the left is now updated and the
previously unassigned sensor is now included. (Screen 2)
Screen 2
STEP 5.4
Press
“
Done
”
The “
Done
” button saves and exits the Indoor
Sensor Setup screen.
Tap “
Done
” if finnished.
After this step follow
Step 7
and
8
from
Page-1
if not already complete
NOTE: By default all sensors in the Assigned list are
averaged together evenly. Up to four sensors may be used
to define the temperature of the sensed space.
Table 3.
UNASSIGNING A SENSOR FROM A THERMOSTAT
RUNNING SOFTWARE
v
5.3
TZON1050, AZON1050, TCONT824, ACONT824, TCONT850, ACONT850
Software
v
5.3
STEP 1
Select an
assigned
sensor
Tap the sensor to be removed from the assigned sensor list. Use the serial
number to verify the device is the correct sensor.
NOTE: The selection indicator on the left of the button turns green.
Screen 3
STEP 2
Unassign
the sensor
Once an assigned sensor is selected “
Assign
” will change to
”
Unassign
” on the Navigation Bar.
Tap “
Unassign
”.
STEP 3
The Sensor
is now
unassigned.
The list of assigned and averaged sensors is now updated and the previously
asssigned sensor is moved to the “
Available Sensors
” list. (Screen 4)
NOTE: In software version 5.3 the order of sensors does not matter. By default
the temperature values from all sensors are averaged together evenly to
determine the temperature of the sensed space.
Screen 4
STEP 4
Press
“
Done
”
The “
Done
” button saves and exits the
Indoor Sensor Setup screen.
TAP “
Done
” if finnished.
NOTE: The thermostat will
not
allow you to exit this screen without at least one
sensor assigned to the system.


