background image

ENGLISH

Hoist

The supporting structures and load-attaching devices used in conjunction with this hoist must
provide adequate support to handle all hoist operations plus the weight of the hoist and attached
equipment. This is the customer’s responsibility.  If in doubt, consult a registered structural engineer.

On HLK hoists remove the solid plug located on top of the hoist and install the attached vent plug
prior to using the hoist. When the hoist is in its normal level position check that the gear case oil level
is at the check plug on the side of the gear box.

Hook Mounted Hoist Installation

Place hook over mounting structure.  Make sure hook latch is engaged.
Ensure the supporting member rests completely within the saddle of the hook and is centered directly
above the hook shank.

CAUTION

Do not use a supporting member that tilts the hoist to one side or the other.

Trolley Mounted Hoist Installation

Refer to trolley manufacturers installation information to safely install the trolley and attach the
hoist.

Chain Container

When installing a chain container, refer to the manufacturers installation Instructions for Chain
Containers.

CAUTION

Make certain to adjust the balance chain so that the chain container does not contact the load

chain.

Allow chain to pile naturally in the chain container.  Piling the chain carelessly into the

container by hand may lead to kinking or twisting that will jam the hoist.

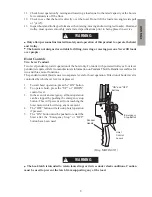
1.

Check the chain container size to make sure the length of load chain is within the capacity of
the chain container.  Replace with a larger chain container, if required.

2.

Attach the chain container to the hoist.

3.

Run bottom block to lowest point and run hoist in up direction to feed the chain back into the
container.

Air System

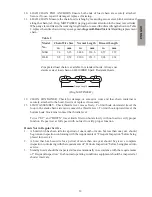
The supply air must be clean, lubricated and free from water or moisture. A minimum of 6.3 bar/
630 kPa (90 psig) at the hoist motor is required, during operation to provide rated hoist performace.

Air Lines

The minimum allowable hose size is 13 mm (1/2 in). Hose size is based on a maximum of 15 m
(50 ft) between the air supply and the hoist motor. Contact your nearest distributor  for recommended
air line sizes for distances greater than 15 m (50 ft). Before making final connections to hoist inlet,
all air supply lines should be purged with clean, moisture free air. Supply lines should be as short
and straight as installation conditions will permit.
Long transmission lines and excessive use of fittings, elbows, tees, globe valves etc. cause a
reduction in pressure due to restrictions and surface friction in the lines. If quick-disconnect fittings
are used at the inlet of the hoist, they must have at least a 10 mm (3/8 in) air passage. Use of smaller
fittings will reduce performance.

5

Содержание HL1000K-E

Страница 1: ...ODELES DE PALANS A CHAINE PNEUMATIQUES MLK et HLK MANUALE DI ISTRUZIONI PER L INSTALLAZIONE E IL FUNZIONAMENTO DEI PARANCHI A CATENA PNEUMATICI MODELLI MLK e HLK H NDBOK for MONTERING OG BRUK AV TRYKK...

Страница 2: ...is used to indicate the presence of a hazard which will or can cause minor injury or property damage if the warning is ignored Notice is used to notify people of installation operation or maintenance...

Страница 3: ...afe practices to avoid and are not necessarily limited to the following list Refer to specific sections in the manual for additional safety information 1 Only allow people trained in safety and operat...

Страница 4: ...low the chain to be exposed to extremely cold weather Do not apply loads to a cold chain WARNING LABEL Each hoist is supplied from the factory with the warninglabelshown Ifthelabelisnotattached to you...

Страница 5: ...0 3 1 4 3 3 2 2 87 5 5625 HL6000K E 6000 4 1 2 3 2 6 1 5 112 5 7500 Sound measurements have been made in accordance with ISO 11201 ISO 3744 3746 and ISO 4871 test specifications for sound from pneumat...

Страница 6: ...in to pile naturally in the chain container Piling the chain carelessly into the container by hand may lead to kinking or twisting that will jam the hoist 1 Check the chain container size to make sure...

Страница 7: ...hauls Moisture traps can help to eliminate moisture Other methods such as an air receiver which collects moisture before it reaches the motor or an aftercooler at the compressor that cools the air pri...

Страница 8: ...perception The hoist operator must be carefully instructed in his duties and must understand the operation of the hoist including a study of the manufacturer s literature The operator must be aware of...

Страница 9: ...r pendant is required Refer to manufacturers information on Pendant Throttle Handle Assemblies for two and three motor functions The pendant control throttle uses two separate levers for hoist operati...

Страница 10: ...al parts of each hoist These reports should be dated signed by the person who performed the inspection and kept on file where they are readily available for review NOTICE The external placement of cod...

Страница 11: ...STEM Visually inspect all connections fittings hoses and components for indication of air leaks Repair any leaks found Check and clean filters if equipped 5 CONTROLS Duringoperationofhoist verifyrespo...

Страница 12: ...r pins and other fasteners on hooks hoist body and chain bucket if used Replace if missing and tighten or secure if loose 2 ALL COMPONENTS Inspect for wear damage distortion deformation and cleanlines...

Страница 13: ...securely attached to the hoist Secure or replace if necessary 13 LIMIT ASSEMBLY Check throttle lever moves freely To limit hook downward travel the loop in the slack chain side must contact the throt...

Страница 14: ...d HLK hoists and cause premature failure Air Line Lubricator Lubricate the hoist supply air with SAE 30W non detergent motor oil minimum viscosity 135 Cst at 40 C 104 F from an in line lubricator The...

Страница 15: ...Ingersoll Rand will not accept any returned goods for warranty or service work unless prior arrangements have been made and written authorization has been provided from the location where the goods we...

Страница 16: ...skade dersom advarselen ignoreres Denne merknaden formidler viktig informasjon om montering bruk eller vedlikehold men er ikke forbundet med fare Sammendrag av sikkerhetsinformasjon ADVARSEL Trykkluf...

Страница 17: ...r ikke n dvendigvistattmedidenneoversikten Deulikedeleneavdenneh ndbokeninneholderytterligere opplysninger om trygg bruk av produktene 1 Trykkluft taljen skal kun betjenes av personer som har gjennomg...

Страница 18: ...l alltid holdes under oppsyn 28 Last som henger fra trykkluft taljen skal aldri sveises eller skj res 29 Kjettingen p trykkluft taljen skal aldri brukes som en sveiseelektrode 30 Trykkluft taljen skal...

Страница 19: ...yd effekt niv dBA Hastighet ved nom last m m Hastighet uten last m m Vekt av krokopphengt trykkluft talje ved 3 m 10 fot l ft kg Nominell grense for l ftesperre for overlast kg opp ned opp ned ML250KS...

Страница 20: ...nes og den tilh rende luftepluggen skal monteres f r trykkluft taljen tas i bruk N r trykkluft taljen henger i normal loddrett stilling m det kontrolleres at oljeniv et i girkassen n r opp til kontrol...

Страница 21: ...m raskt kan frakobles blir brukt ved trykkluft taljens luftinntak skal luftpassasjen i disse v re minimum 10 mm 3 8 tomme Bruk av tynnere r rdeler reduserer yteevnen MERK Trykkluft taljen skal alltid...

Страница 22: ...kluft taljen brukes med et annet lufttrykk kan det v re n dvendig justere avtappingsskruene Juster avtappingsskruene p f lgende m te for oppn maksimal ytelse og kontroll 1 L sne l semutteren p justeri...

Страница 23: ...gerer 7 Kontroller at l pevognen hvis en slik benyttes og kroken beveger seg i samme retning som pilene eller informasjonen p styringsenheten 8 Kontroller at trykkluft taljen er forsvarlig festet til...

Страница 24: ...r sikker p at utstyret brukes p en forsvarlig m te i henhold til de angitte spesifikasjonene Utstyr som anvendes regelmessig skal kontrolleres ofte En mer omfattende inspeksjon skal dessuten foretas m...

Страница 25: ...n oppdages i tide 1 DRIFT Se etter utvendige tegn eller lytt etter unormale lyder f eks knuselyder som kan v re en indikasjon p et problem Kontroller at alle styringsfunksjoner virker p en tilfredssti...

Страница 26: ...s Hvis trykkluft taljenreagererlangsomtellerbevegelseneikkeertilfredsstillende skalikketrykkluft taljen brukes f r alle manglene er rettet opp 6 KROKL S Kontroller at krokl sen fungerer som den skal S...

Страница 27: ...il n rmeste service og reparasjonsverksted som representerer Ingersoll Rand 3 KROKER Kontroller at ingen av krokene har sprekker Bruk magnetkorn eller fargepenetrant til lokalisere sprekker Sjekk krok...

Страница 28: ...ut hvis det er n dvendig 13 GRENSEINNRETNINGER Kontrolleratbetjeningsspakenkanbevegesuhindret Hviskrokens nedadg ende bevegelse skal begrenses m l kken p siden med den slakke kjettingen v re i kontakt...

Страница 29: ...e ikke sm res p en tilfredsstillende m te vil de svikte Flere opplysninger om dette kan f s ved henvendelse til n rmeste service og reparasjonsverksted for Ingersoll Rand OBS Rengj ringsoljer som er b...

Страница 30: ...L6000K skal 2 3 innspr ytinger med olje skytes inn i sm reniplene i enden av tomgangshjulakslene ved hjelp av en sm repistol etter 300 timers bruk Denne sm ringen skal eventuelt foretas med kortere me...

Страница 31: ...reparasjon eller bytte av trykkluft taljer som returneres med pne b yde eller vridde kroker eller som mangler kjetting og kroker H ndtering av gamle trykkluft taljer Trykkluft taljer som ikke lenger e...

Отзывы: