Operating Instructions
Operating & Maintenance Manual
Book: 23012958 (2-16-07) Rev. A
33
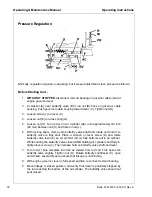
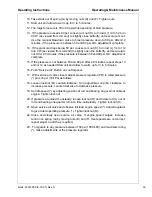
10. Take slack out of spring (G) by moving nuts (E) and (F). Tighten nuts.
11. Start unit and allow to warm up for 3 to 5 minutes.
12. The target pressure is 50 to 80 psi while operating at start pressure.
13. If the pressure exceeds 80 psi: Loosen jam nut (H), turn rod (L) 1/4 to 1/2 turn
CCW (as viewed from rod end) to slightly close butterfly, and secure jam nut.
Use the manual blowdown valve to bleed pressure down to 60 psi. After 2.0
minutes, if the pressure is between 50 and 80 psi, OK. Adjustment complete.
14. If the pressure drops below 50 psi: Loosen jam nut (H), turn rod (L) 1/4 to 1/2
turn CW (as viewed from rod end) to slightly open the butterfly, and secure jam
nut. After 2.0 minutes, if the pressure is between 50 and 80 psi, OK. Adjustment
complete.
15. If the pressure is not between 50 and 80 psi after 2.0 minutes, repeat steps 13
and/or 14 as needed.Start unit and allow to warm up for 3 to 5 minutes.
16. Push “Service Air” Button on control panel.
17. With service air valve closed, adjust pressure regulator (PR) to rated pressure
(*) plus 30 psi (70 kPa) as follows:
18. Loosen locknut (M) counterclockwise; Turn adjustment cap (N) clockwise to
increase pressure, counterclockwise to decrease pressure.
19. Set idle speed (*) by adjusting position of rod end bearing on governor cable at
engine. Tighten lock nut.
20. If pressure at unload is unsteady, loosen locknut (H) and rotate rod (L) out of
rod end bearing one quarter turn at a time until steady. Tighten locknut (H).
21. Open service air valve and observe full load engine speed (*). Adjust regulator
to give rated operating pressure (*). Tighten locknut (M).
22. Close and slowly open service air valve. If engine speed surges, increase
tension on spring (G) by moving nuts (E) and (F). If set speeds are not correct,
repeat steps14 and15 as required.
23. To regulate to any pressure between 150 psi (1050 kPa) and maximum rating
(*), make adjustments at the pressure regulator.
Содержание CSAXHP1070WCAT
Страница 2: ......
Страница 5: ...5 TABLE OF CONTENTS Operating Maintenance Manual TITLE PAGE ...
Страница 6: ...6 Always use Ingersoll Rand Replacement parts ...
Страница 7: ...Book 23012958 2 16 07 Rev A 7 Foreword ...
Страница 10: ...10 Book 23012958 2 16 07 Rev A Always use Ingersoll Rand Replacement parts ...
Страница 11: ...Book 23012958 2 16 07 Rev A 11 Safety ...
Страница 19: ...Book 23012958 2 16 07 Rev A 19 General Data ...
Страница 22: ...22 Always use Ingersoll Rand Replacement parts ...
Страница 23: ...Book 23012958 2 16 07 Rev A 23 Operating Instructions ...
Страница 34: ...34 Book 23012958 2 16 07 Rev A Always use Ingersoll Rand Replacement parts ...
Страница 35: ...Book 23012958 2 16 07 Rev A 35 Trouble Shooting ...
Страница 40: ...40 Book 23012958 2 16 07 Rev A Always use Ingersoll Rand Replacement parts ...
Страница 41: ...Book 23012958 2 16 07 Rev A 41 Maintenance ...
Страница 54: ...54 Book 23012958 2 16 07 Rev A Always use Ingersoll Rand Replacement parts ...
Страница 55: ...Book 23012958 2 16 07 Rev A 55 Lubrication ...
Страница 59: ... 2004 Ingersoll Rand Company Printed in the USA ...


