background image

Sunpak® Infrared Heaters 

10

Servicing Instructions 

Turn off gas and electrical before attempting any service 
to this appliance. Heater may be serviced by opening the 
door to control compartment. Rotate round disk on 
control door 90 degrees to open. Top of heater may be 
removed for servicing by removing six (6) screws holding 
top in place. The top should be removed if the gas 
controls, burner or burner orifice is to be replaced. 
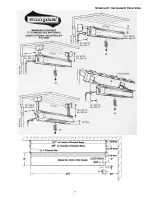
1.  Removal of Burner 

a.  Remove grille by removing two (2) screws at one 

end of the grill near control door. Pull downward 
at the end and grill will be loose. The end of the 
grill is supported by two (2) pins that enter two (2) 
holes in the reflector’s far end. 

b.  Remove top of heater by removing six (6) screws 

holding top in place. 

c.  The burner can be removed without removing the 

pilot-electrode assembly. However, extreme care 
should be taken to prevent the burner from 
contacting the fragile electrode when removing or 
reinstalling the burner. To remove the pilot-
electrode assembly, disconnect the orange wire 
from the module connected to the electrode. 
Detach the pilot tubing. Remove the two screws 
holding the pilot-electrode in place. 

d.  Remove burner clip securing mixer inside control 

compartment. Be careful not to damage white 
insulation pads. 

e.  Remove 3/8” hex locknut located inside the 

burner orifice bracket holding piping assembly to 
burner. A 7/8” 12-point wrench is recommended 
to loosen the 3/8” locknut. 

f. 

Remove two (2) screws holding the end of the 
burner. Carefully slide burner down and out. 
When reinstalling, be sure both ends of the 
burner are beneath the reflector end flanges. 

g.  To reinstall burner, reverse procedure. 

2.  Removal of RAM-3 Direct Spark Ignition Control 

a.  Disconnect two 24 VAC power leads 
b.  Disconnect two gas valve leads. 
c.  Disconnect igniter lead from control 
d.  Disconnect green ground lead from casing. 
e.  Remove two (2) 8-32 x 1 1/4 screws and nuts 

holding control module in place. Screw heads are 
located on exterior front side of heater above 
control compartment door. 

f. 

If insufficient removal clearance, loosen control 
assembly and move out of way. 

Trouble Shooting 

1.  If no spark from electrode; or if gas valve doesn’t 

work then: 
a.  Check power supply. There should be 24 

VAC between the low voltage power wires. 
Use voltmeter between inlet 24 VAC wire and 
ground terminal at the electrode plate to 
measure 24 VAC. 

b.  Check continuity. Use ohmmeter. For 

example, check resistance between valve 
wire and ground. Should show almost no 
resistance (O ohms) through valve. If high 
resistance, check wire connectors. 

c.  Check spark gap. Spark gap should be 7/64” 

(.109”) between electrode tip, and pilot hood. 
If gap is too large, spark will occur at wrong 
location. If gap is too small it may not be hot 
enough to light pilot burner. 

d.  Be sure connectors are fully inserted into 

ignition control (See Wiring Diagram on 
rating plate). 

2.  If insufficient gas flow then: 

a.  Manual gas valve not full “ON”. Turn valve 

handle to full “ON” position. 

b.  Burner orifice plugged. Remove heater top, 

remove burner orifice (use ½” hex wrench) 
and thoroughly clean. Spiders often crawl 
into orifice hole and make a web, blocking 
the orifice. 

Содержание Sunpak S25

Страница 1: ...is equipment Installation and replacement of gas piping gas utilization equipment or accessories and repair and servicing of equipment shall be performed by a qualified agency familiar will all precautions required regarding this type of equipment and that has complied with all requirements of the authority having jurisdiction Infrared Dynamics SUNPAK Gas Fired Unvented High Intensity Infrared Hea...

Страница 2: ...ds the flame sensor will shut OFF the gas valve To relight the pilot and burner shut OFF power Wait 5 minutes Turn power back ON If the heater will not light turn the manual gas valve to OFF position and the electrical switch OFF to the heater and call your quality service agency or gas supplier Shutting Down Your Heater Turn electrical power to the heater OFF Should you need to shut down your hea...

Страница 3: ...options Sunpak heaters may be laid out in a number of configurations depending on the structural constraints of the patio and heating requirements One approach is to face heaters straight down over the table and seating areas Another approach is to locate heaters to the side and to angle them inward A third approach is to cluster the heaters in the center of the patio and angle heaters outward It ...

Страница 4: ...e the patio environment Wind breaks shall NOT interfere with the ventilation of combustion air requirement of the heater s ANGLE MOUNTING Most models of the SUNPAK heater may be angle mounted to a maximum of 30º to accommodate mounting the heaters around the edges of the patio Note that the top clearance to combustibles increase when heater is tipped from the horizontal NOTE Local codes may have s...

Страница 5: ...Sunpak Infrared Heaters 5 ...

Страница 6: ...pply pressure and manifold pressure required for each heater are listed below For gas supply line pressures in excess of psig consult with your representative or the factory Gas Inlet Pressure Nat Gas Propane Maximum Pressure psig psig Minimum Pressure 6 W C 11 W C Manifold Pressure 5 W C 10 W C It is important that the gas piping system be adequately sized for all the gas appliances it serves Cle...

Страница 7: ...Sunpak Infrared Heaters 7 ...

Страница 8: ...anger and brackets must be secured with adequate anchor to a secure structure using good building practices Additional bracing to protect against seismic forces may be required in seismically active areas CAUTION Sharp Edges Every effort has been made to remove sharp edges from this heater however care should be taken to avoid injury when reaching inside the heater during installation and when ser...

Страница 9: ...se an open flame Use a soap and water solution 6 For gas supply line pressures in excess of psig consult the factory or your local representative 7 Installation of 1 8 N P T plugged tapping accessible for test gage connections is required upstream of the gas supply connections to the heater Initial Start Up Procedure 1 Before turning on the manual gas valve to the heater verify that the control sy...

Страница 10: ...e end of the burner Carefully slide burner down and out When reinstalling be sure both ends of the burner are beneath the reflector end flanges g To reinstall burner reverse procedure 2 Removal of RAM 3 Direct Spark Ignition Control a Disconnect two 24 VAC power leads b Disconnect two gas valve leads c Disconnect igniter lead from control d Disconnect green ground lead from casing e Remove two 2 8...

Страница 11: ...Sunpak Infrared Heaters 11 ...

Страница 12: ...Sunpak Infrared Heaters 12 ...

Страница 13: ...Sunpak Infrared Heaters 13 ...

Страница 14: ...Sunpak Infrared Heaters 14 ...

Страница 15: ...eterioration of Front Grill Sunpak heater must be installed in such a manner as to allow the products of combustion or hot gases to vent out the top of the heater When operating normally only radiant heat passes through the front grill If conditions exist which force hot gases through the front grill of the heater the installation must be altered to correct the condition Rumbling Burner Noise Rumb...

Страница 16: ...livery charges for forwarding the new heater or replacement part from the nearest distributor and returning the claimed defective heater or part to such distributor c All cost necessary or incidental for handling and administrative charges and for any materials and or permits required for installation of the replacement heater or part LIMITATION ON IMPLIED WARRANTIES Implied warranties including a...

Отзывы: