background image


13 

Model Variations 

Comprised of RAID and JBOD models,  the  RAID systems store hard drives and 

control  the entire storage system  while JBOD systems  connect to a master RAID 

system and can expand storage capacities by adding more hard drives. All systems 

are compatible with SAS-3  and SAS-6; SATA-II and SATA-III hard drives. However 

hard drive limitation(s) may vary model to model.        


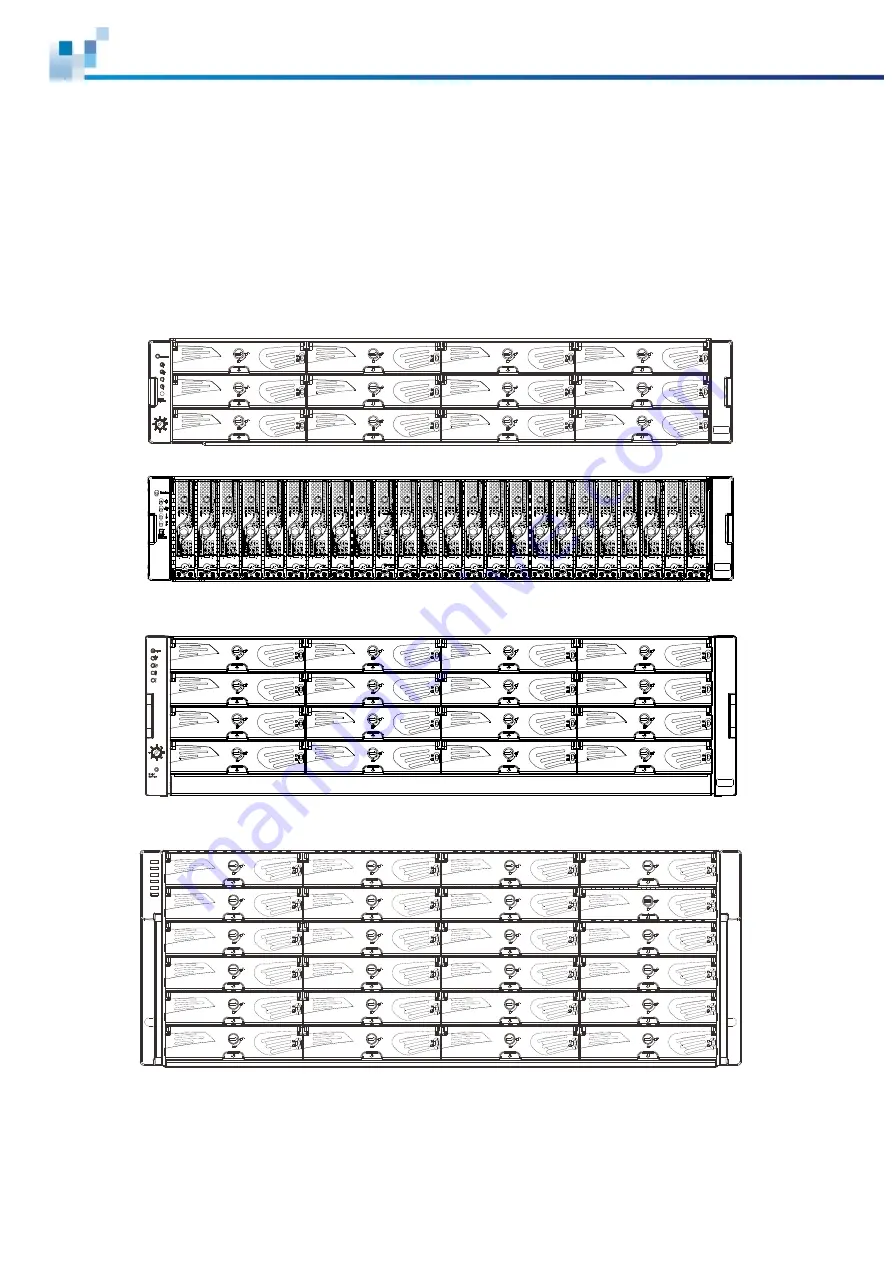
2U systems 


3U systems 


4U systems 


Содержание EonStor DS 1012

Страница 1: ...Version 1 2 Infortrend EonStor DS 1000 Series Hardware Manual...

Страница 2: ...ith Infortrend product Before installing any software applications or components provided by a third party customer should ensure that they are compatible and interoperable with Infortrend product by...

Страница 3: ...105 0023 Japan Tel 81 3 5730 6551 Fax 81 3 5730 6552 Email Technical Support Website Americas Infortrend Corporation 435 Lakeside Dr Sunnyvale CA 94085 USA Tel 1 408 988 5088 Fax 1 408 988 6288 Email...

Страница 4: ...urthermore Infortrend Technology reserves the right to revise this publication and to make changes from time to time in the content hereof without obligation to notify any person of such revisions or...

Страница 5: ...o 20cm clearance on the rear side Do not cover the enclosure openings Route the cables inside the rack cabinet Do not leave drive bays empty as it will affect airflow efficiency Secure each enclosure...

Страница 6: ...ent When replacing components insert them as gently as possible while assuring full engagement Vibration and shock can easily damage hard drives Only qualified service personnel should open the enclos...

Страница 7: ...discharge static electricity when installing or operating the enclosure Avoid dust debris carpets plastic vinyl and styrofoam in your work area Do not remove any module or component from its anti stat...

Страница 8: ...For non serviceable components please contact our support sites Firmware operation Consult the Firmware User Manual on the CD ROM SANWatch software Consult the SANWatch User Manual on the CD ROM Revis...

Страница 9: ...Rear Panel Components 22 Controller Module of RAID Models 22 Controller Module of JBOD Models 23 Cache Backup Module CBM 24 Super Capacity Battery Flash Backup Module 25 PSU Cooling Module 26 System M...

Страница 10: ...ith Redundant RAID Controller 70 Single Controller with Fault Tolerant Path 72 High Availability IP SAN Recommended Cabling Method for Remote Replication 73 High Availability IP SAN with Port Trunk Re...

Страница 11: ...recautions 122 Replacing the Supercapacitor Battery 123 Replacing Flash Backup Module coupled with SuperCap 124 Replacing the Power Supply Module Cooling Module 125 Detecting a Failed PSU 125 Replacin...

Страница 12: ...example below RAID DS1016RTB DS A 20 B 24 C R D T E B F Designation Description A DS EonStorDS systems JB JBOD systems B 10 where 0 indicates first generation 1 indicates second generation and so on...

Страница 13: ...entire storage system while JBOD systems connect to a master RAID system and can expand storage capacities by adding more hard drives All systems are compatible with SAS 3 and SAS 6 SATA II and SATA...

Страница 14: ...can further preserve cache data beyond 72 hours The embedded firmware features intelligent algorithms such as power saving modes variable fan speeds and exiled drive handling JBOD Controller and Inter...

Страница 15: ...A B The top controller Controller A is the primary controller The bottom controller Controller B is the secondary redundant controller which is idle during normal operation and takes over the managem...

Страница 16: ...is designated with the letter S it can be upgraded into a dual controller configuration by adding another controller module and firmware upgrade see software manual If the model name is designated wi...

Страница 17: ...stem LEDs Handles 3 There are handles on both sides of the enclosure for users to pull push the enclosure out and into the cabinet when the enclosure is installed on a slide rail rackmount system Rota...

Страница 18: ...age will be placed at the controller 2 position The host port configurations will vary For details see Rear Panel Components WARNING Do NOT remove the dummy cage for the single controller model Doing...

Страница 19: ...and low voltage power paths Thermal sensors and I2C devices are embedded to detect system temperatures and PSU cooling module operating status This board contains no user serviceable components WARNIN...

Страница 20: ...LED 1 a power supply status LED 2 cooling module status LED 3 temperature sensor status LED 4 System fault LED 5 rotary ID switch JBOD 6 and a Mute Service button 7 For details please refer to LED Pa...

Страница 21: ...utton 2 can be used when retrieving disk drives from the chassis To the right of the bezel plate there is a drive busy LED 3 and a power status LED 4 WARNING Be careful not to warp twist or contort th...

Страница 22: ...d its components may be optional items for some systems The controller module contains no user serviceable components except when users are installing upgrading the cache memory or installing replacin...

Страница 23: ...ansion controller contains a circuit board within a metal canister interfaced through hot swap docking connectors at the back end Two SAS wide ports on the interface faceplate connect to a managing RA...

Страница 24: ...led into the controller and an optional accessory for single controller models The Battery Backup Unit BBU can be serviced by the user but the Flash Backup Module FBM is not serviceable by the user NO...

Страница 25: ...NOTE The super capacity battery is only charged partially when shipped Therefore after powering on the system the super capacity battery will start charging to its full capacity It normally requires...

Страница 26: ...a temperature sensor fails Elevated temperature if the temperature breaches the upper threshold set for any of the interior temperature sensors During the system initialization stage the cooling fans...

Страница 27: ...nd the alarm and deliver warning messages if there is a conflict between JBOD IDs If more than one JBOD is connected to the managing RAID system each JBOD needs a unique enclosure ID set using the rot...

Страница 28: ...SANWatch SANWatch is a browser based graphical user interface GUI software that can be installed on a local remote computer and accessed via the network The manager communicates with the array via the...

Страница 29: ...he following components can be user maintained and hot swappable Controller module dual controller models PSU including cooling modules Hard drive NOTE Normalized airflow ensures sufficient cooling of...

Страница 30: ...act your vendor for a replacement Hard drives SAS NL SAS SATA hard drives must be purchased separately and be available prior to installing the system Cabling All the cables that connect the system to...

Страница 31: ...rack or cabinet requires at least two people due to its weight If you need to install the slide rails that came with the system please go here 3 Install CBM if necessary Install the CBM Battery Backu...

Страница 32: ...d its manual and Firmware Operation Manual and a product utility CD containing the Installation and Hardware Reference Manual this document Preinstalled Components Shown below are the components pre i...

Страница 33: ...ufacturer of the same model and claiming the same rated capacity may actually carry different block numbers meaning that their capacity may not be exactly the same When configuring hard drives into a...

Страница 34: ...3 With a MUX board 4 paired to the hard drive 5 data signals is able to switch between controllers A and B signal ports indicated by the blue arrow dotted line Under normal circumstances controller B...

Страница 35: ...d and applied The single controller JBODs do not require MUX kit Dual ported SAS and Single port SATA Connectors WARNING The hard drives and drive trays should only be installed into the system after...

Страница 36: ...yourself with the designations to avoid withdrawing the hard drive s out of the enclosure 1 2 3 4 5 6 7 8 9 10 11 12 1 2 3 3 4 5 6 7 8 9 10 11 12 13 14 15 16 17 18 19 20 21 22 23 24 2U systems 1 2 3...

Страница 37: ...and its label side facing up If you have a MUX board and you want to install a SAS drive the MUX board should be removed Installing a 3 5 SAS HDD or single controller systems Installing a 3 5 HDD with...

Страница 38: ...be populated with a tray even if it does not contain a hard drive With a bay empty air flow ventilation may be disrupted and the system will overheat With the hard drive tray bezel opened align and i...

Страница 39: ...ore rack mounting the system NOTE Dual controller model s BBU and FBM are pre installed Dual controller systems come with the BBU pre install in the system while the FBM may be default or an optional...

Страница 40: ...cuit board or connector pins Flash Backup Module Installation Once the controller has been removed place the base plate into the designated location in the controller shown in green and secure it usin...

Страница 41: ...41 Hold the SSD on a 45 degree angle match the notch indicated by the circle insert the SSD gold fingers into the slot lower the other end of the SSD until the edges are clipped on...

Страница 42: ...ith the controller removed remove the cover by removing the two screws show in the illustration below 2 Hold the battery cage at a 45 degree angle make sure the cage sits and meets the screw holes Sec...

Страница 43: ...the other end of the cage with flathead screws from underneath the controller One on each side 4 Gently insert the battery backup unit into the cage and secure it using the thumb screw 5 Reinstall the...

Страница 44: ...controller Always place the controller on a clean static free surface and hold the controller only by its metal canister and never touch the circuit board or connector pins Flash Backup Module Instal...

Страница 45: ...placing the SSD PCB board on the copper stands Secure the PCB with screws provided 4 Insert the SSD at a 45 degree angle make sure the notch meets indicated by the blue circle Gently lower the other...

Страница 46: ...troller removed insert the supercapacitor battery at a 45 degree angle make sure the protrusion is inserted into the slot indicated by the blue circle arrow 2 Secure the supercapacitor battery with a...

Страница 47: ...47 3 Connect the four pin molex connector to the SSD PCB board 4 Reinstall the controller...

Страница 48: ...er slowly into the module slot When you feel the contact resistance use slightly more force and then push both of the ejection levers upwards indicated by the blue arrows to secure the controller into...

Страница 49: ...ndwidth If for example two 6 drive logical arrays are associated with two IDs residing on a single host channel there may be a trade off with performance If your system comes with dual controllers for...

Страница 50: ...devices e g foot traffic or fan exhaust Do not over tighten or bend the cables Host Side Topologies The primary concern for configuring host side topologies is to avoid points of failure It is therefo...

Страница 51: ...t IDs LUNs IDs 0 1 2 and 3 in a configuration where Host A accesses ID 0 one nexus Host B accesses ID 1 one nexus Host C accesses ID 2 one nexus Host D accesses ID 3 one nexus These connections are al...

Страница 52: ...the Auto automatically configured setting The default value is 256 I O operations The appropriate Maximum Queued I O Count setting depends on how many I O operations the attached servers are performi...

Страница 53: ...uding 10GB iSCSI WARNING Lasers can be hazardous and may cause permanent eye damage or blindness and therefore must be treated with respect and used with caution Never look directly at lasers while it...

Страница 54: ...remove any covers or attempt to gain access to the inside of the product Refer all servicing to qualified personnel FC port dust plugs Each FC port comes with a dust plug Remove these dust plugs only...

Страница 55: ...n topology currently in use Fibre Channel devices are all connected to a loop Each device is assigned an arbitrated loop physical address AL_PA The FC AL supports 124 devices in a single loop Fabric T...

Страница 56: ...odule 1 from its static protective package 2 Remove the dust plug 2 from the SFP transceiver module 3 Insert the SFP module into the system host ports The module will click into place 4 Remove the two...

Страница 57: ...Information RAID controller 2 Host server 2 Data path connection Fault tolerant data paths Host channel bandwidth 6400 MB s Above is an example demonstrating simple end to end connections with each SF...

Страница 58: ...sary in order to avoid access contention CH1 ID112 LD0 CH3 ID112 LD1 CH0 ID112 CH2 ID112 HBA 1 HBA 0 CH1 ID112 CH0 ID112 HBA 1 HBA 0 CH3 ID112 CH2 ID112 EonPath EonPath Channels Controller A Host CH0...

Страница 59: ...ing more host channel IDs or LUN numbers If a server has multiple data paths to a RAID system a multi path software is necessary e g the EonPath driver The two logical drives in the above drawing cann...

Страница 60: ...BA 1 HBA 0 HBA 1 HBA 0 EonPath HBA 1 HBA 0 HBA 1 HBA 0 CH2 A116 CH3 A116 CH2 B117 CH3 B117 CH2 B118 CH3 B118 CH2 A119 CH3 A119 CH0 A112 CH2 A116 CH0 B114 CH2 B118 CH0 B113 CH2 B117 CH0 A115 CH2 A119 C...

Страница 61: ...thstand a failure of a single component e g RAID controller HBA cable or FC switch Each logical partition is redundantly mapped to multiple host channel IDs in an AAPP Active Active Passive Passive co...

Страница 62: ...7x 1x Ethernet A 12x 6x 8x 2x 9x 3x 10x 4x 11x 5x 7x 1x C 1 2 3 4 5 6 7 8 9 1011 12 A B 12x 6x 8x 2x 9x 3x 10x 4x 11x 5x 7x 1x Ethernet A 12x 6x 8x 2x 9x 3x 10x 4x 11x 5x 7 x 1 x C Channels Controller...

Страница 63: ...l ID If you prefer path redundancy you can map a logical partition to IDs residing on two different channels You will then need the EonPath driver to manage access through two different HBA ports The...

Страница 64: ...l cables if you need more than the included one The cables 28AWG x 8 pairs are characterized by 100ohm black colors UL approved lead free 50 120 or 170cm cable lengths connectors can be secured to cha...

Страница 65: ...ion with Redundant Host Path HBA 1 HBA 0 CH0 AID CH1 AID CH0 AID CH1 BID CH0 AID CH0 BID RAID LV LD LD CH1 BID CH1 AID CH1 AID CH1 BID CH0 AID CH0 BID CH0 BID CH0 AID EonPath EonPath CH0 AID CH0 AID C...

Страница 66: ...more hard drives over the SAS expansion links you can create more logical groups of drives Avail these logical partitions using more LUN numbers NOTE EonPath multipath software or Linux Device Mapper...

Страница 67: ...Storage Connection to Two Servers CH0 AID CH1 AID CH1 AID CH0 AID LV LD RAID LV LD NOTE If you would like a LUN a logical partition to be accessed by multiple hosts file locking or multipath access co...

Страница 68: ...initiators software or hardware or via Gigabit Ethernet switches To servers equipped with iSCSI HBA preferably a hardware TOE TCP IP Offload Engine card and then to client stations with an Ethernet NI...

Страница 69: ...ured into the same subnet Please note the following Use the Ethernet management port for management purposes only i e SANWatch or telnet console This Ethernet management port is not used for I O trans...

Страница 70: ...on RAID system iSCSI RAID managed by redundant RAID controllers with a total of 8 host ports HBA iSCSI initiators preferably PCI E TCP IP offload engine TOE capable cards GbE cables GbE network cables...

Страница 71: ...H0 BID LD assigned to controller A LD1 mapped to CH1 AID and CH1 BID LD assigned to controller A LD2 mapped to CH2 AID and CH2 BID LD assigned to controller B LD3 mapped to CH3 AID and CH3 BID LD assi...

Страница 72: ...tch VLAN1 VLAN2 CH0 CH1 CH2 CH3 Component Description RAID system iSCSI RAID managed by a single controller with 4 host ports HBA or NIC iSCSI initiators preferably PCI E TCP IP offload engine TOE cap...

Страница 73: ...10 x 4x 11 x 5x 7 x 1 x C HBA CH0 AID Ch3 BID CH1 BID Ch2 AID Ch1 BID Ch2 AID Ch0 AID Ch3 BID EonPath EonPath Component Description RAID system iSCSI RAID managed by redundant RAID controllers with a...

Страница 74: ...D LD has to be assigned to both controllers A and B to enable remote replication LD1 mapped to CH1 BID CH0 AID CH3 BID and CH2 AID LD has to be assigned to both controllers A and B to enable remote re...

Страница 75: ...RAID managed by redundant RAID controllers with a total of 8 host ports HBA iSCSI initiators preferably PCI E TOE cards GbE cables GbE network cables port trunking indicated by the blue circles GbE s...

Страница 76: ...from drives in JBOD LD0 mapped to CH0 AID and CH1 BID LD has to be assigned to both controllers A and B to enable remote replication LD1 mapped to CH1 BID and CH0 AID LD has to be assigned to both co...

Страница 77: ...nections will work in their respective speeds It maximizes the number of connections while keeping the optimum performance gained by the high speed FC link and FC switch FC NOTE To gain optimum perfor...

Страница 78: ...y mirror pair for data protection but do not want to rely on slow management LAN cable connections In such case you may link the hybrid systems using iSCSI host ports If the distances between the encl...

Страница 79: ...ir 100ohm black UL approved lead free 50cm 120cm or 170cm cable lengths and connectors that can be secured to chassis using thumb screws or latching mechanism WARNING All SAS cables are sensitive and...

Страница 80: ...xpansion links with a dual controller configuration A longer cable is required if connections to JBODs are made from two opposite directions Routing through two different connections can avoid loss of...

Страница 81: ...AS port With data paths through separate SAS domains access to disk drives can be continued in the event of a cable link or SAS JBOD controller failure Designation Description Designation Description...

Страница 82: ...For example one expander unit controls Domain A and the other controls Domain B In a fault tolerant topology the SAS external links always connect to the SAS ports on the same SAS Domain The SAS Domai...

Страница 83: ...2nd JBOD top SAS IN 1st JBOD bottom SAS IN port 2nd JBOD bottom SAS OUT RAID system bottom SAS exp last JBOD bottom SAS IN 1st JBOD 2nd JBOD Last JBOD IN OUT NOTE To ensure redundancy dual controller...

Страница 84: ...84 Single Controller Expansion Connections RAID system SAS exp 1st JBOD SAS IN 1st JBOD SAS OUT 2nd JBOD SAS IN IN OUT 1st JBOD 2nd JBOD Last JBOD...

Страница 85: ...to external consoles Serial port For dual controller models a Y cable is provided in the package For single controller models a standard DB9 straight cable should be supplied by the user NOTE null mod...

Страница 86: ...86 network environment is not running DHCP server protocols a default IP 10 10 1 1 can be used to access for the first time...

Страница 87: ...ve trays Drive trays All the drive trays whether or not they contain a hard drive have been installed into the system Cable connections The system has been correctly connected to host computer s manag...

Страница 88: ...power on the system please follow the procedures below 1 Turn on the power switches to the on position for every PSUs power switches from left to right NOTE Make sure all power supply modules switche...

Страница 89: ...system You should begin verifying system statuses via the following monitoring interfaces LEDs on rear chassis including controller module PSUs and cooling modules refer to System Monitoring Controlle...

Страница 90: ...90 PSU Cooling Module LEDs PSU LED On green PSU LED PSU LED...

Страница 91: ...the system Close your applications running on the host computers to stop all I O access to the system 2 Flush the cache Locate the C_Dirty LED refer to Controller LED for RAID Models on the controlle...

Страница 92: ...ou may monitor the system through the following features Firmware The RAID controller in the system is managed by a pre installed firmware which is accessible in a terminal program via the serial port...

Страница 93: ...details see the SANWatch manual in the CD ROM LEDs LED indicators notify users of system status events and failures LEDs are located on both the front and rear panel of the chassis For details see an...

Страница 94: ...ces 2 Power Green Amber Green indicates that the system is powered properly Amber indicates that there is a power failure in the system 3 Cooling fan Green Amber Green indicates that the cooling fan i...

Страница 95: ...icates that the system has encountered abnormal conditions 6 Rotary ID switch JBOD N A JBOD ID switch Allow users to set enclosure IDs when connected to JBOD expansion enclosure s 7 Mute service butto...

Страница 96: ...ocation of the failed drive 1 2 Name Color Status 1 Drive Busy Blue Flashing Blue indicates data is being written to or read from the drive The drive is busy OFF indicates that there is no activity on...

Страница 97: ...ng the initialization process 2 C_Dirty Amber Amber indicates the following Cache Memory is dirty Data in flash backup module is being flushed to cache Errors occurred with cache memory ECC errors Dat...

Страница 98: ...Green steady on indicates the CBM module is ready Both a BBU and flash modules are present Amber steady on indicates CBM failure meaning either BBU or flash has failed When lit it also indicates eithe...

Страница 99: ...es one of the 4 PHYs links has failed OFF indicates all 4 PHYs are offline 2 SAS Speed Green Amber Green indicates 6Gbps link speed Amber indicates 3Gbps link speed OFF indicates no connection 3 Ctrl...

Страница 100: ...ection established Off Off indicates 10 100Mb connection established or no connection established 2 Link activity Amber Steady amber indicates a connection has been established Flashing amber indicate...

Страница 101: ...ff Off Off indicates a link has not been established 10Gb iSCSI Host Port LEDs RJ45 2 1 No Item Status 1 Speed LED Green indicates 10Gb connection established Amber indicates 1Gb connection establishe...

Страница 102: ...Green indicates 8Gbps connection Amber indicates 4Gbps connection OFF indicates 2Gbps speed or no connection For systems that come with 8Gb Fibre channel host ports They deliver fast I O performance f...

Страница 103: ...ED Green indicates connection established Flashing green indicates data activity Off indicates connection not established 2 Speed LED Green indicates 16Gb connection established Yellow indicates 8Gb c...

Страница 104: ...e validly linked to external devices Blinking indicates less than 4 PHYs links are connected at least one 1 of the 4 PHYs links has failed OFF indicates all 4 PHYs links are offline 2 SAS Speed Status...

Страница 105: ...xternal devices Blinking indicates less than 4 PHY links are connected at least one 1 of the 4 PHYs links has failed OFF indicates all 4 PHYs links are offline 2 SAS Speed Status Green Amber Green ind...

Страница 106: ...you need to replace the PSU as soon as possible For details please refer to Replacing the Power Supply Module PSU Cooling Module Status LED Status Description Flashing Green The system is connected to...

Страница 107: ...ctify the problem The alarm can be turned off using the mute button on the front panel and the Alarm beep pattern is described in the Troubleshooting Guide included in the CD ROM NOTE When temperature...

Страница 108: ...gical drive is associated with which host ID LUN 4 Remove Controller B from the chassis Please refer to Removing the RAID Controller 5 Power off the RAID system 6 Press and hold the Restore Default bu...

Страница 109: ...serted into Controller A s slot While leaving Controller B slot empty with Controller B in slot A perform the above steps 1 to 8 to restore Controller B to default settings 11 Put both Controller A an...

Страница 110: ...e do not use excessive force Forcing or slamming a module can damage the connector pins either on the module itself or on the backplane The following components can be replaced Controller module pleas...

Страница 111: ...ou The replacement controller sent to you will state its firmware version with a label on the packaging To find out the firmware version of your operating controller use Storage Manager Information En...

Страница 112: ...icated by the blue arrows The controller module will automatically ease out of the controller module bay 5 Insert the new controller module Carefully push the controller until you feel the contact res...

Страница 113: ...y When the replacement controller is successfully brought online the Power On Status LEDs should turn on properly 9 For single controller models or replacing both controllers simultaneously Restoring...

Страница 114: ...tem and remove the controller from the enclosure 2 Remove the existing host board from the controller by loosening the three screws 3 By holding onto the edges of the PCB carefully remove the host boa...

Страница 115: ...lue slot Follow the ESD Precautions refer to ESD Precautions Contact your system vendor for selecting a compatible DRAM module Reusing the DRAM module removed from a failed controller is not recommend...

Страница 116: ...n the DIMM module with the socket and firmly push the DIMM module into the socket The side clips will close automatically and secure the DIMM module into the socket 5 If applicable Reinstall the BBU m...

Страница 117: ...storage can store the data indefinitely WARNING Make sure you have the replacement module s on hand before you attempt to replace the CBM Make sure the flash backup module has been installed before in...

Страница 118: ...dule has been charged for over twelve hours A timer is embedded with the charger When this occurs the charger will enter a timer fault state Charging will resume automatically after you remove re inst...

Страница 119: ...an anchor gently pull out the BBU 2 2 3 Install the replacement BBU module and fasten the thumb screw NOTE A replacement BBU takes approximately twelve hours to charge to its full capacity The life ex...

Страница 120: ...refer to Replacing the Controller Module 2 Locate the flash backup module 3 Flick the clips holding down the FBM in the direction of the arrow to release it and remove it while holding it on a 45 deg...

Страница 121: ...n hand before you attempt the replacement procedure Make sure the flash backup module has been installed before installing the supercapacitor battery Please refer to procedures mentioned in Installing...

Страница 122: ...timer is embedded with the charger When this occurs the charger will enter a timer fault state Charging will resume automatically after you remove re install the supercapacitor battery module or reset...

Страница 123: ...roller Module 2 Loosen the screw at the end of Supercapacitor battery 3 Lift the Supercapacitor battery from the screw end at 45 degree angle 4 Insert the replacement Supercapacitor battery at a 45 de...

Страница 124: ...eps 1 Remove the controller module refer to Replacing the Controller Module 2 Loosen the screw at the end of flash backup module and remove the flash backup module 3 Insert the replacement flash backu...

Страница 125: ...st steel canister Detecting a Failed PSU If a PSU module fails the system notifies you through the following indicators PSU status LED locations PSU LED PSU LED Audible alarm refer to Audible Alarms F...

Страница 126: ...n WARNING Although the system can operate with a failed PSU in a system it is not recommended to run the system with a failed PSU for an extended period of time The failed spare redundant PSU should b...

Страница 127: ...rack use another hand to support its weight while removing the module 4 Insert the replacement module Make sure the extraction handle is pointing outwards Push the replacement PSU into the chassis an...

Страница 128: ...ircuits part and interface connectors To replace a hard drive follow these steps 1 Identify the drive tray Use the firmware utility SANWatch or the LED on the drive tray to identify faulty hard drive...

Страница 129: ...drive to the drive tray Without mux board With mux board 3 5 inch tray 2 5 SAS HDD without MUX 2 5 SATA HDD with MUX MUX board screw locations 2 5 inch tray 2 5 inch SAS hard drive 2 5 inch SATA hard...

Страница 130: ...using a flat blade screwdriver Do not push the bezel lock while turning it otherwise the spring handle will pop out again NOTE Never leave the bezel lock unlocked the RAID controller might consider it...

Страница 131: ...TA II SATA III Nearline series SAS host RAID models Host O S Compatibility Host O S independent Host Interface 3Gbps 6Gbps 12Gbps Multi lane SAS host ports 4x iSCSI Host Channels Multiple SAS PHYs log...

Страница 132: ...s with time record and task scheduling Configuration Text based firmware embedded utility over RS 232C through the serial cable Telnet via an established network connection The SANWatch Manager progra...

Страница 133: ...ce via I2 C interface Yes Automatic Drive Failure Detection Yes Automatic Rebuild on Spare Drives Yes Regenerate Logical Drive Parity Yes Bad Block Reassignment Yes Manual and Automatic Rebuild upon F...

Страница 134: ...quency 50 to 60Hz AC Input 100VAC 10A or 240VAC 5A with PFC Power Factor Correction Yes Hold up Time At least 12ms at 115 230VAC full load after a loss of AC input Over temperature Protection Auto shu...

Страница 135: ...sions With chassis ears protrusions Height 130mm 131mm Width 445mm 482 6mm Length 514 04mm 531 64mm 4U series Dimensions Without chassis ears protrusions With chassis ears protrusions Height 174 40mm...

Страница 136: ...rating Sea level to 12 000ft Packaged Sea level to 40 000ft Shock Half sine Operating 5G half sine 11ms pulse width Non operating 15G half sine 11ms pulse width Vibration Random Operating 5 to 500Hz 0...

Страница 137: ...05 EN 55024 1998 A1 2001 A2 2003 IEC 61000 4 2 1995 A2 2000 IEC 61000 4 3 1995 A2 2006 IEC 61000 4 4 2004 IEC 61000 4 5 2005 IEC 61000 4 6 2003 A1 2004 A2 2006 IEC 61000 4 8 1993 A1 2000 IEC 61000 4 1...

Страница 138: ...d against the Unpacking List Contact your vendor immediately if anything is missing Install the enclosure as is out of the packaging install hard drives and optional modules FBM Supercapacitor battery...

Страница 139: ...sure rack cabinet 2 Enclosure onto the slide rail and into the cabinet 3 Hard drives into drive trays and then into the enclosure 4 Drive trays with or without hard drives into the enclosure 5 If Supe...

Страница 140: ...e with the rack ear mount kit Kit Contents Item Description Quantity 01 Mounting bracket assembly left side 1 02 Mounting bracket assembly right side 1 03 Hexagon washer screws 6 32mm 8 04 Truss head...

Страница 141: ...installation begins with determining the installation position and M5 cage nut 5 insertion location 3 4U M5 cage nut position Front rack posts Unit boundary Unit boundary 05 2U M5 cage nut position 0...

Страница 142: ...x 9 0mm 04 3 With the assistance of another person holding the enclosure at the installation height the other person can place four M5 x 25mm 6 at the front of the enclosure and eight 6 32 screws 3 f...

Страница 143: ...kit Kit Contents Item Description Quantity 01 Mounting bracket assembly left side 1 02 Mounting bracket assembly right side 1 03 Inner glides 2 04 Flathead screws 6 32 L4 6 05 Truss head screws M5 x9...

Страница 144: ...determining the installation position front and rear rack positions and M5 cage nut 5 insertion location 3 4U M5 cage nut position Front rack posts Unit boundary Unit boundary 05 2U M5 cage nut positi...

Страница 145: ...x the length M5 x 9 0mm 05 M5 x 9 0mm 05 Inner glide rail 3 Attach the inner glides to BOTH sides of the enclosure using flathead screws 6 32 8 6 32 08 4 With the assistance of another person lift and...

Страница 146: ...ion Cease all input output transactions shutdown the system disconnect all the cables please refer to the User Manual for details Empty all drive bays hard drives hard drive trays and transport them s...

Отзывы: