background image

29

Sleep Timer

: allows you to force the projector to automatically shutoff after 

4 hours.

Screen Save

: automatically blanks the screen with a black color after no sig-

nals are detected for a preset number of minutes. The image returns when 
an active source is detected or a remote or keypad button is pressed. Screen 
Save is disabled when Power Save is enabled.

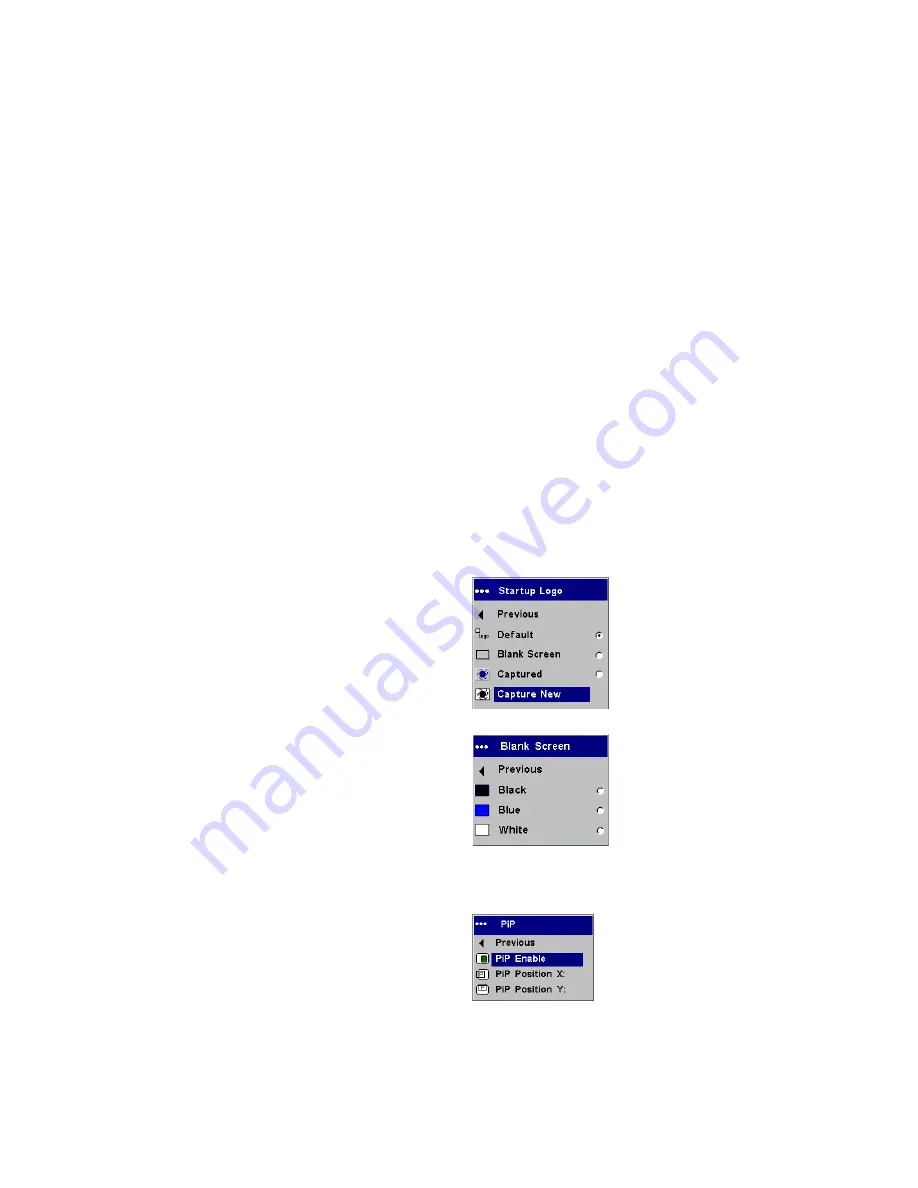
Startup Logo: 

allows you to display a blank Black, White, or Blue screen 

instead of the default screen at startup and when no source is detected. It 
also allows you to capture and display a custom startup screen. 

To capture a custom logo, display the image you want to capture on your 
computer, highlight Capture New, then press 

Select 

twice. When complete, 

the projector confirms the capture. 

The next time you start the projector, the custom logo you captured dis-
plays.

Blank Screen

: determines what color is displayed when you press the 

Blank

 button on the remote.

PiP

:

 (Picture in Picture) allows you to overlay a smaller window showing 

the video source on top of the larger computer source window. You must 
have both a computer and video source connected to use PIP. You can’t 
show a computer image in the smaller PiP window, only a video image. You 
can select a small, medium, or large window. You can also move the PiP 
window on the screen using the PiP Position X and Y options in the menu. 
Press the up and down arrows to change the position.

Startup Logo

Blank Screen

Picture in Picture

Содержание SP5000

Страница 1: ...imits are designed to provide reasonable protection against harmful interference in a residential installation This equipment generates uses and can radiate radio frequency energy and if not installed and used in accordance with the instructions may cause harmful interference to radio communications However there is no guarantee that interference will not occur in a particular installation If this...

Страница 2: ... 34 Appendix 35 Accessories 35 Red LED behavior and projector errors 36 Projected image size 36 If you are experienced in setting up presentation systems use the included Quick Set Up card For complete details on connecting and operating the projector refer to this User s Guide Electronic versions of this User s Guide in multiple languages are available on our website The most current ver sions ca...

Страница 3: ...event of the lamp rupturing discard any edible items placed in the surrounding area and thoroughly clean the area along all sides of the projector Wash hands after cleaning the area and handling the ruptured lamp This product has a lamp which contains a very small amount of mercury Dispose of it as required by local state or fed eral ordinances and regulations For more information see www eiae org...

Страница 4: ...n incentives See the inside of the back cover for the web address Included items The lens cap tether ships in the Documentation Pack Attach it to the lens cap and the projector if desired Projector components and features documentation remote computer cable projector lens cap power cable audio video cable S video cable lens cap tether keypad speakers zoom focus elevator foot release remote control...

Страница 5: ...s provides a con stant output while the projector is on For example if you connect your pro jection screen to the trigger when you turn on the projector the screen will move down when you turn the projector off the screen will return to the storage position You must turn the trigger on in the System menu see page 28 Connector panel audio in serial control Pr Pb Y trigger lock power connector M1 D ...

Страница 6: ...rojector on the ceiling refer to the installation guide that comes with the Ceiling Mount Kit for more information To turn the image upside down see page 28 InFocus recommends use of an authorized InFocus ceiling mount The Ceiling Mount Kit is sold sepa rately 2 Position the projector the desired distance from the screen The distance from the lens of the projector to the screen the zoom set ting a...

Страница 7: ...ed by S video and then composite video NOTE If you want to use RGB video see page 8 Table 1 Video connections Input signal Connector Connector label on projector Standard Broadcast TV not HDTV via cable digital cable satellite TV DirectTV Component video S video Composite video Component 3 S video 4 Video 5 HDTV Component video VESA DVI Component 3 VESA 1 DVI 2 DVD Component video S video Composit...

Страница 8: ...In connector on the projector if desired If the video device uses a yellow composite video con nector plug the A V cable s yellow connector into the video out connector on the video device Plug the other yellow connector into the yellow Video 5 connector on the projector Connect the red and white audio connectors from the A V cable to your source and the projector If the video device uses a DVI co...

Страница 9: ...tton on the keypad or remote Adjust the height of the projector by pressing the release button to extend the elevator foot Rotate the leveling foot if necessary Position the projector the desired distance from the screen at a 90 degree angle to the screen See page 36 for a table listing screen sizes and distances to the screen remove lens cap press Power button turn on video device vesa 1 L audio ...

Страница 10: ...e horizontal keystone via the menus or set the projec tor to automatically adjust the vertical keystone See page 24 Adjust the volume in the Audio menu Adjust the Contrast Brightness Color or Tint in the Picture menu See page 23 for help with the menus adjust zoom and focus focus zoom adjust keystone vesa 1 L audio in component 3 serial control dv1 2 video 5 trigger R S video 4 adjust volume comp ...

Страница 11: ...power cable that shipped with the projector You can control the projector from an LCD control panel or computer by connecting an RS 232 cable to the projector s Serial control connector Spe cific RS 232 commands can be found in the Service and Support section of our website at www infocushome com support You should also check here for software updates You can update your projector s software using...

Страница 12: ... lamp turns off and the LED blinks green for 1 minute while the fans continue to run to cool the lamp When the lamp has cooled the LED lights green and the fans stop Unplug the power cable to completely power off the projector Troubleshooting your setup If your image appears correctly on the screen skip to the next section page 20 If it does not troubleshoot the setup The LED on top of the pro jec...

Страница 13: ...ojected vesa 1 L audio in compone nt 3 serial contro l dv1 2 video 5 trigge r R S vide o 4 vesa 1 L audio in compo nent 3 serial control dv1 2 video 5 trigger R S video 4 vesa 1 L audio in compone nt 3 serial contro l dv1 2 video 5 trigge r R S vide o 4 vesa 1 L audio in compone nt 3 serial contro l dv1 2 video 5 trigger R S vide o 4 A or restart laptop vesa 1 L audio in componen t 3 serial contro...

Страница 14: ...tem Computer image projected Edges of image distorted Turn Overscan on in the Picture Overscan menu Correct image vesa 1 L audio in component 3 serial control dv1 2 video 5 trigger R S video 4 A Signal out of range You may also need to set a different resolution on your computer vesa 1 L audio in component 3 serial control dv1 2 video 5 trigger R S video 4 A A A B A B ...

Страница 15: ...e menu Square image Image not sharp Adjust the focus lens or Sharpness in the Picture Advanced menu Correct image Image does not fit 16 9 screen Change aspect ratio to 16 9 in Picture Aspect ratio menu Correct image vesa 1 L audio in component 3 serial control dv1 2 video 5 trigger R S video 4 A B A B A B ...

Страница 16: ...16 Image upside down Turn off Ceiling in Settings System menu Correct image Image reversed left to right Turn off Rear in Settings System menu Correct image A B A B A A B ...

Страница 17: ...image Lamp won t turn on LED blinking red page 12 Make sure vents aren t blocked allow projector to cool for one minute Unplug projector wait one minute plug in projector and turn it on lamp lights COLOR COLOR blinks red vesa 1 L audio in compone nt 3 serial contro l dv1 2 video 5 trigge r R S vide o 4 vesa 1 L audio in compo nent 3 serial control dv1 2 video 5 trigge r R S video 4 vesa 1 L audio ...

Страница 18: ...ue Lamp won t turn on LED blinking red page 12 Lamp must be replaced page 32 Lamp turns on Image not centered on screen Move projector adjust zoom adjust height Correct image blinks red vesa 1 L audio in compone nt 3 serial contro l dv1 2 video 5 trigge r R S vide o 4 vesa 1 L audio in compone nt 3 serial contro l dv1 2 video 5 trigge r R S vide o 4 vesa 1 L audio in compone nt 3 serial contro l d...

Страница 19: ...choices made in the menus page 23 up down arrows navigates to and adjusts settings in the menus page 23 auto image resets the projector to the source presets cycles through the available preset settings page 26 keystone vertical keystone adjusts the squareness of the image page 24 brightness adjusts intensity of the image page 24 resize changes the aspect ratio page 24 source changes the active so...

Страница 20: ...shut down info backlight button to light the remote s buttons in the dark Brightness and Contrast buttons to adjust the image Blank button to display a blank screen instead of the current image to change the color of the blank screen see page 29 Source buttons to switch among sources to assign a particular source to a source button see page 28 and a source toggle Resize button to change the Aspect...

Страница 21: ...io menu see page 28 Troubleshooting audio If there is no sound check the following Make sure the audio cables are connected Make sure mute isn t active in the Audio menu Make sure the volume is turned up enough Adjust the audio source If playing a video make sure the playback has not been paused connect audio connectors on A V cable audio in serial control Pr Pb Y trigger adjust volume ...

Страница 22: ...ptimizing video images After the video device is connected properly and the image is on the screen you can optimize the image using the onscreen menus For general informa tion on using the menus see page 23 Adjust the Keystone Contrast Brightness Color or Tint in the Picture menu See page 24 Change the Aspect ratio Aspect ratio is the ratio of the image width to image height TV screens are usually...

Страница 23: ...ious menu press the Menu button at any time to close the menus Dots appear before the menu name The number of dots indicate the menu s level ranging from one the Main menu to four the most nested menus The menus are grouped by usage The Picture menu provides image adjustments The Settings menu provides set up type adjustments that are not changed often The About menu provides a read only display o...

Страница 24: ...t sources only adjusts a video image from black and white to fully saturated color Tint NTSC video sources only adjusts the red green color balance in the image Aspect Ratio Aspect ratio is the ratio of the image width to image height TV screens are usually 1 33 1 also known as 4 3 HDTV and most DVDs are 1 78 1 or 16 9 The default is16 9 Native this mode bypasses the internal scaler displaying the...

Страница 25: ...reserves the 16 9 aspect ratio If you have a 16 9 source and screen the image fills the screen If your source is letterboxed the image is expanded to fill the screen Natural Wide this mode stretches a 4 3 image to fill the entire 16 9 screen The center two thirds of the image is unchanged the edges of the image are stretched 16 16 9 9 16 9 image input 16 9 image 16 9 aspect ratio 16 9 4 3 4 3 imag...

Страница 26: ... the future by selecting the appropriate user presets Gamma Gamma tables contain preset intensity configurations optimized for the input source You can select a gamma table that has been specifically tuned for either film presentation or photography NOTE Your viewing preferences may vary Cycle through the gamma options and pick the one you like the best Overscan video sources only removes noise ar...

Страница 27: ...mputer sources choose either SMPTE240 REC709 or REC601 for component sources Color Temperature changes the relative warmth of the colors Color Control allows you to individually adjust the gain intensity of the color the offset the amount of black in the color and the gamma of the red green and blue colors The following 4 options are for computer and component sources only Phase adjusts the horizo...

Страница 28: ... player with RGB output System Rear reverses the image so you can project from behind a translu cent screen Ceiling turns the image upside down for ceiling mounted projection Auto Ceiling automatically senses when the projector is inverted and turns the image upside down This is On by default Auto Power When Auto Power is checked the projector automatically goes into the startup state after the pr...

Страница 29: ...ant to capture on your computer highlight Capture New then press Select twice When complete the projector confirms the capture The next time you start the projector the custom logo you captured dis plays Blank Screen determines what color is displayed when you press the Blank button on the remote PiP Picture in Picture allows you to overlay a smaller window showing the video source on top of the l...

Страница 30: ...except Lamp Hours to their default after displaying a confirmation dialog box Lamp Reset resets the lamp hours counter in the About menu to zero Do this only after changing the lamp It displays a confirmation dialog box Service Info provides information about the projector s software version and the active source Service Code only used by authorized service personnel Language Service menu ...

Страница 31: ...eaner and don t apply the cleaner directly to the lens Abrasive cleaners solvents or other harsh chemicals might scratch the lens 2 Lightly wipe the cleaning cloth over the lens in a circular motion If you don t intend to use the projector immediately replace the lens cap clean the lens with a soft dry cloth and non abrasive cleaner ...

Страница 32: ...e projector to cool thoroughly 3 Turn the projector upside down and remove the lamp door by loosening the captive screw and then prying the lamp door out 4 Remove the two screws on the lamp module WARNINGS To avoid burns allow the projector to cool for at least 60 minutes before you replace the lamp Unplug the power cord before replacing the lamp Do not drop the lamp module The glass may shatter a...

Страница 33: ...ose of it as required by local state or fed eral ordinances and regulations For more information see www eiae org 5 Carefully remove the lamp module by grasping and lifting the metal bail wire Dispose of the lamp in an environmentally proper manner 6 Install the new lamp module making sure that it is properly seated 7 Replace the two screws 8 Replace the lamp door and tighten the screw 9 Plug in t...

Страница 34: ... the power cable 2 Wait 60 minutes to allow the projector to cool thoroughly WARNING To avoid burns allow the projector to cool for at least 60 minutes before you clean or replace the dust filter 3 Turn the projector upside down and remove the lamp door See page 32 4 Remove the dust filter door 5 Clean the filter using a vacuum set on low power 6 Replace the dust filter door and the lamp door 7 Va...

Страница 35: ...tional Accessories Part Number Shipping Case ATA approved CA ATA 019 Projector Mount SP CEIL 011 False Ceiling Plate for Projector Mount SP LTMT PLT Extension Arm for Projector Mount 26 47 SP LTMT EXTP Organizer Carry Case CA C230 DVI D Cable 6 ft 1 8 m SP DVI D M1 to Component Adaptor SP M1 ADPT LiteShow Wireless Connection LP LITESHOW ProjectorNet Software SW PN2 1CD Audio Video Cable 30 ft 9m S...

Страница 36: ...r has shut down the lamp Turn the projector off and wait one minute then turn the projector on If the lamp does not turn on replace the lamp Contact Technical Support for repair if replacing the lamp does not solve the problem Four 4 blinks A fan has failed Contact Technical Sup port for repair Five 5 blinks The projector is overheating Check for a blocked air vent Contact Technical Sup port for r...

Страница 37: ...onnector panel 5 contacting InFocus 18 Contrast 10 custom logo startup screen 29 customer service contact information 18 D Display Messages 28 displaying PiP 29 video image 9 dust filter cleaning 34 DVI connector 8 F focus 10 H HDTV 7 I image display video 9 size 6 image does not fit screen 15 image edges distorted 14 image not centered 18 image not sharp 15 image not square 15 image offset 6 imag...

Страница 38: ...adjusting the height 9 connector panel 5 customizing 22 optional accessories 35 remote control 20 shutdown 12 standard accessories 35 troubleshooting problems 12 R Rear 28 remote control 20 replacing the lamp 32 Reset 30 RS 232 connecting 11 S Screen Save 12 security lock 34 Serial connection 11 Settings menu 28 shutting down the projector 12 Sleep Timer 28 solid green 12 solid red 12 Source troub...

Страница 39: ... from date of purchase WARRANTY LIMITATION AND EXCLUSION THIS WARRANTY SETS FORTH INFOCUS MAXIMUM LIABILITY FOR ITS PRODUCT THIS WARRANTY EXTENDS ONLY TO PRODUCTS PUR CHASED FROM INFOCUS OR AN INFOCUS AUTHORIZED RESELLER InFocus shall have no further obligation under the foregoing Limited War ranty if the Product has been damaged due to abuse misuse neglect smoke exposure cigarette or otherwise ac...

Страница 40: ... purchase iii provides the dealer s name and iv provides the model and serial number of the Product Upon request of InFocus Corporation or an autho rized repair center for InFocus proof of legal import must accompany the warranty repair Product otherwise the Product must be returned to the place of original purchase to the manufacturer Purchaser must bear all tax duty and freight or the Purchaser ...

Отзывы: