background image

Page 11

INF7012 Series Hardware Guide

C

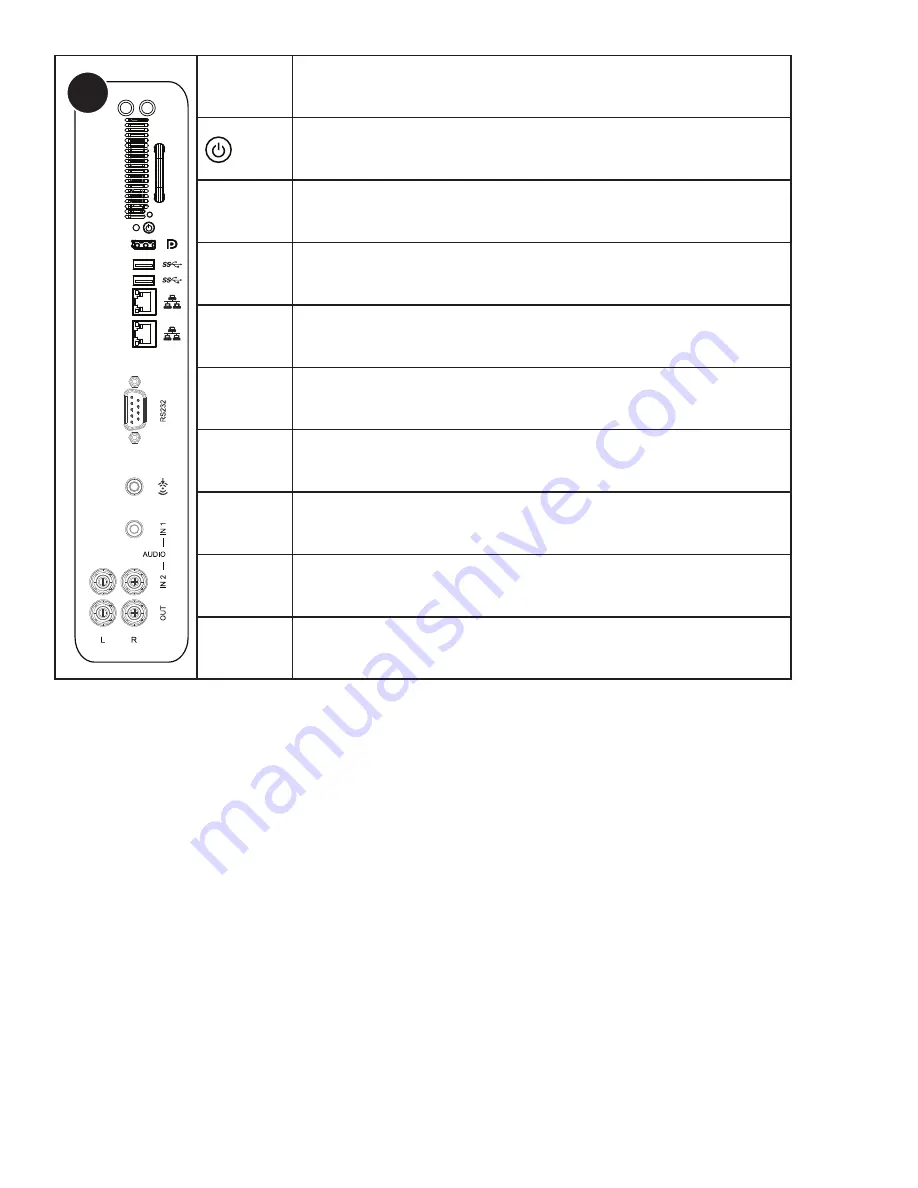
Antennas

LED

ANTENNAS

Connect the antennas to these jacks in order to receive and transmit wireless 
data.

POWER

Press to turn the PC on and off.

DISPLAYPORT 

OUT

Connect a DisplayPort cable from the embedded computer to another display.

USB-A

Connect a wireless mouse, USB thumb drive or other USB device one of these 
USB Type A connectors. Both USB 2.0 and 3.0 devices can be used.

RJ45

Connect to an ethernet network (10/100/1000 Mbps).

RS232

Connect to an RS232 control device for remote control applications.

PC AUDIO 
LINE IN

Connect a line in audio source for the PC module.

AUDIO IN1

Connect a 3.5mm audio cable to an external device (e.g., iPod player) for the VGA 
and component inputs.

AUDIO IN2

Connect an RCA L/R audio cable to an external device for the VGA and 
component inputs.

AUDIO OUT

Connect an RCA L/R audio cable to external stereo speakers.

Содержание INF7012

Страница 1: ...70 009 1660 00 INF7012 Hardware Guide...

Страница 2: ...een control setup 12 Turning the Display On Off 12 Setting up the Wireless Mouse and Keyboard 13 Wireless mouse 13 Wireless keyboard 13 Using the Remote 14 Using the Keypad 16 OSD On Screen Display Me...

Страница 3: ...nt is operated in a commercial environment This equipment generates uses and can radiate radio frequency energy and if not installed and used in accordance with the instruction manual may cause harmfu...

Страница 4: ...r other devices including amplifiers that produce heat Do not place the display in direct sunlight humid greasy or dusty places or in places where the display may come into contact with rain smoke or...

Страница 5: ...ervice to qualified service personnel Do not remove the cover or back Servicing your own display can be dangerous to you and will void the warranty Only use replacement parts specified by InFocus Unau...

Страница 6: ...Page 6 InFocus 8 12 UL1678 PC 1 30 10 2 2 2 1...

Страница 7: ...7 6 5 4 2 3 Q A D G S F H E T W R Y Z X C V B Tab S hift S hift Ctrl Ctrl Alt Alt Antennas Remote control batteries not included Documentation Stylus 1920 x 1080 display Power cord varies per country...

Страница 8: ...he mounting means should be strong enough to bear the weight of the display Do not install the display in places subject to mechanical vibration Do not place the display on an unstable surface which c...

Страница 9: ...ted to the connection panels on the back and side of the display Available jacks include USB B for touch control 1 HDMI In 3 DisplayPort 1 PC In 1 Component RCA 1 USB Type A 6 RJ45 2 DisplayPort Out 1...

Страница 10: ...Type A connector Both USB 2 0 and 3 0 devices can be used B HDMI COMPONENT PC IN HDMI 1 3 Connect an HDMI cable from the display to an HDMI external device such as a computer or DVD player DisplayPor...

Страница 11: ...ne of these USB Type A connectors Both USB 2 0 and 3 0 devices can be used RJ45 Connect to an ethernet network 10 100 1000 Mbps RS232 Connect to an RS232 control device for remote control applications...

Страница 12: ...ble to the USB Type A jack on the computer and to the USB Type B jack on the side of the display 3 The computer can now be controlled by using touchscreen gestures on the display TURNING THE DISPLAY O...

Страница 13: ...that the drivers have not been tested for compatibility tap Continue installation to finish 4 Insert two 2 AAA batteries not included into the mouse by aligning the and end of the batteries as indica...

Страница 14: ...ptimum operation is about 26 8m and within a horizontal and vertical angle of 30 degrees 30 30 CAUTION When disposing of the batteries be sure to do so in an environmentally proper manner If the remot...

Страница 15: ...not visible when a secondary source has not been selected PIP SWAP PiP Swap Switches the position of the main and secondary sources PIP POSITION PiP Position Moves the PiP window position from corner...

Страница 16: ...s Saves changes selections if the OSD menu is on button Moves the highlight bar up when the OSD or Source menu is on v button Moves the highlight bar down when the OSD or Source menu is on button When...

Страница 17: ...t PICTURE BRIGHTNESS CONTRAST SHARPNESS COLOR TEMPERATURE COLOR CONTROL PICTURE MODE PICTURE RESET NATIVE STANDARD NO 70 50 50 100 100 100 RED GREEN BLUE Sel Adjust Enter Back Quit SCREEN H POSITION V...

Страница 18: ...the image Range 0 100 Default 50 Sharpness changes the clarity of the edges of a video image Range 0 100 Default 50 Color Temperature changes the intensity of the colors Options include Native default...

Страница 19: ...100 Default 50 Clock adjusts the width of the image For VGA input only Range 0 100 Default 50 Clock Phase adjusts the focus clarity and stability of the image For VGA input only Range 0 100 Blank When...

Страница 20: ...or just external speakers are used Options include Internal both internal and external speakers operate and External only external speakers operate Default Internal Audio Source selects the audio inp...

Страница 21: ...Swap switches the source in the main and the PiP windows Options include Yes and No PIP Size changes the size of the PiP window used in the Corner to Corner configuration Options include Small default...

Страница 22: ...on the last selected source regardless of whether an active source is detected or not Options Yes and No default USB Hub Switch allows the user to use the embedded Mondopad module exclusively the touc...

Страница 23: ...ault 10 Freeze When enabled freezes the image which is currently displayed Options On and Off default OSD H Position adjusts the horizontal position of the OSD menu Range 0 100 Default 50 OSD V Positi...

Страница 24: ...e edges of a video image Options include On and Off default IR Control disables and enables the IR sensor on the display Options include Normal default IR is enabled and Lock IR is disabled Keypad Con...

Страница 25: ...source is selected and that the input signal is compatible with the display The colors on the display do not look right Adjust the color settings in the Picture menu Reset the picture settings Verify...

Страница 26: ...display Move the infrared communication equipment away from the display to eliminate the noise No sound If using the external speakers verify that the speakers are connected properly and that the spea...

Страница 27: ...splay is powered on Off Off The system does not have power 1 Verify the power cord is properly connected to the power outlet and to the display 2 Verify that the power switch on the back of the unit i...

Страница 28: ...depending on your product model and the country of purchase To review the warranty period associated with your product model please refer to the product specifications information on www infocus com B...

Страница 29: ...by anyone other than a representative of InFocus or an InFocus Authorized Service Provider ASP or your own installation of customer installable parts as instructed by InFocus h to a product or part th...

Страница 30: ...ANTY OR CONDITION MAY LAST SO THE LIMITATIONS OR EXCLUSIONS DESCRIBED BELOW MAY NOT APPLY TO YOU THIS WARRANTY GIVES YOU SPECIFIC LEGAL RIGHTS AND YOU MAY ALSO HAVE OTHER RIGHTS THAT VARY BY COUNTRY S...

Страница 31: ...ons parts availability and response times may vary according to the country in which service is requested Service options are subject to change at any time You may be responsible for shipping and hand...

Страница 32: ...Page 32 1 98 5 4 1 2 1...

Страница 33: ...Page 33 INF7012 Series Hardware Guide M8 12 UL1678 PC...

Страница 34: ...Page 34 BIGTOUCH 70 I O PORT HDMI COMPONENT PC IN TOUCH CONTROL USB A B Antennas LED C TOUCH CONTROL USB A TOUCH CONTROL USB USB Monitor USB U USB Type A USB2 0 USB3 0...

Страница 35: ...C IN HDMI 1 3 HDMI DisplayPort DisplayPort PC IN RGB COMPONENT DVD HDTV YPbpr C Antennas LED ANTENNAS POWER DISPLAYPORT OUT DISPLAYPORT USB A U USB Type A USB2 0 USB3 0 RJ45 10 100 1000 Mbps RS232 PC...

Страница 36: ...Page 36 1 Source 2 OSD OSD OSD OSD OSD OSD OSD OSD...

Отзывы: