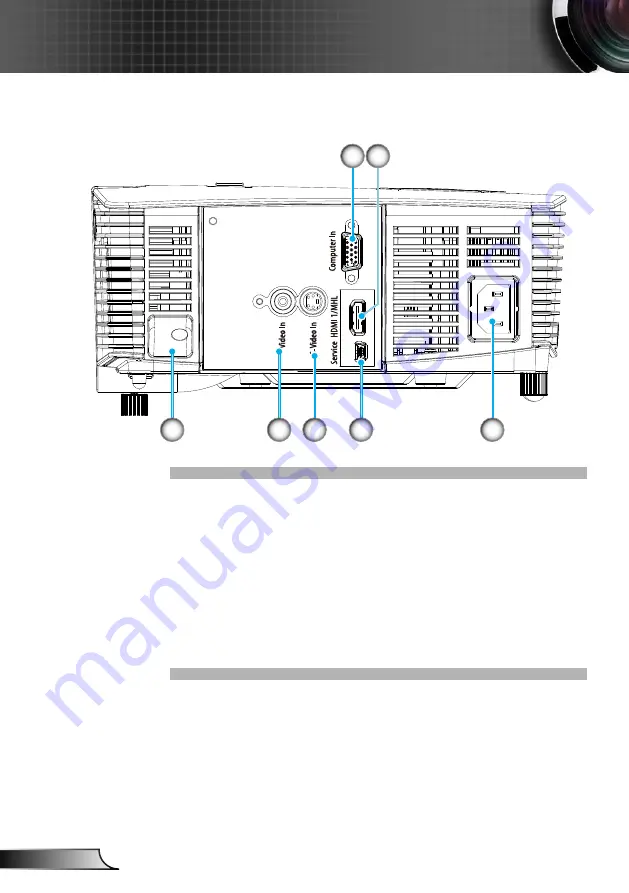
InFocus IN112xa Скачать руководство пользователя страница 10

10

English

Introduction

VGA-IN/YPbPr Connector (PC Analog Signal/Component 

1. 

Video Input/HDTV/YPbPr)

HDMI1 Connector

2. 

Security Lock Slot

3. 

Composite Video Input Connector

4. 

S-Video Input Connector

5. 

USB Connector (Connect to PC for Remote Mouse func

-

6. 

tion/

USB Service for firmware upgrade)

Power Socket

7. 

3

4

5

6

7

1

2

P109, IN112xv, IN114xv, IN116xv

Содержание IN112xa

Страница 1: ...19 User Controls 21 Control Panel Remote Control 21 Control Panel 21 Remote Control Battery Installation 22 Remote Control 23 On screen Display Menus 27 How to operate 27 Menu Tree 28 IMAGE 30 IMAGE...

Страница 2: ...o not place the projector on a crowded coffee table sofa bed etc Do not put the projector in an enclosure such as a book case or a cabinet that restricts air flow 2 Do not use the projector near water...

Страница 3: ...amp when it shows warning messages Warning Reset the Lamp Reset function from the on screen display OPTIONS Lamp Settings menu after replac ing the lamp module refer to page 46 Warning When switching...

Страница 4: ...long period of time Do not Block the slots and openings on the unit provided for ventilation Use abrasive cleaners waxes or solvents to clean the unit Use under the following conditions In extremely h...

Страница 5: ...on HD compatible 720p and 1080p supported BrilliantColorTM Technology Kensington Lock RS232 control Rapid shutdown Full 3D See page 58 The Product Features shall be configured by the manufacturer as p...

Страница 6: ...ories Power Cord IR Remote Control Package Overview Unpack and inspect the box contents to ensure all parts listed below are in the box If something is missing please contact your nearest customer ser...

Страница 7: ...2 IR Receiver 3 Control Panel 4 Input Output Connections 5 Kensington 6 TM Lock Port Ventilation inlet 7 Speaker 8 Tilt Adjustment Feet 9 Ventilation outlet 10 The interface is subject to model s spec...

Страница 8: ...English Introduction 6 1 2 7 8 11 Source 1 Keystone Correction 2 Enter 3 Re Sync 4 Help 5 Four Directional Select Keys 6 Temp LED 7 Power 8 On Standby LED 9 Lamp LED 10 Menu 11 Control Panel 5 10 3 4...

Страница 9: ...Component Video Input HDTV YPbPr HDMI2 Connector 5 USB Connector Connect to PC for Remote Mouse func 6 tion USB Service for firmware upgrade Security Lock Slot 7 Audio2 Input 8 Connector 3 5mm mini ja...

Страница 10: ...1 Video Input HDTV YPbPr HDMI1 Connector 2 Security Lock Slot 3 Composite Video Input Connector 4 S Video Input Connector 5 USB Connector Connect to PC for Remote Mouse func 6 tion USB Service for fi...

Страница 11: ...o and S Video 3 HDMI 4 3D 5 Volume 6 Four Directional Select 7 Keys Menu 8 AV Mute 9 Mute 10 IR LED 11 Power On Off 12 VGA 13 Keystone and 14 Remote Mouse function Aspect 15 Enter and Enable 16 Remote...

Страница 12: ...rence in applications for each country some regions may have different accessories Not included The interface is subject to model s specifications 1 Audio Output Cable 2 VGA Out Cable 3 VGA Cable 4 HD...

Страница 13: ...the difference in applications for each country some regions may have different accessories Not included The interface is subject to model s specifi cations 1 VGA Cable 2 HDMI Cable 3 Power Cord 4 USB...

Страница 14: ...ble 8 15 Pin to 3 RCA Component HDTV Adaptor 9 3 RCA Component Cable S Video Output Composite Video Output Due to the difference in applications for each country some regions may have different access...

Страница 15: ...ent HDTV Adaptor 7 3 RCA Component Cable S Video Output Composite Video Output Due to the difference in applications for each country some regions may have different accessories Not included The inter...

Страница 16: ...ou use the projector you will be asked to select the preferred language and power saving mode 3 Turn on and connect the source that you want to display on the screen computer notebook video player etc...

Страница 17: ...he projector has completed the cooling cycle and has en tered standby mode Once in standby mode simply press button to restart the projector 3 Disconnect the power cord from the electrical outlet and...

Страница 18: ...with elevator feet for adjusting the image height 1 Locate the adjustable foot you wish to modify on the underside of the projector 2 Rotate the adjustable ring clockwise to raise the projector or co...

Страница 19: ...6 feet 1 2 to 12 0 meters WXGA series The projector will focus at distances from 3 28 to 32 8 feet 1 to 10 meters Adjusting Projection Image Size SVGA XGA series Projection Image Size from 27 5 to 302...

Страница 20: ...11 92 250 132 50 212 00 3 37 5 38 27 21 30 21 8 35 9 15 0 42 16 56 300 159 00 254 40 4 04 6 46 32 65 36 25 10 02 10 98 0 50 19 87 4 3 diagonal screen inches Height inches width inches Height meters Wi...

Страница 21: ...Press Menu to launch the on screen display OSD menu To exit OSD Press Menu again Help Help Menu only available when OSD menu is not shown Four Directional Se lect Keys Use to select items or make adju...

Страница 22: ...N H C R 2 0 2 5 3V O L T S C R 2 0 2 5 M 3V O L T S C R 2 0 2 5 To ensure safe operation please observe the following pre cautions Use CR2025 type battery Avoid contact with water or liquid Do not exp...

Страница 23: ...Use to select items or make ad justments to your selection AV Mute Momentarily turns off on the audio and video Enter Confirm your item selection and Enables Remote Mouse function Mute Momentarily tur...

Страница 24: ...24 English User Controls Using the HELP button The HELP function ensures easy setup and operation Press the button on the control panel to open the Help Menu...

Страница 25: ...the Troubleshooting section on pages 48 53 for more details Help menu button functions only when no input source is detected If input source is detected and help button is pressed the following pages...

Страница 26: ...26 English User Controls...

Страница 27: ...ed use keys to select any item in the main menu While making a selection on a particular page press or Enter key to enter sub menu 3 Use keys to select the desired item and adjust the settings using k...

Страница 28: ...VGA 0 31 Frequency VGA 5 5 H Position VGA 5 5 V Position VGA 5 5 Exit Exit Reset Format 4 4 3 16 9 Native AUTO 5 4 3 16 9 or 16 10 Native AUTO Edge Mask 0 10 Zoom 5 25 80 200 Image Shift H 100 100 V...

Страница 29: ...der On Off Brightness Mode Bright Eco Dynamic Lamp Reset Yes No Dynamic Dimming On Off Exit Optional Filter Settings Yes No Filter Usage Hours 0 9999 Filter Reminder Off 300hr 500hr 800hr 1000hr Filte...

Страница 30: ...o achieve optimum color settings when projecting onto a blackboard green User User s settings 3D Recommend setting for 3D mode enabled Any further adjustments by the user in 3D will be saved in this m...

Страница 31: ...ack and white to fully saturated color Press the to decrease the amount of saturation in the image Press the to increase the amount of saturation in the image Tint Adjust the color balance of red and...

Страница 32: ...w color processing algorithm and system level enhancements to enable higher brightness while providing true more vibrant colors in picture The range is from 0 to 10 If you prefer a stronger enhanced i...

Страница 33: ...elect Red Green and Blue Colors Reset Choose Yes to return the factory default settings for color adjustments Color Space Select an appropriate color matrix type from AUTO RGB RGB 0 255 RGB 16 235 or...

Страница 34: ...n again Phase Synchronize the signal timing of the display with the graphic card If the image appears to be unstable or flickers use this function to correct it Frequency Change the display data frequ...

Страница 35: ...caling AUTO Automatically selects the appropriate display format Auto Input resolution Auto Scale SVGA Auto Scale XGA H V H V H V 4 3 640 480 800 600 1024 768 800 600 800 600 1024 768 1024 768 800 600...

Страница 36: ...e widescreen laptops Native This format displays the original image without any scaling AUTO Automatically selects the appropriate display format Auto Input resolution Screen Type 16 10 Screen Type 16...

Страница 37: ...tion removes the noise in a video image Edge mask the image to remove video encoding noise on the edge of video source Zoom Press the to reduce the size of an image Press the to magnify an image on th...

Страница 38: ...selected automatically SBS Use this mode for Side by side format 3D content Top and Bottom Use this mode for Top and Bottom format 3D content Frame Sequential Use this mode for Frame Sequential forma...

Страница 39: ...e selection Projection Front Desktop This is the default selection The image is projected straight on the screen Rear Desktop When selected the image will appear reversed Front Ceiling When selected t...

Страница 40: ...isplay screen Screen Type Choose the screen type from16 10 or 16 9 Projector ID ID definition can be set up by menu range 0 99 and allow user control an individual projector by RS232 Refer to pages 59...

Страница 41: ...the On to turn mute on Choose the Off to turn mute off Volume Press the to decrease the volume Press the to increase the volume Audio Input The default audio inputs are on the back panel of the projec...

Страница 42: ...default startup screen Neutral Logo is not displayed on startup screen Closed Captioning Use this function to set the desired startup screen If changes are made they will take effect the next time the...

Страница 43: ...High Altitude When On is selected the fans will spin faster This feature is useful in high altitude areas where the air is thin Information Hide On Choose On to hide the info message Off Choose Off t...

Страница 44: ...Off you will only be able to use the control panel keys When you change the setting from On to Off it will display a warning message Background Color Use this feature to display a Black Red Blue Gree...

Страница 45: ...ithout a signal being sent to the projector The projector will automatically power off when the countdown has finished in minutes Quick Resume On If the projector is accidentally turned off this featu...

Страница 46: ...oose BRIGHT to increase the brightness Eco Choose Eco to dim the projector lamp which will lower power consumption and extend the lamp life Dynamic Choose Dynamic to dim the lamp power which will be b...

Страница 47: ...assembling filter please turn on the projector then press Menu go to OPTIONS Op tional Filter Settings Optional Filter Installed and select Yes Filter Usage Hours Display the filter time Filter Remind...

Страница 48: ...you are using a PC For Windows 95 98 2000 XP Windows 7 1 Open the My Computer icon the Control Panel folder and then double click on the Display icon 2 Select the Settings tab 3 Verify that your disp...

Страница 49: ...screen of the Notebook or PowerBook computer is not displaying your presentation If you are using a Notebook PC Some Notebook PCs may deactivate their own screens when a second display device is in us...

Страница 50: ...ratio by referring to the following Please setup the display format as 16 9 wide aspect ratio type on your DVD player Image is too small or too large Adjust the Zoom Ring on the top of the projector...

Страница 51: ...ormat Press 3D Format button and switch to SBS for input signal is HDMI 1 3 2D 1080i side by side Image does not display in 3D Check if the battery of 3D glasses is drained Check if the 3D glasses is...

Страница 52: ...N STANDBY LED Temp LED Lamp LED Green Amber Red Red Standby State Input power cord Amber Power on Warming Flashing Green Lamp lighting Green Power off Cooling Flashing Green Error Over Temp Flashing A...

Страница 53: ...ck the operating angle of the remote control is within 20 both horizontally and vertically of one of the IR receivers on the projector Make sure there are not any obstructions between the remote contr...

Страница 54: ...wn for at least 30 minutes before changing the lamp Warning Lamp compartment may be hot Allow it to cool down before changing the lamp Warning To reduce the risk of personal injury do not drop the lam...

Страница 55: ...e 5 9 Lift up the lamp handle 6 and remove the lamp module slowly and carefully 7 To replace the lamp module reverse the previous steps 10 Turn on the projector and reset the lamp timer Lamp Reset i P...

Страница 56: ...hree months clean it more often if the projector is used in a dusty environment Procedure Switch off the power to the projector by pressing the 1 button Disconnect the power cord 2 Remove the dust fil...

Страница 57: ...endent on graphics cards support Signal Resolution Refresh Rate Hz Video Analog HDMI Mac NTSC 720 x 480 60 O PAL SECAM 720 x 576 50 O VGA 640 x 480 60 O O O 640 x 480 67 O 640 x 480 72 8 O O 640 x 480...

Страница 58: ...While 3D Format is SBS 1920 x 1080i 60Hz 1280 x 720p 50Hz 1280 x 720p 60Hz 1920 x 1080i 50Hz Top and Bottom While 3D Format is Top and Bottom 1920 x 1080i 60Hz 1280 x 720p 50Hz 1280 x 720p 60Hz 480i...

Страница 59: ...59 English Appendices RS232 Pin Assignments RS232 Commands and Protocol Function List Pin no Spec from projector side 1 N A 2 RXD 3 TXD 4 N A 5 GND 6 N A 7 N A 8 N A 9 N A 1 2 3 4 5 6 7 8 9...

Страница 60: ...3 2 3 0 3 0 3 E 7 7 0 2 X X D 3 D 0 9 3 0 2 0 3 2 3 0 3 0 3 E 7 9 0 2 X X XX21 n 7E 30 30 32 31 20 a 0D Brightness n 50 a 2D 35 30 50 a 35 30 0 3 5 3 a 0 5 0 3 5 3 D 2 a 0 5 n t s a r t n o C D 0 a 0...

Страница 61: ...7 3 0 3 0 3 E 7 6 0 7 X X h s i l o P D 0 7 3 0 2 0 3 7 3 0 3 0 3 E 7 7 0 7 X X h c t u D D 0 8 3 0 2 0 3 7 3 0 3 0 3 E 7 8 0 7 X X h s i d e w S D 0 9 3 0 2 0 3 7 3 0 3 0 3 E 7 9 0 7 X X h s i n a D...

Страница 62: ...E 30 30 31 31 35 20 30 0D Off 0 2 for backward compatible XX114 1 7E 30 30 31 31 34 20 31 0D Power Mode Standby Eco 0 5W XX114 0 7E 30 30 31 31 34 20 30 0D Active 0 2 for backward compatible XX109 1 7...

Страница 63: ...0D Brightness OKn XX126 1 7E 30 30 31 32 36 20 31 0D Contrast OKn XX127 1 7E 30 30 31 32 37 20 31 0D Aspect Ratio OKn WXGA n 0 1 2 3 4 4 3 16 9 or 16 10 LBX Native AUTO SVGA XGA n 0 1 2 3 4 4 3 16 9 L...

Страница 64: ...to the projector meet the following specifications Screw type M4 3 Minimum screw length 10mm Warning 1 If you buy a ceiling mount from another company please be sure to use the correct screw size Scr...

Страница 65: ...this device does cause harmful interference to radio or television reception which can be determined by turning the device off and on the user is encouraged to try to correct the interference by one...

Страница 66: ...Part 15 of the FCC Rules Operation is subject to the following two conditions 1 This device may not cause harmful interference and 2 This device must accept any interference received including interfe...

Отзывы: