


CT-ILPC ASSEMBLY INSTRUCTIONS
WEIGHT STACK AND CABLE ASSEMBLY
C1.
Insert Guide Rods into the base of the Loop Upright. Allow Guide Rods to lean back
away from the machine. Place one weight stack cushion on each Guide Rod and
slide down to the base. Apply lubricant to the Guide Rods from the weight stack
cushions to the tops of the Guide Rods.
Making sure that the recess for the weight labels is facing towards the machine and
that the three pads are facing down slide onto the Guide Rods: 5
–
15lb. weight
plates, 10
–
10lb. weight plates and 5
–
5lb weight plates. Place the Top Weight
with Cable on the Guide Rods with the drilled hole facing the machine and slide
down to the stack.
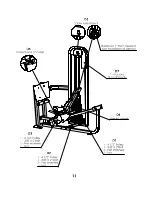
C2.
Before proceeding with the cable installation slide the loop of the weight pin lanyard
over the end of the ILPC Cable down to the top weight.
C3.
Install Guide Rod Bracket onto top of guide rods. Place the ILPC Cable over one 4
½”
pulley and slide up between the plates of the Main Upright at the slot. Stand the
weight stack assembly upright and bolt the Guide Rod Bracket, Pulley and Loop
Upright together using 1
–
3/8
”
x 2
”
bolt, 1 - Cam Washer, 2
–
3/8
”
flat washers, and
1
–
3/8
”
nut. Do not tighten at this time.
C4.
Place the ILPC Cable over one 4
½”
pulley and slide up between the plates of the
Main Upright at the hole near the corner. Bolt the pulley in place using 1
–
3/8
”
x 1
¾”
bolt, 2
–
3/8
”
flat washers, and 1
–
3/8
”
nut.
8


