background image

Battery

Lithium Battery

6 months
-20 

 - 25 

5 % -95 %

 - 40 

-15 

 - 50 

3 hours
25.2 V

Charging time
Voltage
Initial Capacity
Working Temperature
Charging Temperature
Storage Time
Storage Temperature
Storage Humidity

4400 mAh

07

8.1 Weight Restrictions
Battery Specifications

BATTERY WARING

9. Charging your scooter

Failure to follow the Safety Precautions listed in the Battery Warning could 
lead to serious bodily injury and death. Seek immediate medical attention 
if you are exposed to any substance that is emitted from the battery.

• Do not attempt to modify, change, or replace your battery.

 Do not use your scooter if the battery begins to emit odor, overheats, or

begins to leak.

• Do not touch any leaking materials, or breathe fumes emitted.
• Do not allow children and animals to touch the battery.
• The battery contains dangerous substances, do not open the battery, or 

insert anything into the battery.

• Please only use the charger provided by scooter.
•  Do  not  attempt  to  charge  the  scooter  if  the  battery  has  discharged  or 

 emitted any substances. In that case, the battery should be abandoned

for safety.

Please follow all local, state and federal laws in regards to recycling,

handling and disposing of Lithium Ion batteries.

• The scooter should only be shipped in its original packaging.
• Do not throw away your box as you need you scooter packaging for future use.

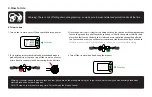
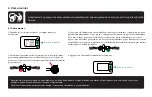
Step 1:  Ensure that the charging port is clean and dry.
Step 2:  Plug the charger into the power socket, then connect the cable with the  
               power supply (100V

240V; 50,60Hz), make sure the light on the charger 

is lit GREEN.

Step 3:  Male DC connector plug into the charging port ofthe scooter. The 

indicator light on the charger should change to RED, indicating that your 
scooter is now, being charged. When the RED indicator light on your 

charger turns to GREEN then your scooter is fully charged. A full charge 
typically occurs within 3 hours.

Step 4:  Please unplug the charger from your scooter and from the power outlet.

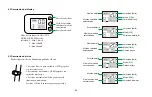
IMPORTANT NOTES ABOUT CHARGING

If the green light on your charger does not turn RED when you plug it tinto your

scooter, it could mean you have to check the cables to ensure you have a 

proper connection; or that your scooter is already fully chaged. Push and hold 

your power button next to the charging port to check the status of your battery

in the display.

• Do not overcharge, as this will affect the life of the battery.

• The best charging temperatures are between 0°~40°. Extreme cold and 

extreme  heat will prevent your battery from charging fully.

• Make sure to unplug your charger before standing on or operating you 

scooter, as this can be very dangerous.

• Use only the scooter charger that you received in your box.

• If the scooter is powered on when you enter the plug, the Battery Indicator will

begin blinking, if the scooter is powered off when you enter the plug,

the Battery Indicator will not blink.

Содержание 8436546192084

Страница 1: ...USER S MANUAL...

Страница 2: ...height of extension pole 4 How to ride 5 SCOOTER SAFETY PRECAUTIONS 6 Weight and Speed Limitations 6 1 Weight Restrictions 6 2 Speed Limits 7 Operating Range 8 Battery Information and Specifications...

Страница 3: ...1 General Information 01 Front Wheel Motor Kickstand Charging port Deck Rear Brake Vibration Light Folding Latch Lock buckle Handle Display LED Light Accelerator Electric Brake...

Страница 4: ...in seconds Pull up the tube of the folding construction then pull up the the front pole when bottom of the folding tube goes into the slot the unfolding completed 3 1 Unfolding Before you first experi...

Страница 5: ...t rider s height When the bead goes into the hole the height is fixed 3 Close the lock buckle lock buckle height limit button The extensive height is prohibited to exceed the first upper Limit hole Li...

Страница 6: ...h then push accelerator and place the other foot on the deck this is safer and more controlled than pulling off with two feet on the deck as you will have less control and stability with two feet on...

Страница 7: ...cted speed level Speed Km h Display mode DIS Single distance km Km h RPM Battery power Selected speed level Speed Km h Display mode RPM Motor speed Km h km ODO Battery power Selected speed level Speed...

Страница 8: ...eboard or scooter THE SCOOTER IS NOT A SKATEBOARD 10 Do not turn sharply especially at high speeds 11 Do not abuse your scooter doing so can damage your unit and cause failure to the operating system...

Страница 9: ...cluding near areas with flammable gas steam liquid dust fiber which could cause fire and explosion accidents Please notice the scooter can travel a distance of 8 12 km on a fully charged battery in id...

Страница 10: ...g for future use Step 1 Ensure that the charging port is clean and dry Step 2 Plug the charger into the power socket then connect the cable with the power supply 100V 240V 50 60Hz make sure the light...

Страница 11: ...arge You must bring the scooter into a warmer environment before charging Check under Battery Information and Specifications for more details To prevent dust from getting into your scooter try wrappin...

Страница 12: ...mprar nuestro producto Para obtener un rendimiento y una seguridad ptimos lea atentamente estas instrucciones antes de utilizar el producto Por favor conserve este manual para referencias futuras MANU...

Страница 13: ...de extensi n Peso y limitaciones de velocidad 01 02 02 02 02 02 02 03 03 03 4 4 C mo montar 5 5 PRECAUCIONES DE SEGURIDAD DEL SCOOTER 04 05 05 6 1 Restricciones de peso 6 2 L mites de velocidad Rango...

Страница 14: ...1 Informaci n general 01 Rueda frontal Motor Patilla Puerto de carga Cubierta Freno trasero Luz de vibraci n Pestillo plegable Hebilla de bloqueo Manillar Display Luz LED Acelerador Freno el ctrico...

Страница 15: ...en la ranura el despliegue se completa 3 Descripci n del producto 3 1 Despliegue Puede desplegar el Smart Kick Scooter sin ning n inconveniente en segundos Antes de que experimente por primera vez su...

Страница 16: ...a altura del jinete Cuando la cuenta entra en el agujero la altura es fija 3 Cierre la hebilla de bloqueo cierre de hebilla height limit button Se proh be la altura extensa para exceder el primer orif...

Страница 17: ...alcanza los 10 km h luego presione el acelerador y coloque el otro pie en la plataforma esto es m s seguro y m s controlado que arrancar con dos pies en la plataforma ya que tendr menos control y est...

Страница 18: ...ode RPM Velocidad del motor Km h km ODO Nivel de bater a Nivel de velocidad seleccionada Velocidad Km h Modo ODO Total de KM km Km h VOL Velocidad Km h Mode VOL Voltaje de bater a V 1 Presione el bot...

Страница 19: ...UN SKATEBOARD 10 No gire bruscamente especialmente a altas velocidades 11 No maltrate su scooter ya que esto puede da ar su unidad y provocar una falla en el sistema operativo que podr a provocar les...

Страница 20: ...es 7 Rango operativo Tenga en cuenta que el scooter puede recorrer una distancia de 8 a 12 km con una bater a completamente cargada en condiciones ideales Los siguientes son algunos de los principales...

Страница 21: ...arlo en el futuro 9 Carga Paso 1 Aseg rese de que el puerto de carga est limpio y seco Paso 2 enchufe el cargador a la toma de corriente luego conecte el cable con el fuente de alimentaci n 100V 240V...

Страница 22: ...levar el scooter a un ambiente m s c lido antes de cargarlo Consulte en Informaci n y especificaciones de la bater a para obtener m s detalles Para evitar que entre polvo en su scooter intente envolve...

Страница 23: ...UAL DE USU RIO Obrigado por comprar nosso produto Para um desempenho e seguran a otimizados leia atentamente estas instru es antes de usar o produto Por favor mantenha este manual para refer ncia futu...

Страница 24: ...tura do polo de extens o Limita es de peso e velocidade 01 02 02 02 02 02 02 03 03 03 4 4 Como montar 5 5 PRECAU ES DE SEGURAN A DA SCOOTER 04 05 05 6 1 Restri es de peso 6 2 Limites de velocidade Fai...

Страница 25: ...1 Informa es gerais 01 Roda dianteira Engine Pin Porto de carga Capa Freio traseiro Luz de vibra o Trinco dobr vel Fivela de bloqueio Guiador Display Luz LED Acelerador Freio el trico...

Страница 26: ...da frente quando a parte inferior do tubo dobr vel entrar no slot a implanta o estar conclu da 2 descri o do produto 2 1 Informa es gerais Nossa scooter el trica uma solu o intuitiva e tecnologicamen...

Страница 27: ...justar a altura do piloto Quando a nota entra no buraco a altura fixa 3 Feche a fivela de bloqueio fecho de fivela bot o de limite de altura A altura excessiva proibida para exceder o primeiro buraco...

Страница 28: ...cidade atingir 10 km h pressione o acelerador e coloque o outro p na plataforma isso mais seguro e controlado do que a inicializa o com dois p s na plataforma j que voc ter menos controle e estabilida...

Страница 29: ...Km h Mode RPM Velocidade do motor Km h km ODO N vel da bateria N vel de velocidade selecionado Velocidade Km h Mode ODO KM total km Km h VOL Velocidade Km h Mode VOL Tens o da bateria v 1 Pressione o...

Страница 30: ...UM SKATE 10 N o gire nitidamente especialmente em altas velocidades 11 N o abuse da sua scooter pois isso pode danificar sua unidade e causar uma falha no sistema operacional que pode causar ferimento...

Страница 31: ...ases inflam veis vapor l quidos poeira fibras que poderiam causar inc ndios e explos es 7 Faixa de opera o Note que a scooter pode percorrer uma dist ncia de 8 a 12 km com uma bateria totalmente carre...

Страница 32: ...1 verifique se a porta de carregamento est limpa e seca Etapa 2 Conecte o carregador na tomada e em seguida conecte o cabo fonte de alimenta o 100V 240V 50 60Hz verifique se a luz do carregador est ac...

Страница 33: ...e mais quente antes de carreg la Consulte informa es e especifica es da bateria para mais detalhes Para evitar a entrada de poeira na sua scooter tente envolv lo ou sel lo em sua embalagem original Gu...

Страница 34: ...Z _ w _ w o en nuestra web www infiniton e acio...

Страница 35: ...n la Directiva 99 05 CE del Parlamento Europeo y del Consejo de 9 de Marzo de 1 999 traspuesta a la legislac i n espa ola mediante el Real Dec reto 1 890 2000 de 20 de Noviembre Para m s informaci n r...

Страница 36: ...INFINITON WORLD ELECTRONIC S L info infiniton es INFINITON WORLD ELECTRONIC S L info infiniton es...

Страница 37: ...Para mas informaci n sobre nuestra pol tica de RMA y Reparaciones visite www infiniton es rma politica rma infiniton pdf INFINITON WORLD ELECTRONIC S L info infiniton es WORLD ELECTRONIC...

Отзывы: