


13 - PayCon Touch - Pillar
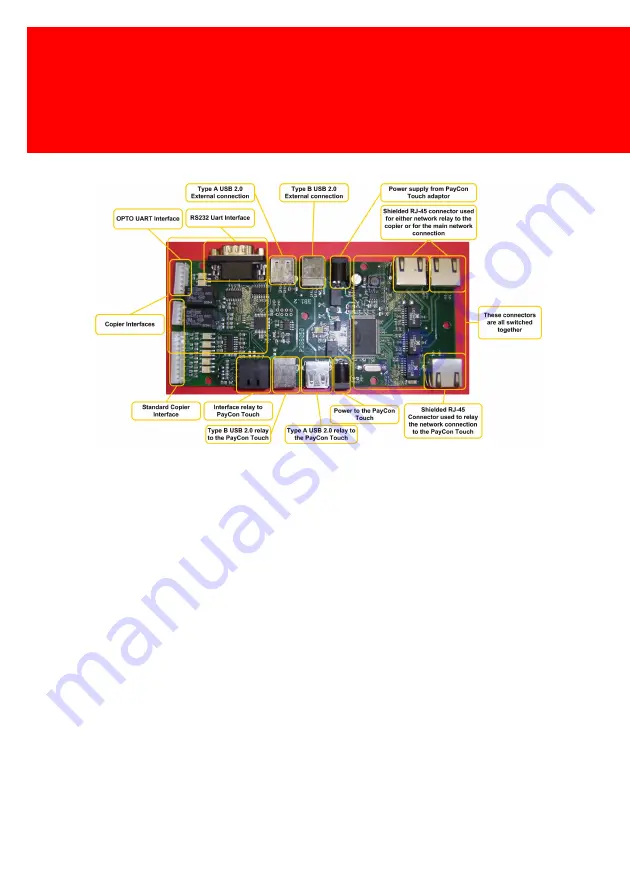
3. Connect the first network cable from the unshielded RJ-45
connector to the unshielded connector on the interface board.
4. Connect the second network cable from the shielded RJ-45
connector to the shielded connector on the interface board.
5. Connect the power cable to the power outlet on the interface
board.
6. Connect both the USB cables.
7. Connect the copier interface cable to the correct interface on the
board, and connect to the copier.
8. Connect the power supply and connect it to a power outlet.
9. Connect the network cable and connect it to a working network
outlet.
Содержание PayCon Touch - Pillar
Страница 1: ...2019 Inepro B V All rights reserved Installation Manual PayCon Touch Pillar PayCon Touch Pillar...
Страница 4: ...Table of Contents Introduction 1 Check Kit Content 3 Hardware Setup 10...
Страница 6: ...I Introduction Part...
Страница 8: ...II Check Kit Content Part...
Страница 10: ...5 PayCon Touch Pillar 1x PayCon Touch Cables and Cover Package 1x PayCon Touch Kit...
Страница 14: ...9 PayCon Touch Pillar PayCon Touch Kit...
Страница 15: ...III Hardware Setup Part...
Страница 17: ...Hardware Setup 12 2 Fasten the copier interface with 6 of the 10 machine screws...
Страница 19: ...Hardware Setup 14 10 Mount the cover over the Copier Interface Board with the last 4 screws...
Страница 21: ...Hardware Setup 16 14 Fasten the PayCon Touch to the pillar start with the 2 hex key screws on back...
Страница 23: ...Hardware Setup 18 16 You have finished constructing the PayCon Touch Stand...
Страница 24: ......


