10
GB
Voltage and
mains frequency
Electrical connections
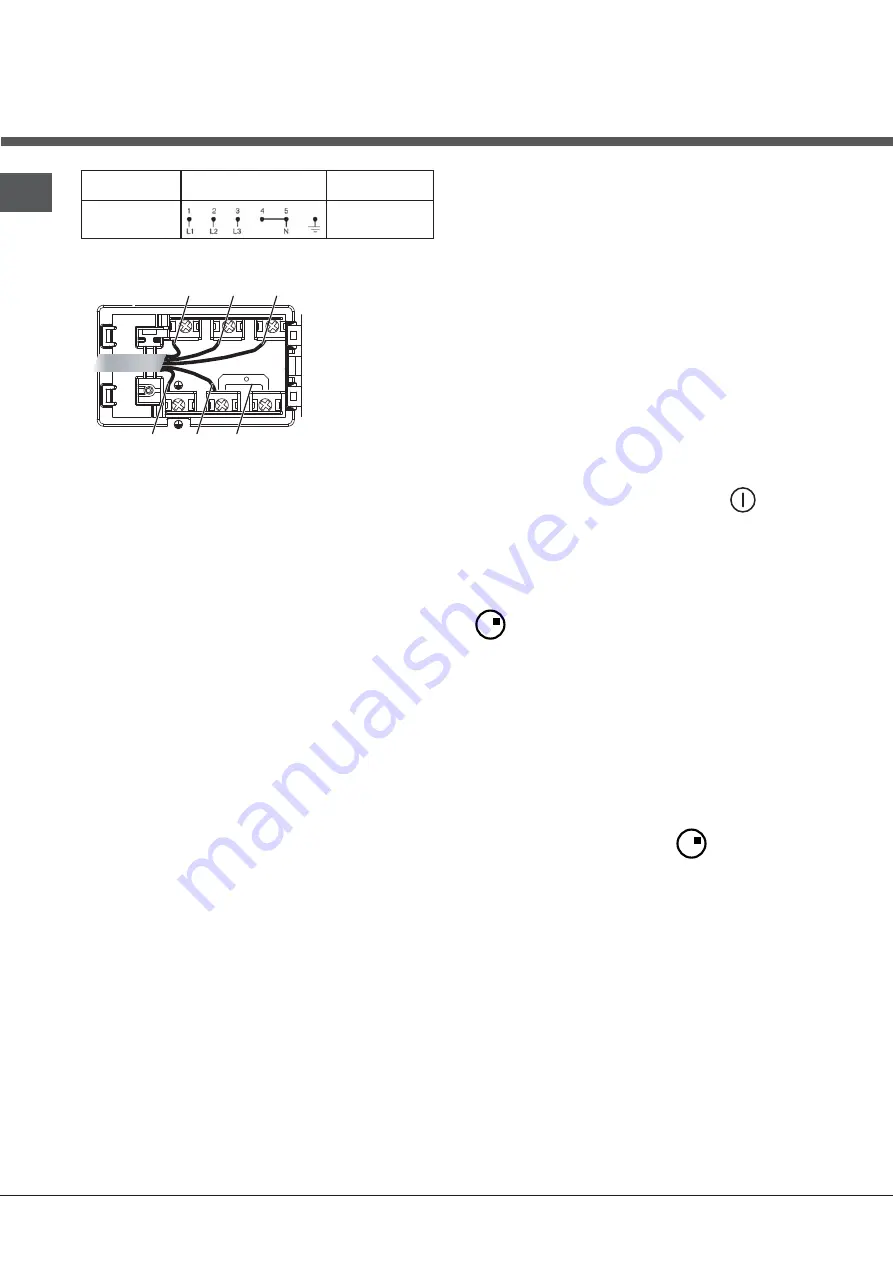
Terminal board
400V 3-N ~
50/60 Hz
Three-phase 400
5. Secure the power supply cable by fastening the
cable clamp screw, then put the cover back on.
Three-phase 400
Connecting the electricity supply cable to the mains
If the appliance is being connected directly to the
electricity mains an omnipolar switch must be installed
with a minimum opening of 3 mm between contacts.
!
The installer must ensure that the correct electrical
connection has been made and that it is fully compliant
with safety regulations.
Before connecting the appliance to the power supply,
make sure that:
• The appliance is earthed and the plug is compliant
with the law.
• The socket can withstand the maximum power of
the appliance, which is indicated on the data plate
located on the appliance itself.
• The voltage falls within the range of values indicated
on the data plate.
• The socket is compatible with the plug of the
appliance. If the socket is incompatible with the
plug, ask an authorised technician to replace it. Do
not use extension cords or multiple sockets.
!
Once the appliance has been installed, the power
supply cable and the electrical socket must be easily
accessible.
!
The cable must not be bent or compressed.
!
The cable must be checked regularly and replaced
by authorised technicians only.
!
The manufacturer declines any liability should
these safety measures not be observed.
!
Do not remove or replace the power supply cable
for any reason. Its removal or replacement will void
the warranty and the CE marking. INDESIT does not
assume liability for accidents or damage arising from
replacement/removal of the original power supply
cable. Replacement can only be accepted when
carried out by personnel authorised by INDESIT and
using an original spare part.
U-bolt
connection support
Neutral
Earth
Phase
Phase
Phase
1
2
3
5
4
Start-up and use
!
The glue applied on the gaskets leaves traces of
grease on the glass. Before using the appliance, we
recommend you remove these with a special non-
abrasive cleaning product. During the first few hours
of use there may be a smell of rubber which will
disappear very quickly.
!
A few seconds after the hob is connected to the
electricity supply, a buzzer will sound. The hob may
now be switched on.
!
If the
-
or
+
button is pressed for an extended
period of time, the display scrolls quickly though the
power levels and timer minutes.
Switching on the hob
To switch the hob on, press and hold the
button
for approximately one second.
Switching on the cooking zones
Each cooking zone is controlled using a selector button
and a power adjustment device consisting of a
double
-
and
+
button.
• To begin operating a cooking zone, press the
corresponding control button and set the desired
power level (between 0 and 9) using the buttons
-
and
+
.
Start-up and use
Switching off the cooking zones
To switch off a cooking zone, select it using the
corresponding selector button
and:
• Press the
-
button: the power of the cooking zone
will progressively decrease until it is switched off.
Heating elements
Two types of heating element may be installed,
depending on the appliance model: halogen and
radiant elements.
Halogen elements emit heat via radiation from the
halogen lamps they contain.
They have similar properties to gas burners: they are
easy to control and reach set temperatures quickly,
allowing you to see the power level instantly.
Radiant elements consist of a series of coils which
allow heat to be distributed evenly at the base of
the cookware, so that all slow-flame cooking may be
performed successfully, for example stews, sauces or
reheated dishes.


