9
B
E
F
O
R
E
U
S
E
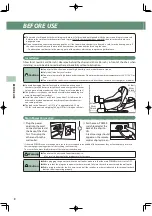
At least
65 cm
(26 inch.)
At least
40 cm
(16 inch.)
BEFORE USE
●
This product is shipped with the reclining seat back in its fully reclined position and with the armrests and leg rest removed.
Before use, be sure to attach the armrests and leg rest (refer to the insertion sheet attached) then raise the seat back to its
upright position.
●
Do not expose the chair to sudden change of heat. If the room where the chair is to be used is cold, turn the heat up slowly. If
the chair is moved from a cold place into a heated room, wait one hour before using the chair.
→
Condensation could occur in the moving parts of the product, which may compromise performance.
Installation
Allow for at least 65 cm (26 inch.) clearance behind the chair and 40 cm (16 inch.) in front of the chair when
installing, so as to be able to recline the seat back fully without obstruction.
Caution
●
Do not install the chair in an area of high humidity, such as a bathroom or sauna.
●
Only install on a flat, level surface.
●
Do not use in areas of high debris or dust content. Do not use where ambient temperature is 40°C (104°F) or
over.
●
Do not install the chair where it can come into contact with direct heat, such as direct sunlight or a radiator.
●
To avoid damaging floor surfaces and to cut down on the noise of
the chair, it may be better to install the chair on a carpeted surface or
to lay a piece of carpet under the chair. (Do not use electric blanket.)
●
The product is very heavy, so please be careful when unloading it so
as not to damage floor surfaces.
●
Install the chair at least 1 m (40 inch.) away from TVs, radios, and/or
other audio or video equipment. Interference from these devices
can cause problems.
●
The load to the floor per 1 cm
2
(0.16 in
2
) is approximately 2.5 kg
(5.5 lbs.) with a person weighing 100 kg (220 lbs.) sitting on the chair.
Main Power Connection
①
Plug the power
cord into the cord
connector located at
the back of the chair
first. Then plug the
other end into the
wall outlet.
②
Set the main POWER
switch located at the
back of the chair to
ON.
A text message should
appear on the remote
control display screen.
* If the main POWER switch is turned on while the rollers are stopped in the middle of the movement, they will automatically return to
their storage position (upper part of the reclining seat) then stop.
The seat will also move for adjustment of the initial position then stop.
Warning
●
Do not use with any type of transformer device.
→
May result in damage to the product or electric shock.
Caution
●
Before plugging the power cord into the wall outlet, make sure that the main POWER switch is set to OFF.
●
Make sure that the plugs on the power cord are inserted fully into the cord connector and the wall outlet.
●
Before using the chair for the first time, turn on all the switches in order as indicated in this manual to check
that the chair is operating properly.
Содержание DREAMWAVE HCP-11001A
Страница 33: ...Jobeb EsfbnXbwf HCP 11001A HCP 11001D HCP 11001E 2 5 6 22 25 26 28 2 34 37 38 39 3 41...
Страница 34: ...2 Jobeb EsfbnXbwf 6 9 BD PGG...
Страница 35: ...3 49 PO 8 25 Zpvui 3 IDQ 22112B BD231W IDQ 22112E BD331 351W IDQ 22112F BD221W...
Страница 36: ...4 FNFSHFODZ TUPQ 41 6 41 25 Zpvui...
Страница 37: ...5 231 276 1 EsfbnXbwf 2 7 EsfbnXbwf 4E 4E Zpvui Zpvui 25 Jobeb EsfbnXbwf...
Страница 38: ...6...
Страница 39: ...7...
Страница 40: ...8 SPMMFS CBDL 4 E 4E FNFSHFODZ TUPQ BJS MFWFM 4 WJCF PGG QPXFS PO PGG MFH SFTU SFDMJOF...
Страница 41: ...9 Mpdbujoh Tijbutv Qpjout Tqffe 2 4 Xjeui 4 NVUF PO PGG Tipvmefs Bsn Tfbu Gppu 4 Cbdl Wjcf 3 Ifbufs Spmmjoh...
Страница 42: ...76 dn 51 dn 2 76 dn 51 dn 51 D BW 2 n 211 lh 2 dn3 3 6 lh...
Страница 43: ...21...
Страница 44: ...22 RECLINE LEG REST SFDMJOF 3 SFDMJOF 3 PO MFH SFTU 3 MFH SFTU 3 PO 0...
Страница 45: ...23...
Страница 46: ...24 M S M S S M...
Страница 47: ...25 5 Ifbufs c t c t 3 PO c t NVUF...
Страница 48: ...26 27...
Страница 49: ...27 2 Gvmm Cpez 3 Gvmm Cpez Bjs 4 Zpvui 25 5 Rvjdl 6 Npsojoh 7 Ojhiu 8 Tusfdi 9 EsfbnXbwf EsfbnXbwf 3 3...
Страница 51: ...29 26 6 41 25 Zpvui QPXFS 3 3 3 6 3 Zpvui SPMMFS PO0PGG 3...
Страница 52: ...2 32 4 32 2 3 2 4 3 32 4 2 3 2 3 PGG...
Страница 53: ...31 PO PGG PGG...
Страница 54: ...32 CBDL 4 E 4E SPMMFS 203 203 Tqffe 2 4 Xjeui 2 203 4 3...
Страница 55: ...33 41 4E QPXFS FNFSHFODZ TUPQ QPXFS QPXFS 3 26 PO0PGG...
Страница 56: ...34 EsfbnXbwf EsfbnXbwf Sftubsu uif nbjo QPXFS txjudi 6...
Страница 57: ...35 SPMMFS 6 QPXFS 2 6 dn 2 6 dn...
Страница 58: ...36 CBDL 4 E 4E 6 21...
Страница 59: ...37 CBDL 4 E 4E BJS MFWFM Cbdl Wjcf CBDL 4 E 4E Cbdl Wjcf CBDL 4 E 4E BJS MFWFM Cbdl Wjcf CBDL 4 E 4E Cbdl Wjcf...
Страница 60: ...38...
Страница 61: ...39 2 3 34 36 2 3 41 4 5 6 7...
Страница 62: ...3 4 2 3 26 6...
Страница 64: ...2 5 6 22 25 26 28 2 34 R B 37 38 39 3 41 HCP 11001A HCP 11001D HCP 11001E...
Страница 65: ...2 Jobeb EsfbnXbwf 6 9 BD...
Страница 66: ...3 49 8 25 3 IDQ 22112B BD231W IDQ 22112E BD331 351W IDQ 22112F BD221W...
Страница 67: ...4 41 6 41 25...
Страница 68: ...5 231 276 1 EsfbnXbwf 2 7 EsfbnXbwf 4 E 4 E 25...
Страница 69: ...6...
Страница 70: ...7...
Страница 71: ...8 4...
Страница 72: ...9 ESFBNXBWF IDQ 22112 0 2 4 4 4 3...
Страница 73: ...76dn 51dn 2 51dn 76dn 51 2n 211lh 2dn3 3 6lh...
Страница 74: ...21...
Страница 75: ...22 3 3 3 3...
Страница 76: ...23...
Страница 77: ...24 M S...
Страница 78: ...25 0 5 3...
Страница 79: ...26 27...
Страница 80: ...27 2 3 4 25 5 6 7 8 0 9 EsfbnXbwf 3 3...
Страница 81: ...28 27 41 4 E...
Страница 82: ...29 26 6 41 25 3 3 3 6 3 0 3...
Страница 83: ...2 0 0 32 4 32 2 3 2 4 3 32 4 2 3 2 3...
Страница 84: ...31 0 0...
Страница 85: ...32 0 0 203 203 2 4 2 203 4 3...
Страница 86: ...33 41 4 E 3 26 0...
Страница 87: ...34 EsfbnXbwf EsfbnXbwf Sftubsu uif nbjo QPXFS Txjudi 6...
Страница 88: ...35 6 2 6dn 2 6dn...
Страница 89: ...36 6 21...
Страница 90: ...37 R B...
Страница 91: ...38...
Страница 92: ...39 2 3 34 36 2 3 41 4 5 6 7 0 7...
Страница 93: ...3 4 3 26 6...

