INSTRUCTIONS FOR USE
BS300 Plus SHIing ED.2010 rev.00
19 - 66
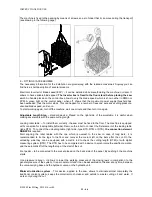
13.1 - COOLING SYSTEM
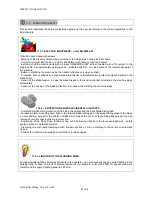
Prepare the coolant by mixing cutting oil with water (the tank contains about 15 litres) in proportion of 1/10,
1/15 or according to the instructions provided by the supplier. Pour in the coolant in the tank or directly on the
worktable. Pay attention that the coolant does not spill out.
In this case check that the chip tray and the tank are correctly placed.
13.2
– PNEUMATIC CONNECTION (OPTION, IF THE MINIMAL LUBRICATION SYSTEM IS APPLIED)
The bandsaw is provided with reducer + air lub
ricator, but it’s recommended to connect it to a system to
unload condensate, with cables correctly installed and a pressure of at least 7/8 BAR. The air consume is
about 1 NI for each cycle.
13.3 - ELECTRICAL CONNECTION
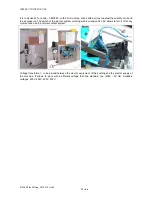
Verify that the voltage and power frequency are compatible with the parameters reported on the technical
data plate located on the right side of the floor stand. A difference over 10% causes some working
anomalies.
The supply cable is complete with a CEE plug. If you have to replace it, we recommend to let
specialized personnel carry out the whole procedure.
If an external voltage transformer is supplied, put it in a safe place far from the material loading/unloading
areas.
The phasing performed by the manufacturer allows to get a correct rotation of all motors by
connecting the wires in the following order: L1=R, L2=S, L3=T. Anyway check what follows:
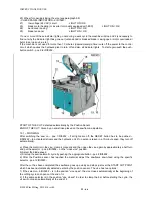
a) If the EMERGENCY button has been pushed, restore it by turning it 1/4 of a round in the direction shown
–
5/RI0292
b) by pushing the button ON of the main switch - 10/RI0292
– the WHITE light has to turn on
c) push the button RESET - 10/RI0292
– to start the hydraulic unit motor (the green light, which indicates that
the blade guard is closed, may turn on) and check that the sawframe moves up and down by means of the
selector
– 7/RI0292
if this doesn’t happen within 5/10 seconds, switch off the saw, disconnect the pin and exchange the
connection of two of the wires inside it, excluding the green/yellow earthing cable, and then start
again from point a).
d) stop all drivers by means of the general switch
– 1/RI0292
If no action is taken in a 10-minute span, the hydraulic unit motor is turned off. To activate it again, the button
RESET
– 10/RI0292 – has to be pushed.
If an EXTERNAL VOLTAGE TRANSFORMER is supplied, place it in a safe location, away from the
loading/unloading areas.
14 - BLADE TENSION
This saw is equipped with a blade which is already tensioned, so as to allow the motor to start (the
saw doesn’t work if the blade does not have the correct tension).
It is recommended to verify, while the machine is off, that the blade is correctly assembled: open the blade
guard and fix it with the back hook - 1/RI0456
– then make sure the blade is about 1-2 mm away from the
edge of the pulleys
– 2/RI0456 – and correctly placed into the guides – 3/RI0456. If necessary, loosen the
blade-tensioning screw - 4/RI0456
– to be able to change the placement of the blade, then assemble the
blade guard again. Check that the end-stroke key is suitably placed into its location - 5/RI0456
Содержание BASIC 300 PLUS SHI
Страница 4: ...INSTRUCTIONS FOR USE BS300 Plus SHIing ED 2010 rev 00 4 66 ...
Страница 43: ...INSTRUCTIONS FOR USE BS300 PLUS SHIing ED 2010 rev 00 43 ...
Страница 44: ...INSTRUCTIONS FOR USE BS300 PLUS SHIing ED 2010 rev 00 44 ...
Страница 45: ...INSTRUCTIONS FOR USE BS300 PLUS SHIing ED 2010 rev 00 45 ...
Страница 46: ...INSTRUCTIONS FOR USE BS300 PLUS SHIing ED 2010 rev 00 46 ...
Страница 47: ...INSTRUCTIONS FOR USE BS300 PLUS SHIing ED 2010 rev 00 47 ...
Страница 48: ...INSTRUCTIONS FOR USE BS300 PLUS SHIing ED 2010 rev 00 48 ...
Страница 49: ...INSTRUCTIONS FOR USE BS300 PLUS SHIing ED 2010 rev 00 49 ...
Страница 50: ...INSTRUCTIONS FOR USE BS300 PLUS SHIing ED 2010 rev 00 50 ...
Страница 51: ...INSTRUCTIONS FOR USE BS300 PLUS SHIing ED 2010 rev 00 51 ...
Страница 52: ...INSTRUCTIONS FOR USE BS300 PLUS SHIing ED 2010 rev 00 52 ...
Страница 53: ...INSTRUCTIONS FOR USE BS300 PLUS SHIing ED 2010 rev 00 53 ...
Страница 54: ...INSTRUCTIONS FOR USE BS300 PLUS SHIing ED 2010 rev 00 54 ...
Страница 55: ...INSTRUCTIONS FOR USE BS300 PLUS SHIing ED 2010 rev 00 55 ...
Страница 56: ...INSTRUCTIONS FOR USE BS300 PLUS SHIing ED 2010 rev 00 56 ...
Страница 57: ...INSTRUCTIONS FOR USE BS300 PLUS SHIing ED 2010 rev 00 57 ...
Страница 58: ...INSTRUCTIONS FOR USE BS300 PLUS SHIing ED 2010 rev 00 58 ...
Страница 59: ...INSTRUCTIONS FOR USE BS300 PLUS SHIing ED 2010 rev 00 59 ...

