IMB MB8002A Скачать руководство пользователя страница 12

9

6.3 Mould replacement

1. Remove the knife cover assembly, fixed knife and front cover plate according to steps 1 and

2 of 6.2.

2 Remove the screws and replace the washers.

3. Remove the upper cover plate, the right cover plate and the moving knife according to

step 2.3.4 of 6.2.

4. The copper sleeve is fixed by gluing. It is recommended to preheat it with a baking gun

and knock out the copper sleeve.

5. Fix the fixed knife on the upper cover plate, the screw cannot be tightened, and the

fixed knife can be moved.

6. Brush glue on the new copper sleeve to cover the copper sleeve on the moving knife, then

insert the moving knife into the fixed knife edge, and insert the copper sleeve into the

upper cover plate to ensure that the moving knife and the fixed knife are vertical. Tighten

the fixed knife fixing screws until the glue solidifies.

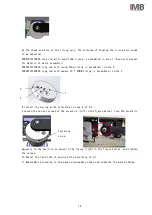
7. Remove the fastening screw of the pin as shown in the figure, and adjust the hole position

of the pin

报错

fastening

screw

washer

screw

Содержание MB8002A

Страница 1: ...CHANGZHOU WISDOM VALLEY ELECTRICAL TECHNOLOGY CO LTD Please read the operation manual of the touch screen interface before using the device Please keep this operation manual of touch screen interface...

Страница 2: ...comply with current regulations IMB No part of this manual may be copied or transcribed without requesting prior authorization from IMB The contents of this manual may be subject to change without adv...

Страница 3: ...DESCRIPTION 6 6 CHANGEOVER OPERATION 7 6 1 STEPS OF ADJUSTING THE FEED RATE OF MOVING KNIFE 7 6 2 Replacement steps of moving knife and solid knife 7 6 3 Mould replacement 9 7 ELECTRICAL WIRING 11 7 1...

Страница 4: ...1 1 ESSENTIAL INFORMATION 1 Machine head 2 Loader 3 Knife 4 Control box 1 3 2 4...

Страница 5: ...ICATIONS MB8002A Lining feeding device 1 Machine head Button sewing Bar tack machine 2 Working Voltage V 220 3 Shape Size Diameter 10 15 Thickness 0 2 1 X 5 10 Y 10 20 0 2 1 Other shapes can be custom...

Страница 6: ...6 In order to prevent personal injury please take care not to pinch your fingers when the sewing machine moves up and down or returns to its original position 7 When the sewing machine is running plea...

Страница 7: ...pinch fingers etc 17 During the folding operation please be careful not to let the air cylinder clamp the finger when putting the finger in the folding machine WARNING Improper operation of the machi...

Страница 8: ...N DESCRIPTION 1 Manual button Press the button manually the device cuts a piece of lining 2 Pedal After pressing the foot pedal to finish sewing the device automatically cuts a piece of lining and sen...

Страница 9: ...es on the machine table to ensure that there are no sundries hindering the operation of the machine Check whether the eye guard has been installed correctly 5 2 OPERATION PROCESS DESCRIPTION 1 BOOT DE...

Страница 10: ...r fixing screw and remove the right cover 2 Loosen the fixing block screws 3 Move the knife up manually about 1 5mm away from the fixed knife through the lining clearance and tighten the fixing block...

Страница 11: ...eel 6 Align the new solid knife edge with the moving knife edge press it on the upper cover plate reassemble according to the above disassembly steps The moving and fixed knife replacement is complete...

Страница 12: ...copper sleeve 5 Fix the fixed knife on the upper cover plate the screw cannot be tightened and the fixed knife can be moved 6 Brush glue on the new copper sleeve to cover the copper sleeve on the mov...

Страница 13: ...hole 2 02800210102800 long rod with square 10 20MM lining is assembled in hole 3 8 Install the moving knife according to step 4 of 6 2 9 Loosen the two set screws of the eccentric left in the figure b...

Страница 14: ...11 7 ELECTRICAL WIRING 7 1 MAIN BOARD 8002A PORT RESET STATUS Presser switch 2P IN1 Motor switch 2P IN2 Button 2P IN3...

Страница 15: ...TAND REFORCEMENT TABLE 8 2 SUPPORTING PLATE The support plate is divided into two types BROTHER and JUKI See details of different parts and assembly methods MB8002A Lining feeding machine parts manual...

Страница 16: ...he operation steps in 6 1 Cause 2 replace the moving knife and solid knife according to step 6 2 Stitched lining not centered 1 Device position movement 2 Bartack length adjustment Adjust the guide me...

Страница 17: ...r 1 Clean up the dust Remove dust from equipment surface and parts 2 Cleaning up oil pollution Clean the greasy dirt on the table needle plate and bobbin 3 Oil Oil volume not lower than warning line 4...

Страница 18: ...gy Co Ltd and are protected by national intellectual property laws and regulations Without the written permission of the right holder the patented technology of the achievement shall not be implemente...

Отзывы: