background image


16 


Your tag is finished!

Engrave Other Side

Engrave New Tag

Engrave Next RabiesTag

— Holder Setup

— Edit Text

— Retu rn t o Sta rt Screen

— Re-Engrave LastTag


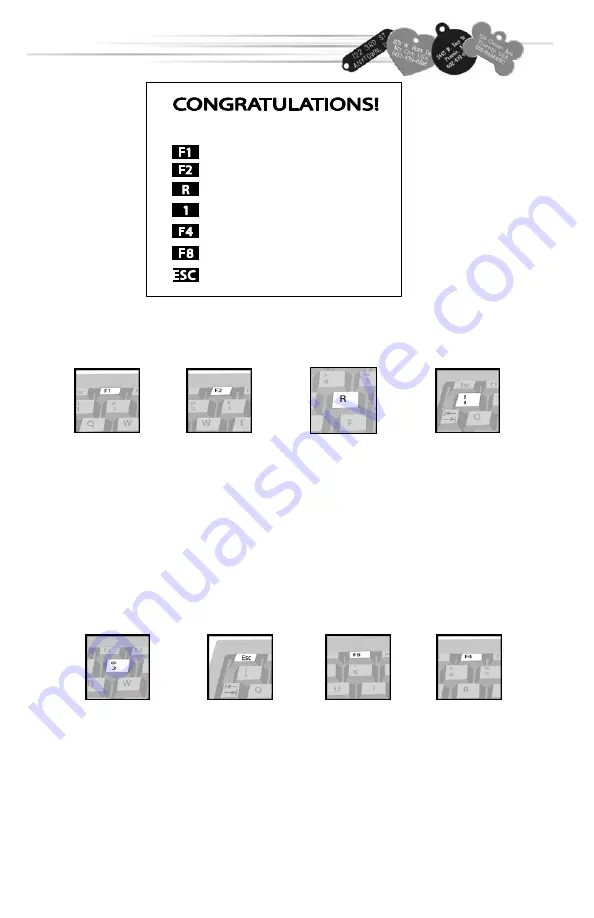
Press Esc to 

return to the 

INTRODUCTION 

SCREEN. 

Once your tag is 

completed, 
press F1 to 

engrave the 

other side of 

your tag. 

Note: This will 

bring you back 

to the CHOOSE 

FONT screen. 


Pressing the 

number 2 will 

repeat your last 

engraving,  

and will 

automatically 

engrave the 

tag twice, 

making the 

final engraving 

deeper. 

Press F4 to 

change your 

tag holder. 

Press F2 to start 

a new style tag 

and next rabies 

number. 

Note: This will 

bring you back 

to the TAG 

SELECTION 

screen. 


Press the 

number 1 to 

engrave the 

next rabies 

number (same 

style tag). 

Note: The 

iMARC will 

automatically 

begin the 

engraving 

process. 

When your tag is finished, the table will move out. When it stops,  

you can remove your tag, or flip it over to engrave the other side. 

Press F8 to 

edit your text. 
Note: This will 

bring you back 

to the TEXT 

ENTRY screen. 


E

NGRAVING 

A


R

ABIES 

T

AG


To repeat the 

same engraving 

on the same 

style tag  

press R. 

Note: The 

iMARC will 

automatically 

begin engraving 

process. 


Содержание VET TAG Engraver

Страница 1: ......

Страница 2: ...28 Clipart 30 Troubleshooting Look for tips and tricks on the inside back cover TABLE OF CONTENTS IMPORTANT NOTE The iMARC is equipped to engrave only on iMARC manufactured tags and plates with iMARC...

Страница 3: ...2 Before you plug in your new iMARC and engrave your first tag familiarize yourself with some of the components of the machine GETTING STARTED...

Страница 4: ...t Plug your power cord into the electric receptacle Plug the cord into any standard 110 Volt outlet and switch on the machine GETTING STARTED Note If your machine is configured for 220 volts there wil...

Страница 5: ...holder Press F4 for holder setup The holder setup is simple You can follow the on screen instructions as well as the steps on this page Engraving Table No holder installed Tag Holder Engraving Table W...

Страница 6: ...holders directly up or down over the pins It may be a snug fit so apply light pressure as needed This is the HOLDER SETUP screen The current position to be installed will be flashing Press the up and...

Страница 7: ...IONS Press F1 to enter the correct local time and date This is important to do before starting to serialize your rabies tags The iMARC contains an internal clock that will keep time even if it is unpl...

Страница 8: ...Rabies tag serialization function Once you ve finished with this section you will be able to engrave all of your clinic s information with just a few steps In the Function Screen shown above press F5...

Страница 9: ...te This procedure needs to be followed once for every different tag shape If the tag you want to engrave does not show up on the screen press F4 to return to HOLDER SETUP and install the correct holde...

Страница 10: ...ay have its own restrictions regarding amount of lines and characters Please refer to the tag template book before continuing With the cursor in the desired line press F10 to insert the date You will...

Страница 11: ...ou make them Press ESC at any time to go back to the setup screen without saving Press Enter to save and continue with setup SETTING UP A RABIES TAG Press F8 to set up your rabies sequence Press F2 to...

Страница 12: ...te To setup your Rabies tag dating serialization and clinic information press F5 and refer to page 9 and 10 Note You can only engrave a rabies tag using the standard type style iMARC Block To engrave...

Страница 13: ...s not been set up other than that one the screen below will appear Press F1 and refer to page 8 to set up that tag Press Escape to quit Press Enter to Continue ENGRAVING A RABIES TAG If the tag you wa...

Страница 14: ...essF4for holder set u p The door will open and the table will move out for tag insertion Insert tag into matching position Note Ensure that your tag is inserted completely flat into the tag holder ENG...

Страница 15: ...Note Text will not be enlarged to fit on the screen but will be expanded or condensed to fit on the finished tag Pressing the number 2 will automatically engrave your tag twice making the final engra...

Страница 16: ...ll be pulled back into the iMARC and the door will close While your tag is engraving you will see the screen shown above Press Esc at any time to stop the engraving process Note Pressing ESC before iM...

Страница 17: ...raving deeper Press F4 to change your tag holder Press F2 to start a new style tag and next rabies number Note This will bring you back to the TAG SELECTION screen Press the number 1 to engrave the ne...

Страница 18: ...started Note After a period without keystrokes the machine will reset to this screen Engraving your tag is quick and easy Each option is clearly stated as you follow the steps to your completed tag In...

Страница 19: ...ags using the up and down arrow keys If the tag you want to engrave does not show up on the screen press F4 to return to HOLDER SETUP and install the correct holder See pg 5 for instructions Press Esc...

Страница 20: ...OGO FUNCTION 8 FOR CLIPART 9 FOR YOUR LOGO To engrave clipart onto your iMARC tags press 8 and turn to page 25 for additional instructions If your iMARC has your company s logo stored in it press 9 to...

Страница 21: ...ep in mind that iMARC will automatically increase or decrease your type size for optimum coverage Press Enter once to go to the next line twice to skip a line or backspace to edit Press Esc to change...

Страница 22: ...essF4for holder set u p ENGRAVING A CUSTOM TAG The door will open and the table will move out for tag insertion Insert tag into matching position Note Ensure that your tag is inserted completely flat...

Страница 23: ...the text entry screen Press F4 to change your tag holder Press Enter to engrave your tag Using the CHECK TEXT screen make sure you ve typed in your information correctly and that you have chosen the...

Страница 24: ...ll be pulled back into the iMARC and the door will close While your tag is engraving you will see the screen shown above Press Esc at any time to stop the engraving process Note Pressing ESC before iM...

Страница 25: ...nd will automatically engrave the tag twice making the final engraving deeper Press F4 to change your tag holder Press F2 to start a new tag Note This will bring you back to the TAG SELECTION screen T...

Страница 26: ...PART From the CHOOSE FONT screen press the number 8 From the available clipart shown on pages 28 and 29 type the character representing the clipart you ve chosen into the INPUT SCREEN and then press F...

Страница 27: ...Block type style Some characters may be available with other type styles Example To get the letter you would need to have the caps locks key off hold the alt key and press E To get the letter you wou...

Страница 28: ...letter you would need to have the caps locks key on hold the ctrl key and press N To get the letter you would need to have the caps locks key on hold the ctrl key and press 4 If you would like to add...

Страница 29: ...in your iMARC select the image you want proceed through the tag selection screens as normal In the CHOOSE FONT screen press 8 then simply type the corresponding number of your image in the TEXT ENTRY...

Страница 30: ...29 CLIPART...

Страница 31: ...o to the time edit screen While in the TIME EDIT screen press F4 to reset the machine The time will change to zero Reset the time and date as needed and press ENTER Press F4 again to set up your holde...

Страница 32: ...Technical Support 602 439 0700 Sales 602 439 8818 17621 N Black Canyon Highway Phoenix Arizona 85023...

Отзывы: