background image

Making the RS-232C settings
on the model 5000

Note: If your machine is DL170, 3500 or ix3010, see page 6.

Note: You must make the following settings if you change your fax

software.

Note: The parameters for the following settings should be listed in

your fax software. If you choose the wrong RS-232C parame-
ters, the fax machine cannot communicate with your computer.

1.

Press 

MENU, 6, 1, 0, 3, ENTER.

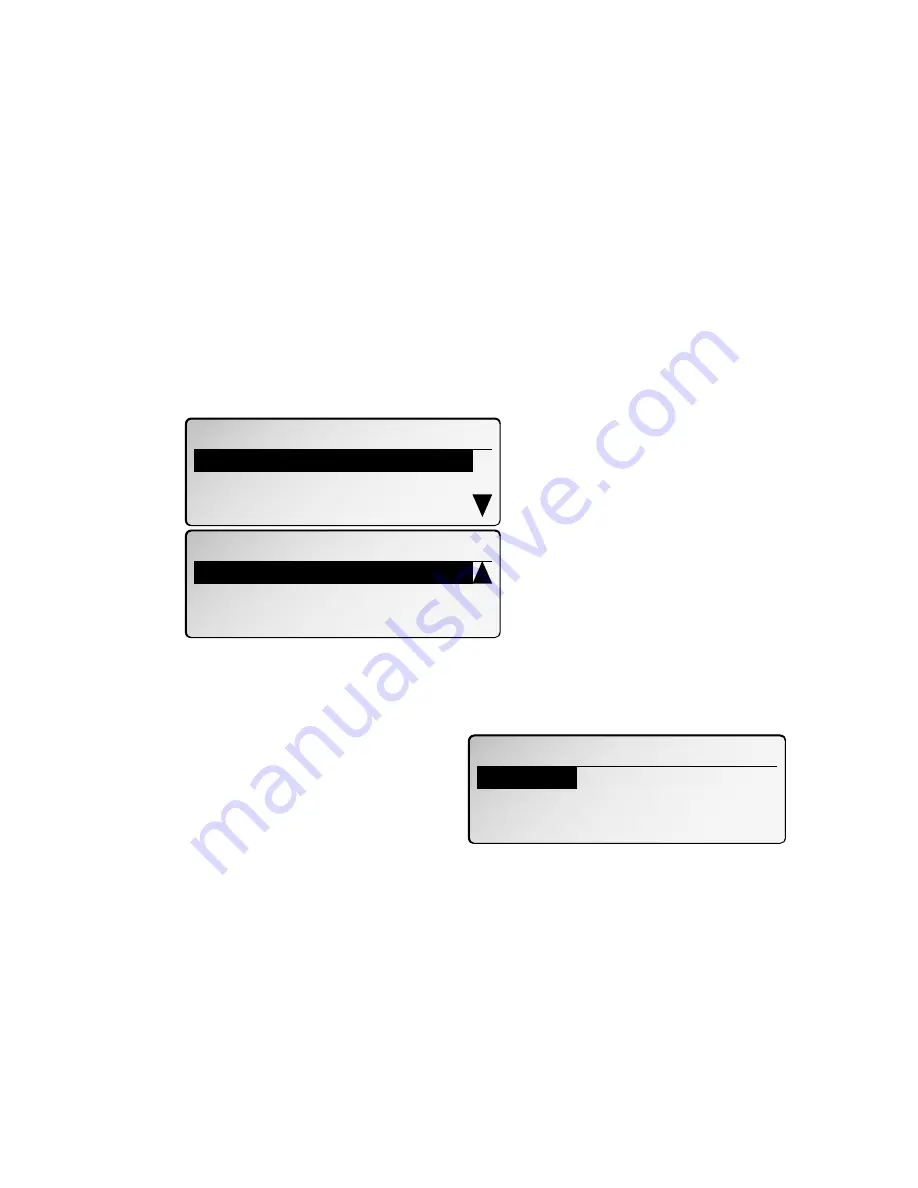
The LCD shows the machine’s RS-232C parameters:

2.

Select parameter you want to set using the cursor key. Then
press 

ENTER

.

Baud Rate: Transmission
speed (baud rate) in bps (bits
per second).
Use the cursor key to select
the appropriate baud rate for your computer and software. This
setting must match the setting in your computer software.
The settings are: Variable; or 600, 1200, 2400, 4800, 9600 or
19200 bps. Select the setting you want, then press 

ENTER

.

Note: If using one of the following Imagistics International-

tested packages, select 

“Variable”

:

•BitWare

TM

Ver. 3.30

•BitWare

TM

Plus Ver. 4.0

03.Set RS‑232C

600 bps
1200 bps

Variable

4800 bps
9600 bps

2400 bps

19200 bps

03.Set RS‑232C

Baud Rate   :Variable
Parity Bit  :None

03.Set RS‑232C

Data Length :Variable

Exit

Stop Bit    :1 Bit

7

Содержание Imagistics RS-232C

Страница 1: ......

Страница 2: ...x s new PC connection 10 Scanning from your fax to your computer 10 Printing from your computer to your fax 11 Sending receiving faxes with your computer 11 Reference 12 AT commands 12 Copyright 2002 Imagistics International Inc all rights reserved Bitware is a trademark of Cheyenne Software Inc a division of Computer Associates International Inc WinFax is a trademark of Symantec Corporation Windo...

Страница 3: ...more information on your computer s serial interface port see your computer s operating instructions Note Please use a RS 232C interface cable no longer than 3 meters Pin assignment Pin No Signal code Signal name Contents 2 TXD Transmitted data Data signal sent from computer to your fax 3 RXD Received data The data sent to computer by your fax 4 RTS Request to send Signal for request to send data ...

Страница 4: ...le to your computer s RS 232C port Note If you don t know where your computer s RS 232C port is check the computer s operating instructions To connect between your fax machine and your computer you will need an RS 232C interface cable supplied 25 pin type Your fax Your computer 2 TXD 2 TXD 3 RXD 3 RXD 4 RTS 4 RTS 5 CTS 5 CTS 6 DSR 6 DSR 7 SG 7 SG 20 DTR 20 DTR 9 pin type Your fax Your computer 2 T...

Страница 5: ...3 This page intentionally blank ...

Страница 6: ...ng software titles Unimessage Xlite Ver 2 0 Unimessage Pro Ver 1 0 BitWareTM Ver 3 30 BitWareTM Plus Ver 4 0 WinFax PROTM Ver 4 for Windows 3 1 and Ver 7 for Windows 95 LaserFaxTM Ver 3 5 Except North America Note While this RS 232C interface should work with most class 1 fax software there may be some fax packages with which it may not work If you experience trouble please confirm that you are fo...

Страница 7: ...on speed baud rate in bps bits per second Model DL170 or ix3010 s LCD Model 3500 s LCD Note This setting is just for the RS 232C port It does not change the speed at which your machine sends faxes 2 Use the cursor key to choose the appropriate baud rate for your computer and software This setting needs to match the setting in your computer software The settings are Variable or 600 1200 2400 4800 9...

Страница 8: ...press ENTER Model DL170 or ix3010 s LCD Model 3500 s LCD Initializing your machine 1 Make sure your fax is connected to your computer see page 3 2 Computer Make sure that your fax software is running and in receive mode Note If necessary consult your fax software s instructions 3 Your machine On the DL170 and ix3010 Press Program key F 1 0 2 ENTER On the 3500 Press MENU 6 1 0 2 ENTER It will take ...

Страница 9: ...g the cursor key Then press ENTER Baud Rate Transmission speed baud rate in bps bits per second Use the cursor key to select the appropriate baud rate for your computer and software This setting must match the setting in your computer software The settings are Variable or 600 1200 2400 4800 9600 or 19200 bps Select the setting you want then press ENTER Note If using one of the following Imagistics...

Страница 10: ...en None Odd or Even Then press ENTER Stop Bit Use the cursor key to toggle the between 1 or 2 stop bits Then press ENTER Data Length Use the cur sor key to toggle between 7 or 8 bits data length Then press ENTER 3 When you are finished setting for RS 232C parameters select Exit then press ENTER 03 Set RS 232C Baud Rate Variable Parity Bit None Exit 03 Set RS 232C 8 Bit 7 Bit 03 Set RS 232C 2 Bit 1...

Страница 11: ...rogram key F 1 0 2 ENTER On the 3500 Press MENU 6 1 0 2 ENTER It will take a few moments to initialize the settings On the model 5000 1 Make sure your fax is connected to your computer see page 3 2 Computer Make sure that your fax software is running and in receive mode Note If necessary consult your fax software s instructions 3 Your machine Press MENU 6 1 0 2 ENTER It will take a few moments to ...

Страница 12: ... the document Adjust resolution and con trast if necessary 3 Computer Instruct your fax software to receive Note If necessary consult your fax software s instructions 4 Your machine On the DL170 and ix3010 Press Program key F 1 0 1 ENTER On the 5000 or 3500 Press MENU 6 1 0 1 ENTER Your fax software will now receive the fax including the TTI if you ve set one onto your computer To cancel the scann...

Страница 13: ...subscriber ID 4 Computer When the fax software asks for a fax number to which to send the document enter your subscriber ID 5 Computer Instruct your fax software to transmit The fax machine will begin to print Sending receiving faxes with your computer You can receive documents from another fax onto your computer as well as transmit documents from your computer to other faxes As with scanning the ...

Страница 14: ...l mode T none Set tone dial mode V 0 Short formed response code V1 1 Long formed response code Z none Reset modem F none Initialize to factory setting Q 1 XON XOFF flow control Q2 2 RS CS flow control FCLASS none Indicate current service class FCLASS none Indicate service class capability FCLASS n none Set service class FRH n none Receive HDLC frame n 3 300 bps FLO n none XON XOFF flow control n 1...

Страница 15: ...Printed in Japan D88 90180 61 P N 6429881 ...

Отзывы: