


9
USER
INSTRUCTIONS FOR USE
Fig. 3.
LIGHT SWITCH
lts function is to switch the light on and off.
TIMER BUTTON:
(Clock symbol). lts function is to enter the automatic switch off.
BUTTON 1:
ON/ OFF (turns on and off the engine). lt adjusts the motor to the first speed.
RECYCLING AIR 24 HOURS:
By pushing button “0/1” for 7 seconds, the recycling air
program will be switched on or off (for 24 hours alternating functioning: switched off for
20 minutes and on for 5 minutes in first speed).
BUTTON 2:
lt adjusts the motor at the second speed.
BUTTON 3:
lt adjusts the motor at the third speed.
BUTTON INTENSIVE FAN:
lt adjusts the motor at full speed for 5 minutes and after that, automaticalty returns to
the third speed.
TIMER FUNCTION:
By pressing the “TIMER” push button while the hood is working, the clock symbol will start
flashing.
Once the timer is set, the hood will continue working for about 10 minutes and then it
will automatically switch off. The timer can be switched off at any moment by pressing
its push button. In this case, the hood will continue working as previously set.
FILTERS ALARM:
When, being the motor off, the push-button panel starts blinking, it
means that the carbon filters inside the hood must be replaced for its correct working.
In order to reset the push-button panel it is simply keep push button “TIMER” pressed
unti! the keys switch off.
0/1
2
3
0/1
2
3
0/1
2
3
0/1
2
3
0/1
2
3
0/1
2
3
WORKING PAN EL
0/1
2
3
Содержание AGQ100
Страница 2: ......
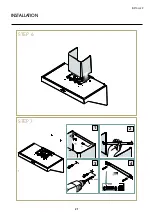
Страница 19: ...19 INSTALLER INSTALLATION STEP 2 STEP 3 2 1 1000 MM 4023 64 min 1000 MM 4023 64 min ...
Страница 20: ...20 INSTALLATION STEP 4 STEP 5 1 2 1 ø8 mm ø 05 16 1000 MM 40 23 64 min 1000 MM 40 23 64 min ...
Страница 21: ...21 INSTALLER INSTALLATION STEP 6 STEP 7 1 3 4 2 ø8 mm ø 05 16 40 mm 137 64 ...
Страница 22: ...22 INSTALLATION STEP 7 STEP 8 ...
Страница 23: ...23 INSTALLER INSTALLATION STEP 9 STEP 10 2 1 150 mm 5 29 32 min 3 2 1 3 4 ...
Страница 24: ...24 INSTALLATION STEP 11 2 3 4 1 ø8 mm ø 05 16 40 mm 137 64 STEP 12 ...
Страница 25: ...25 INSTALLER INSTALLATION STEP 13 1 2 STEP 14 ...
Страница 26: ...26 INSTALLATION STEP 15 STEP 16 2 1 ...
Страница 32: ......


