background image

The remote control battery has been previously installed and ready for operation for immediate 

use. For the first time use, pull out the insulation tag from the button battery tray before operating 

the remote control.  When the remote control stops functioning, you must replace the battery with 

a new one. To do so, locate the battery compartment on the side of the remote and follow the 

steps below:
1.  Squeeze the notch labeled “Tab A” while pulling the 

  “battery door latch B” out towards you. This will allow 

  the battery holder to release and pop out. Please refer 

  to the picture on the right side.
2.  Insert a “CR2025” 3V lithium battery. Make certain to 

  follow the correct polarity, following the directions of 

  the corresponding symbols (+/–).
3.  Secure battery and push the battery holder back into 

  the remote control until fully inserted.

Battery 

door latch

A

B

GETTING STARTED

Remote Control - First Time Use and Replacing of the Battery

For AM radio operation, locate the AM antenna jack on the back of the unit. Plug the AM loop 

antenna into the connector. To achieve the best reception possible, a distance of 30 cm between 

the AM antenna, the unit and the iPod is recommended.

Installing the AM Loop Antenna

To guarantee that your iPod will fit properly into the built-in universal dock, several detachable 

dock adapters for old iPod players are included with this product. Please check the bottom of dock 

adapters to determine compatibility with your iPod. 

1.  Inserting the dock adapter

  a. Choose a dock adapter that corresponds with the iPod you would like to dock. Using the 

    correct dock adapter ensures a proper fit.

  b. Gently push the dock adapter down into the universal dock.

  c.  Carefully place your iPod into the universal dock. Please note that iPod must not be in a case 

    or “Skin”.

2.  Removing the dock adapter

  •  Remove your iPod, grasp the dock adapter and lift upwards carefully.

Installing the Dock Adapter

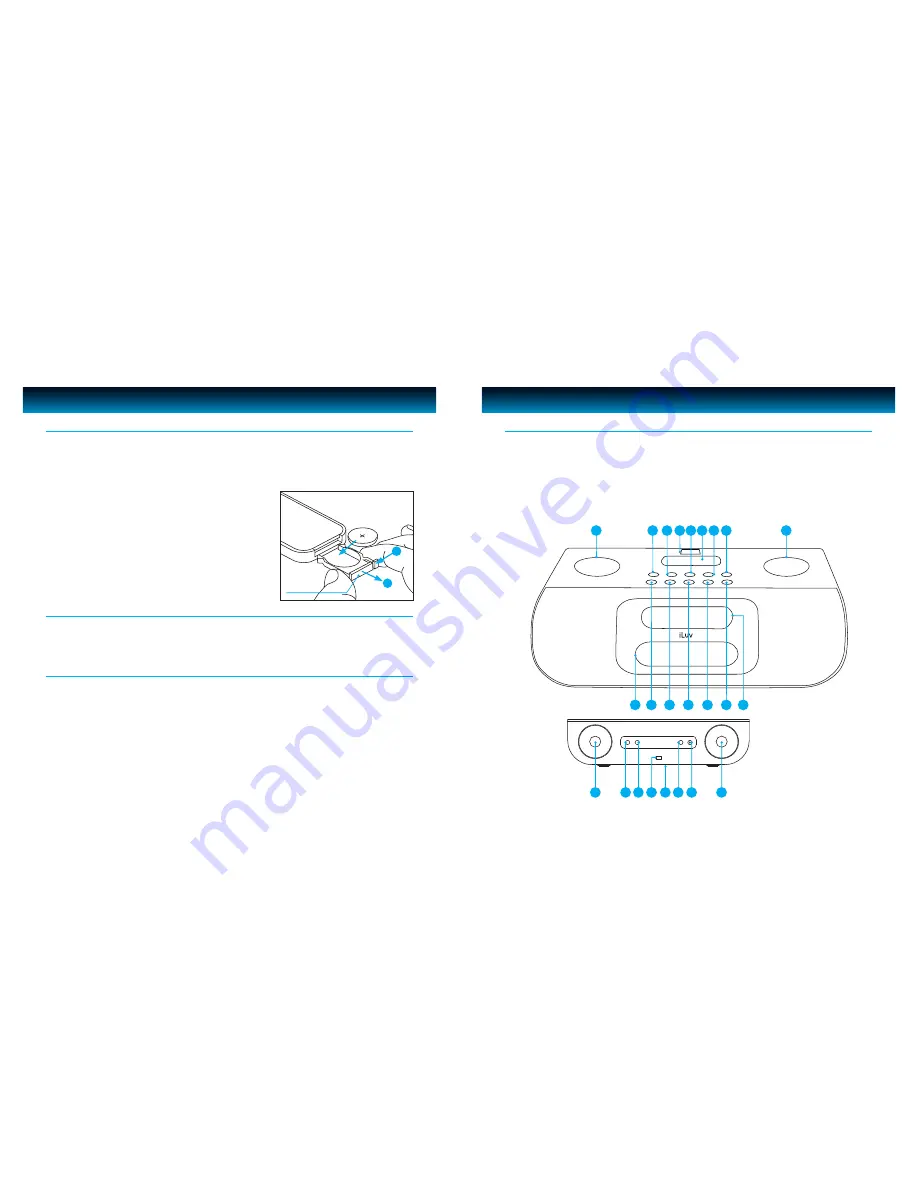
Location of Controls on the Main Unit

GETTING STARTED

4 | iLuv

4

6

9

7

1

3

2

8

5

14

12

11

15

13

10

16

1. 

VOLUME

2. 

PLAY / PAUSE

3. 

BAND/RADIO

4. 

Connector for iPod shuffle 2nd Generation

5. 

iPod / shuffle

6. 

Built-in Universal Dock

7. 

ALARM 1

8. 

ALARM 2

9. 

SEARCH

10. 

LCD Display

11. 

WAKE TO

12. 

SLEEP

13. 

AUX

14. 

TIME SET

15. 

POWER OFF

16. 

SNOOZE/DIMMER

23

17

17

19 20

22

21

17.

  Speaker Ports

18. 

AC Adapter Jack

19. 

LINE-OUT Jack

20. 

AM Loop Antenna Socket

21. 

Battery Compartment

22. 

LINE-IN Jack

23. 

FM Antenna Wire

18

iLuv | 5

i177 | V14M14_IM_EN_09242008

Содержание i177

Страница 1: ...Model i177 Instruction Manual Stereo Audio System with Dual Alarm for Your iPod English ...

Страница 2: ... radio or buzzer Fall asleep to your iPod or AM FM radio Plays and charges your iPod Integrated universal dock for your iPod Supports iPod shuffle Auxiliary line input for any audio devices with 3 5mm jack AM FM radio with PLL digital tuning technology External loop antenna provides better AM reception Liquid crystal display with white backlight and 4 level dimmer control What s Included Main unit...

Страница 3: ... Backup Battery the AC cord is disconnected or a power failure occurs the display will not remain lit but the time date and alarm settings will be temporarily maintained The alarm however will not sound when the i177 is powered only by the Backup Battery To install Backup Battery follow the instructions below 1 Make sure the connection between the AC adapter and the unit is secure This is importan...

Страница 4: ...he AM antenna the unit and the iPod is recommended Installing the AM Loop Antenna To guarantee that your iPod will fit properly into the built in universal dock several detachable dock adapters for old iPod players are included with this product Please check the bottom of dock adapters to determine compatibility with your iPod 1 Inserting the dock adapter a Choose a dock adapter that corresponds w...

Страница 5: ...ing and holding In the radio mode it tunes the radio stations by pressing and holding 32 VOLUME Increases the volume level BAND RADIO AUX SNOOZE DIMMER 24 25 26 27 28 29 31 32 30 Note The included remote control commands all of the basic functions on the i177 Aim the remote control toward the bottom right corner of the main unit for the best results Please note that the provided remote control can...

Страница 6: ... will gradually rise from low to the pre set setting 4 Press the ALARM 1 or ALARM 2 buttons again to exit the alarm setting mode Notes With the Alarm set the i177 is now activated to wake you up To ensure this setting check to see if the alarm and wake icons appear on the display Take notice of the adjusted volume level and make sure it is set at an appropriate level for waking up Setting the Alar...

Страница 7: ...tor To charge your 2nd generation iPod shuffle set the switch on shuffle connector adaptor to CHARGE position The shuffle cannot play while charging Set the switch to AUDIO position for shuffle playback Charging Your iPod OPERATIONAL INSTRUCTIONS 10 iLuv You can still listen to the first and second generations of iPod or any other audio player that is not an iPod with the i177 by simply using the ...

Страница 8: ...ill likewise switch to the buzzer mode In order to wake to your iPod it must be appropriately placed in the built in universal dock and powered off In the event of a power outage or if AC power is disconnected when the i177 is powered by the Backup Battery time and date will not be displayed however time and date settings will be temporarily saved but the alarm will not sound Using the Alarm Funct...

Страница 9: ...od Troubleshooting MAINTENANCE TROUBLESHOOTING GUIDE 14 iLuv Your iPod is not charged even though it is in the dock Your iPod might not be properly docked Take your iPod out of the dock and remove any obstructions on the connector from the dock and on your iPod Place your iPod back into the dock Your iPod is frozen or locked up Check whether your iPod operates correctly before placing it back into...

Страница 10: ... 12 Use only with the cart stand tripod bracket or table specified by the manufacturer or sold with the apparatus When a cart is used use caution when moving the cart apparatus combination to avoid injury from tip over 13 Unplug this apparatus during lightning storms or when unused for long periods of time 14 Refer all servicing to qualified service personnel Servicing is required when the apparat...

Страница 11: ... the FCC Rules These limits are designed to provide reasonable protection against harmful interference in a residential installation This equipment generates uses and can radiate radio frequency energy and if not installed and used in accordance with the instructions may cause harmful interference to radio communications However there is no guarantee that interference will not occur in a particula...

Страница 12: ...ass B limits for radio noise emissions from digital apparatus as set out in the Radio Interference Regulations of Industry Canada These limits are designed to provide reasonable protection against harmful interference in a residential installation This equipment generates uses and can radiate radio frequency energy and if not installed and used in accordance with the instructions may cause harmful...

Страница 13: ...e local regulation for the battery disposal Use this apparatus in the moderate climates It is recommended not to use this apparatus such in a lighting storm SPECIFICATIONS Power Requirement Main Unit DC 15V 1100mA Adapter Center Positive Clock Backup Two 1 5V AA size batteries not included Remote Control One 3V CR2025 size lithium battery included Speakers 4 Ohms each Output Power 3W 3W RMS iLuv 2...

Страница 14: ...MEMO ...

Страница 15: ...e illustrated product and specifications may differ slightly from that supplied Designed in New York USA Made in China 2008 jWIN Electronics Corp All rights reserved No portion of this printed material or product enclosed herewith including design shape or graphics may be reproduced or transmitted in any form without the expressed written consent of jWIN Electronics Corp by any means electronic or...

Отзывы: