background image

English - 13

12 - English

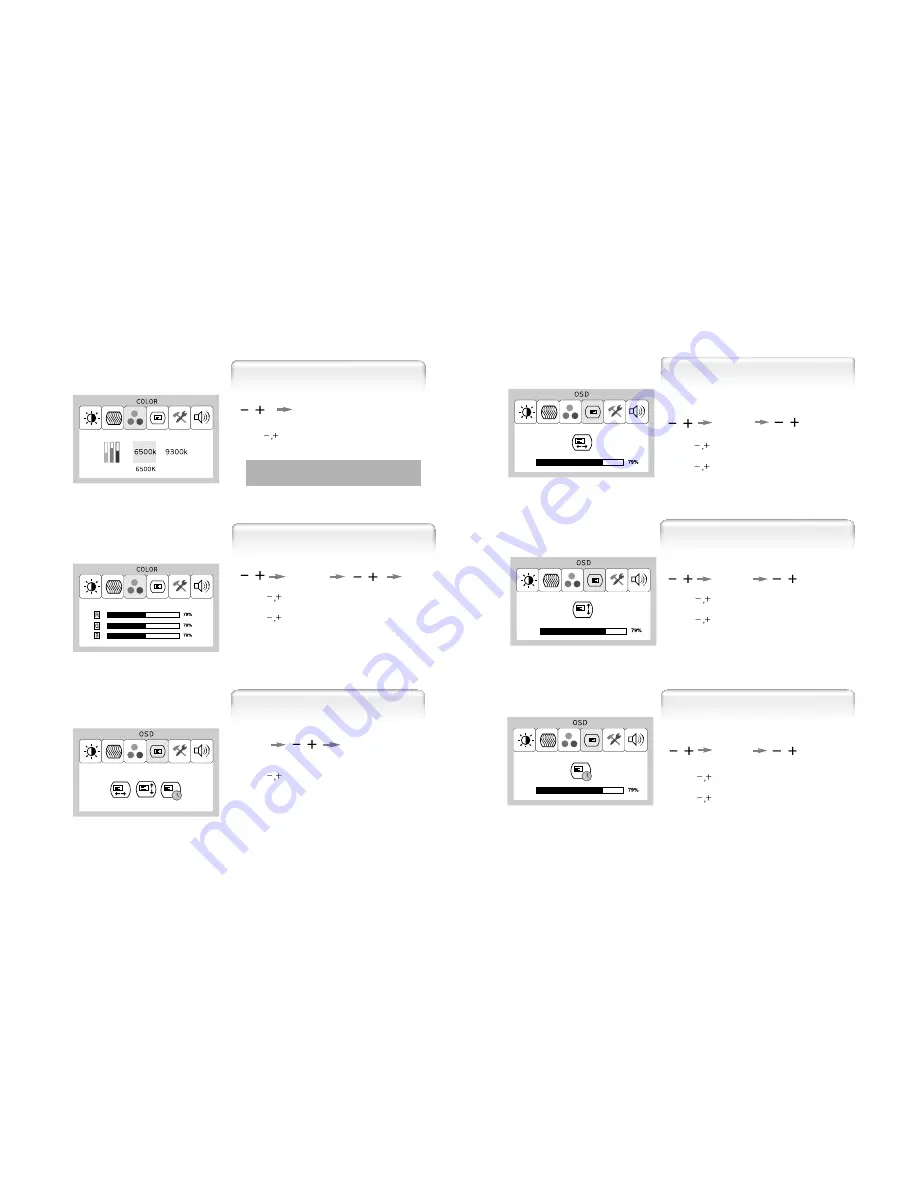
User Color

1. Use 

to move User color ICON.

2. Press SELECT button to select it.
3. Use 

to increase or decrease each color.

1. Use 

to select the Mode 1, and Mode 2.

2. Press the Menu button to return previous state.

9300K : Slightly Bluish white.

6500K : Slightly Reddish white.

MENU

MENU

SELECT

Preset Color

1. Use 

to move OSD V-Position ICON.

2. Press SELECT button to select it.
3. Use 

to adjust OSD upward or downward.

1. Use 

to move OSD Time ICON.

2. Press SELECT button to select it.
3. Use 

to adjust OSD display time.

4. Press Menu button to return main menu.

SELECT

OSD Time

OSD V-Position

1. Use 

to move OSD H-Position ICON.

2. Press SELECT button to select it.
3. Use 

to adjust OSD left or right.

SELECT

OSD H-Position

SELECT

1. Press MENU button to access main menu.
2. Use 

to move OSD ICON.

3. Press SELECT button into the submenu.

MENU

SELECT

OSD

Содержание IK-H750V

Страница 1: ...TFT LCD Color Monitor IK H750V IK H950V Printed on the recyclable paper Printed in Thailand Part No 942667020001 01 User s Manual ...

Страница 2: ...ainst harmful interference in a residential installation This equipment generates uses and can radiate radio frequency energy and if not installed and used in accordance with the instructions may cause harmful interference to radio communications However there is no guarantee that interference will not occur in a particular installation CAUTION Changes or modifications not expressly approved by th...

Страница 3: ...e the correct posture about 50cm Look down the monitor below the horizon Relax shoulders and arms and sit back on the chair Adjust the monitor to prevent reflection Adjust the monitor stand to acquire required angle Keep feet flat on the ground Maintain the arms horizontally and place hands softly on the keyboard Good Posture Guide User s Manual Warranty Card Signal Cable AC Power Cable Stereo Cab...

Страница 4: ...table on the rear side of the optional Macintosh adapter and adjust DIP switch by the resolution The range of control Angle Power source connection Signal cable connection Basic Connection Port for AC power cable Port for BNC output Port for BNC input Port for S VHS input Port for Audio input Kensington Lock Port for signal cable from signal source How to Adjust the Stand 17 How to Adjust the Stan...

Страница 5: ...he previous menu and exit menu SELECT AUTO Press this button when OSD is not displayed to perform automatic setting only PC Mode When OSD is displayed You can select icons POWER Power button By pressing these buttons when OSD is displayed you can move cursor into the menus which you want After pressing the SELECT button you can change gauge level or select submenus When OSD is not displayed you ca...

Страница 6: ... to the world standard Display Power Manager Signalling DPMS mode of Video Electronics Standard Association VESA The power management feature requires that the video card of the computer should support DPMS function Adjusting OSD PC MODE Brightness Contrast 1 Use to move Brightness ICON 2 Press SELECT button to select it 3 Use to adjust the brightness of the screen SELECT Brightness Contrast MENU ...

Страница 7: ...N 2 Press SELECT button to select it 3 Use to adjust display upward or downward 1 Press to move Phase ICON 2 Use SELECT button to select it 3 Use to correct fine trembling or Video noise 1 Use to move Clock ICON 2 Press SELECT button to select it 3 Press or to remove vertical noise Adjusting clock phase is required after the adjustment of clock SELECT SELECT SELECT Vertical Position Clock Phase Ac...

Страница 8: ... to move OSD V Position ICON 2 Press SELECT button to select it 3 Use to adjust OSD upward or downward 1 Use to move OSD Time ICON 2 Press SELECT button to select it 3 Use to adjust OSD display time 4 Press Menu button to return main menu SELECT OSD Time OSD V Position 1 Use to move OSD H Position ICON 2 Press SELECT button to select it 3 Use to adjust OSD left or right SELECT OSD H Position SELEC...

Страница 9: ...2 Press SELECT button to return to default setting Auto Config Factory Reset SELECT 1 Use to decrease or increase volume level 2 Press SELECT button to select it 3 Use to control volume MENU Auto Config Sound SELECT SELECT You can know display information 1 Press the MENU button to access main menu 2 Use to move Special ICON 3 Press SELECT button into the submenu MENU SELECT Special According to t...

Страница 10: ... 1 Use to move Contrast ICON 2 Press SELECT button to select it 3 Use to adjust the contrast of the screen Sharpness CVBS S VIDEO Mode 1 Press the MENU button to access main menu 2 Use to move Sharpness ICON 3 Press SELECT button to select it 4 Use to adjust the sharpness Adjust the clearness of the screen HUE CVBS S VIDEO Mode 1 Use to select the HUE ICON 2 Press SELECT button to select it 3 Use ...

Страница 11: ...ON 2 Press SELECT button to select it 3 Use to adjust OSD left or right SELECT OSD H Position SELECT 1 Press MENU button to access main menu 2 Use to move OSD ICON 3 Press SELECT button into the submenu MENU SELECT OSD 18 English 1 Use to select the Saturation ICON 2 Press SELECT button to select it 3 Use to adjust the saturation SELECT Saturation 1 Use to select the Mode 1 and Mode 2 2 Press the ...

Страница 12: ... know display information According to the characteristic of video card display information can be incorrect 1 Use to move Language ICON 2 Press SELECT button to select it 3 Use to select language MENU SELECT Language 1 Use to move the Factory Reset ICON 2 Press SELECT button to return to default setting Auto Config Factory Reset SELECT 1 Press the MENU button to access main menu 2 Use to move Spe...

Страница 13: ... 30 240 57 284 100 000 Resolution Horizontal Frequency KHz Vertical Frequency Hz Clock Frequency MHz NTSC 1 616 X 452 NTSC 2 680 X 452 PAL 1 736 X 544 PAL 2 680 X 544 31 469 31 469 31 250 31 250 59 940 59 940 50 000 50 000 24 5454 27 000 29 500 27 000 Resolution Horizontal Frequency KHz Vertical Frequency Hz Clock Frequency MHz PC Supported Mode DVR Supported Mode Pin assignment table D Sub Mini 1...

Страница 14: ... Compati bility Power Consumption Control key Front Part Safety Standard EMI Dimension Power Supply Wall Mount Specification Type Amorphous active matrix super TFT LCD Screen Size 48 3cm Diagonal Maximum Resolution 1280 X 1024 75 Hz Pixel Range 0 294 mm X 0 294 mm Display Colors 16 7M Color Contrast Ratio 500 1 Viewing Angle 85 85 85 85 Left Right Up Down Response Time 25 msec Luminance 250 cd m H...

Страница 15: ...OUND Adjust COLOR at User Mode in OSD Color Menu Color is irregular Troubleshooting Check the power connection Refer to page 4 Power LED is dark No picture Perform Auto_config OSD check RGB CVBS SVIDEO is displayed on the screen Check the signal cable or signal Source Refer to page 4 Screen looks to be run down Screen is not clear Check the resolution and frequency of computer and video card and s...

Страница 16: ...re do not connect a large number of equipments in a single line To prevent fire and electric shock pull out the plug in case of thunder and lightening To prevent fire and electric shock do not try to take the monitor apart or repair it yourself Contact your local service station or customer service center for inspection modification or repair If you see smoke or smell something burning stop using ...

Страница 17: ... Electronics Europe GmbH Ikegami Strasse 1 41460 Neuss 1 F R Germany TEL 02131 123 0 FAX 02131 102820 Ikegami Electronics Europe GmbH U K Branch Unit E1 Cologne Court Brooklands Close Windmill Road Sunbury on Thames Middlesex TW16 7EB UK TEL 01932 769700 FAX 01 92 769710 Ikegami Tsushinki Co Ltd Printed in Korea E81015J0 ...

Отзывы: